In a couple of weeks, we are going to release the AngleMaster Pro v2 for pre-order. This tool is insanely accurate compared to all the alternatives. But what does that mean?
In the spirit of quantifiable, and remember, you saw it here first in this totally awesome and worthless blog, here is some data that I think you will find interesting as you continue to improve your skills–oh, and of course, justify new tools.
Let’s say you want to build a simple, flat mitered frame that is square when done–it is possible you know. The outside dimensions are 18” x 18” (457.2 mm). The frame members are 2” wide. (There is no hidden significance to this example other than it is somewhat “real world” believable.) Of course, we desire no gaps in our joinery. The table saw is the tool of choice.
If you set out to tilt your miter gage to a perfect 45 degrees using a reference against a static saw blade, I am suggesting a more accurate way.
Remember, it is the cut you are after, not the setup. There are dynamic forces that can, and often do introduce error into a static set-up on most powered woodworking equipment. Always check your cut and adjust as necessary until your cut against a reference is light tight.
Your pursuit for gap free miters is now at the mercy of the 45 degree reference and your eyesight—as it should be.
If you take some time to peruse the internet, you will find a host of angle measuring devices, most are under $100 and most share the same advertised tolerance; plus or minus .1 degree. But what does this mean?
For the purpose of this illustration, assume your reference is off exactly plus .1 degree = 45.1 degrees. (I picked a positive .1 error because that will manifest itself as a gap on the outside corners.) This is also the worst case scenario achievable with an advertised .1 degree tolerance.
The following three illustrations represent the three most common ways to assemble and glue mitered frames (knaves and flatlanders likely have other methods);
1. One miter at a time–this will always make three perfect miter joints (appearance wise) and the fourth….not so much.
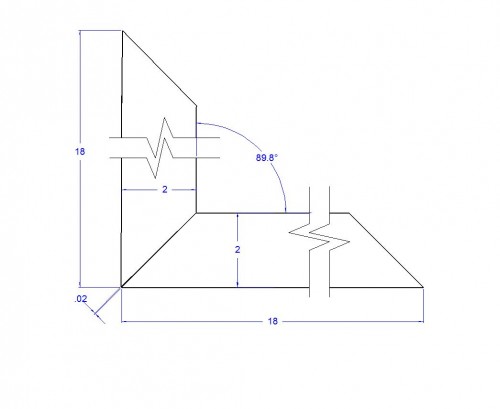
2. Assemble two 90 degree segments and put the two halves together. This will always create two perfect miters and two that are not.
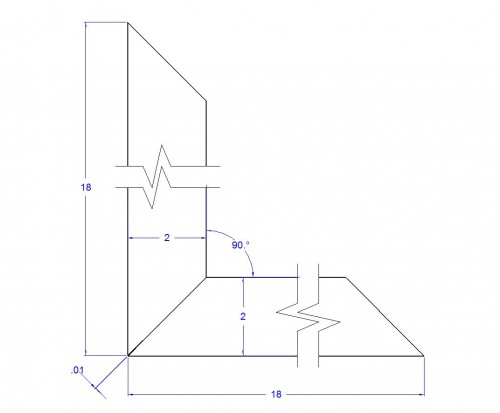
3. Assemble them all at once–and all will be off equally.
The illustration below is the gap created by using method one above. YIKES! That is a gap in excess of an 1/8″ of an inch. Which by the way, is nothing compared to some of the gaps in Fred’s Entertainment Center–one of which will soon become a National Park.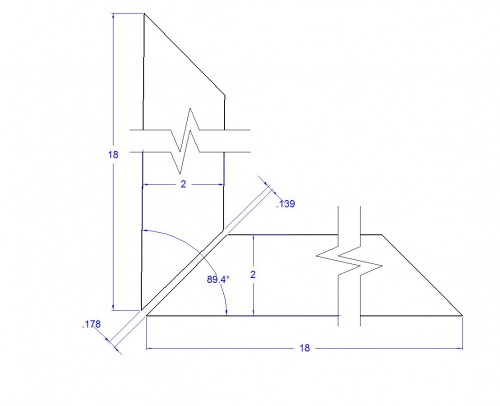
Using method two above, you can see that there will be two opposing joints with gaps of 0.020″ each. This is almost the equivalent of 7 sheets of notebook paper. Not good at all even though two of the miter joints are perfect.
When all the joints are assembled simultaneously, the tolerance stack is distributed equally equating to a gap of .010″ at all four corners. Also not good.
Of course as the stock becomes wider, so does the gap, and conversely, the gap shrinks as the stock narrows.
More troubling is what happens with a project that has wider stock and more than four sides. The following illustrations are the mitered segments from a fictional, eight sided poker table.
The illustration below shows the cumulative gap when seven of the joints are visually perfect. This is almost unbelievable–the gap is almost 7/8″.
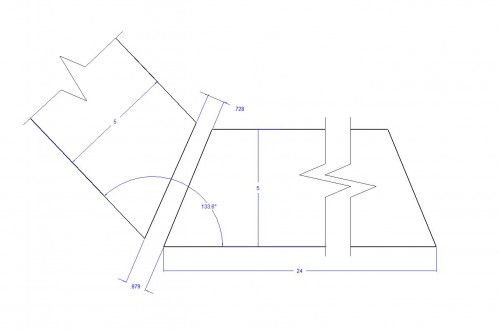
Below is a more likely scenario. Each and every joint will have a significant gap.
Yes, we are aware there are several other factors that can conspire to create gaps. This is a SIMPLE math illustration that shows what would occur if the world were perfect with the exception of your references.
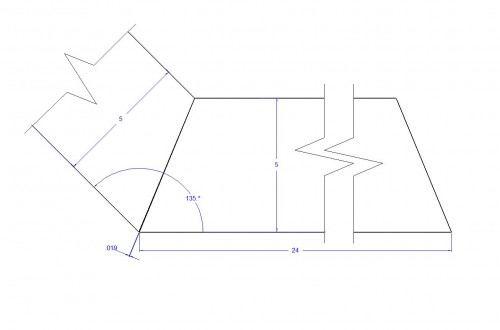
In summary, a .1 degree tolerance is the equivalent of a miter square with a 5″ blade and .010″ of run out over the 5″ blade length. I guarantee you if such a square were made by BCTW it would have close to a 100% return rate.
The difference between perfect work and sloppy is smaller than you think.
Now ponder what a little bit of knowledge can do.
–John

John,
I have the “Version 1” AMP 6i (what does the 6i stand for anyway?) I think it is one of the most ingenius tools you have ever come up with. TRUELY a “cool tool”. I can’t wait to see what improvements you have designed into the new version. I did hear you have a direct read out which is great! Your point is well taken on miter joints. I find these to be the most challenging joint of all. They do need to be perfect or they look like crap. The best way I could find to make them was by making up a shooting vice which clamps pieces and allows a 45 deg. face for a shooting plane…..THEN I got your JMP and combined it with the AMP 6i and did get an (almost) perfect miter cut. I say this because I don’t think I have ever actually made a PERFECT mitered box.
DJ
Dennis;
The new version unfortunately does not have a direct readout–we would have to buy 100,000 calipers to get that functionality.
The 6i stood for 6 inch version. There is a larger version that never will see the light of day.
The AMP v2, as with the 6i, will read to 6 arc seconds, the actual tolerance is about double that.
By the way, just about any joint that has a gap leaves much to be desired, both visually and structurally. Miters are hard. Compound miters are about as hard as it gets.
And that is the subject for my next post.
–John
I had to look up what an arc second is. I learned that 1 arc second (also written “arc-second” or “arcsecond”) =1/3600 of a degree. That means that the AMP v2 (and AMP 6i measures to 1/600 of a degree or 0.001666(repeat), with a tolerance of 1/300 of a degree, or 0.00333(repeat). That’s a tolerance of almost 300 times the 0.1 degree boasted by the competition. Wow.
Chris;
1 tenth of a degree is 6 minutes. There are 60 seconds in a minute so one tenth of a degree equals 360 seconds. The AMPv2 measures down to a theoretical 6 seconds before the tolerance stack is considered.
We can say with a high degree (pun intended) of confidence that this tool will be within 12 seconds of the user’s intent. 360/12 equals an accuracy that is 30 times greater, not 300.
More meaningful is to compare the AMPv2 to our TS-2 Try Square which was within .002″ over the 8″ blade length, the AMPv2 run out (12 seconds) over an 8″ run is rounded to .0005″, making this reference 4 times more accurate than our standard bearer.
The TS-2 is 90 degrees only. The AMPv2 is within .001″ over 8 inches for ALL 15,240 angle settings over a 90 degree quadrant. Now that is cool.
FYI.
–John
I don’t know, John. I’m thinking that I’m going to find 15,240 angle settings a bit limiting…
– Peter