
7/12/12 – We have been working with the casting outfit to finalize our design to ensure correct molds. It is a fun but laborious process.
8/16/12 – We decided to not make the CT-18 plane. We will refund all of the deposits. Kidding folks! Just seeing if anyone is paying attention! These should be out by the end of the year. The drafts for the molds and shrinkage rates are being finalized then off we go.
8/30/12 – So a few people do read this! Yay! I did get word today that the metal used in the CT-18 is prohibited in the state of Pennsylvania. Looks like our customers there will have to settle for a pot-metal version. The foundry is gearing up though. Can’t wait for those first articles. I’ll take pictures too!
9/13/12 – Handle Mold is done.


9/20/12 – The foundry should have been pouring samples this week, no word back from them yet. Oh, the blue part in the image above is the wax that is made to make the metal part. The wax model is used to create the metal part. Hopefully we’ll have images of that next week.
9/27/12 – They poured the handle today. Unfortunately, I have not seen it yet. Lever Cap is next.
10/4/12 – Well, they are reworking the handle form a bit. Some air pockets were indeed formed in a few spots. So, modifications are happening and a re-try is next.
10/10/12 – They should have poured again today, I will find out more next week.
10/18/12 – The mold for the lever is done. I have a few pictures of it that I’ll post next week. There is not another lever like this on any other plane, that’s for certain.
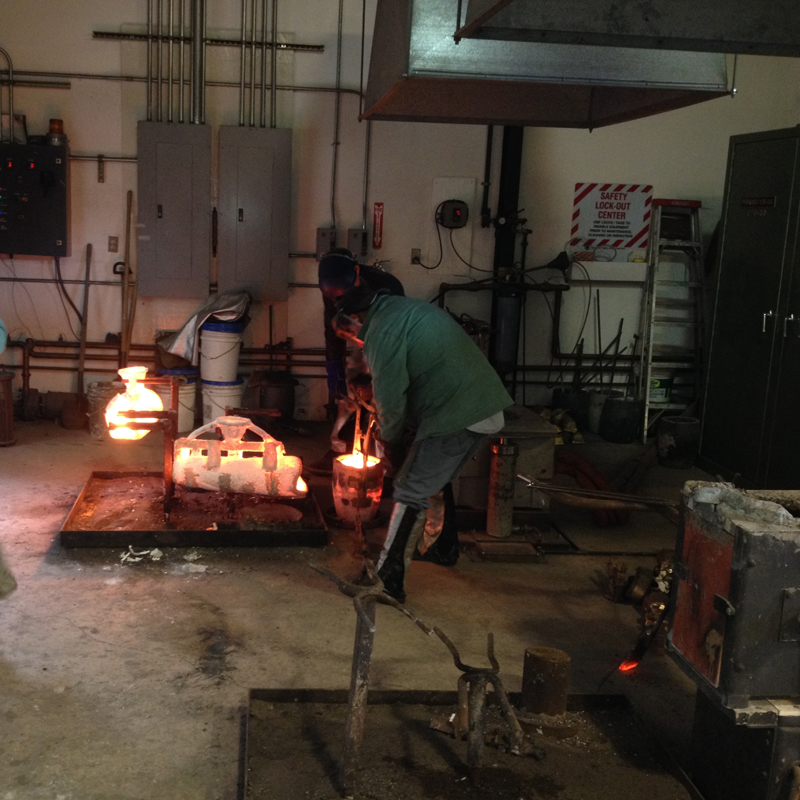
11/8/12 – Finally, the foundry poured stainless steel today so they were able to pour real samples for us. Can wait to get my hands on them!
11/21/12 – Gorgeous stuff. There is not a seam line visible anywhere on these parts. Unbelievable. 

These are 304 stainless steel. No polish yet. Yum! I say!
12/6/12 – The Body mold is being worked on, I am working on a finishing system for the Handle. We have some really cool plans for it. The rest of the parts are being massaged to fit the cast parts. I did a 3d print out of the whole plane this week. The Handle is really comfortable on it.
12/13/12 – Body mold is in process. Not sure on eta at this time. The small time foundries are pretty lo-fi when it comes to business operations. Can’t complain with the quality though!
01/03/13 – The foundry finalized the specs on the handle and lever. The body is being tested and re-worked. Looking good so far though.
01/17/13 – Finish samples are starting on the rear tote. There are quite a few processes that need to occur on the rear tote. Bead blasting, polishing, masking, powdercoating, sanding. We need to get this dialed in first. Body casting is in the works still.
02/7/13 – The Rear tote is all polished up on the sample, the body casting is now coming along. The mold maker finally has time on his hands. Painting the inside of the handle is next week.
02/21/13 – The mold for the body should be wrapping up next week. Full production pour of everything soon after that.
03/14/13 – Re-working the body mold. Handle painting still in process.
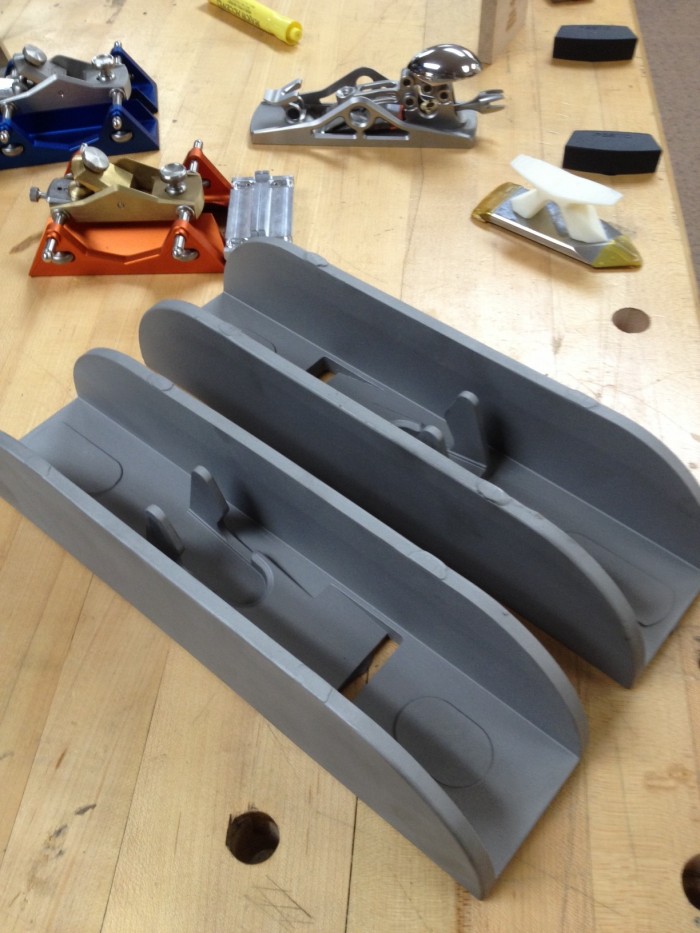
03/21/13 – Walnut boxes for these are starting up shortly. Body waxes were poured but are being adjusted. Once production starts with the casting, I will have more definitive dates. This is killing me as much as it you all! Yikes. Here is a picture of the multi-piece mold.

03/28/13 – Got the rear tote back from the powdercoater. The internal surfaces are painted, the exterior and sides are raw stainless steel; either grained or polished. It is sweet. I can’t say that this will be their favorite project, since the masking is quite the drag, but at least it is in the name of design! No definitive timeline for the castings yet, but they are rock solid now. Ready to roll. I should hear tomorrow or Monday.
04/4/13 – The foundry is working on the productions schedule for the body. I am anxiously waiting for the sample to arrive as well..
04/25/13 – They have been doing test pours on the body all week. They need to set up a large knife gate along the whole plane to allow the metal to get in everywhere. The standard gates have not been working. I have been pushing and pushing to make this happen faster, but it is like pushing a cement truck it seems.
05/16/13 – We went out to visit the foundry this week to get a feel for how it is going. The body has been causing problems on a couple of fronts. It is a slooooooow process to work through the kinks. We are almost through it though. I built some wood forms to help the waxes stay straight as they cool. And they are testing one more way to gate it so that the metal flows.
06/06/13 – Ok, finally. The foundry is rolling now. Parts will be complete in 8-12 weeks. THEN, secondary machining.
06/20/13 – The foundry built a new hydraulic press this week so that they can straighten and tweak the castings as they come off the line. Apparently, the foundry considers 304 stainless as “soft and malleable.” I guess it is all a matter of perspective.
07/11/13 – I should have the first batch of castings next week. Looking forward to seeing them!
07/18/13 – A sampling of the bodies are finished with heat treat and will be shipping over to me tomorrow. Meanwhile, I did find another casting outfit in the midwest who we have used in the past (meaning 20 years ago..). I may need to hit them next time around. This is pretty absurd to wait this long.
08/01/13 – Some of the parts are finally out of casting. Next stop is the machine shop. I’ll have some pictures next week. We may have a sample in the museum show in a few weeks, but definitely not a completed tool. That was our goal and the foundry did not meet the deadline.
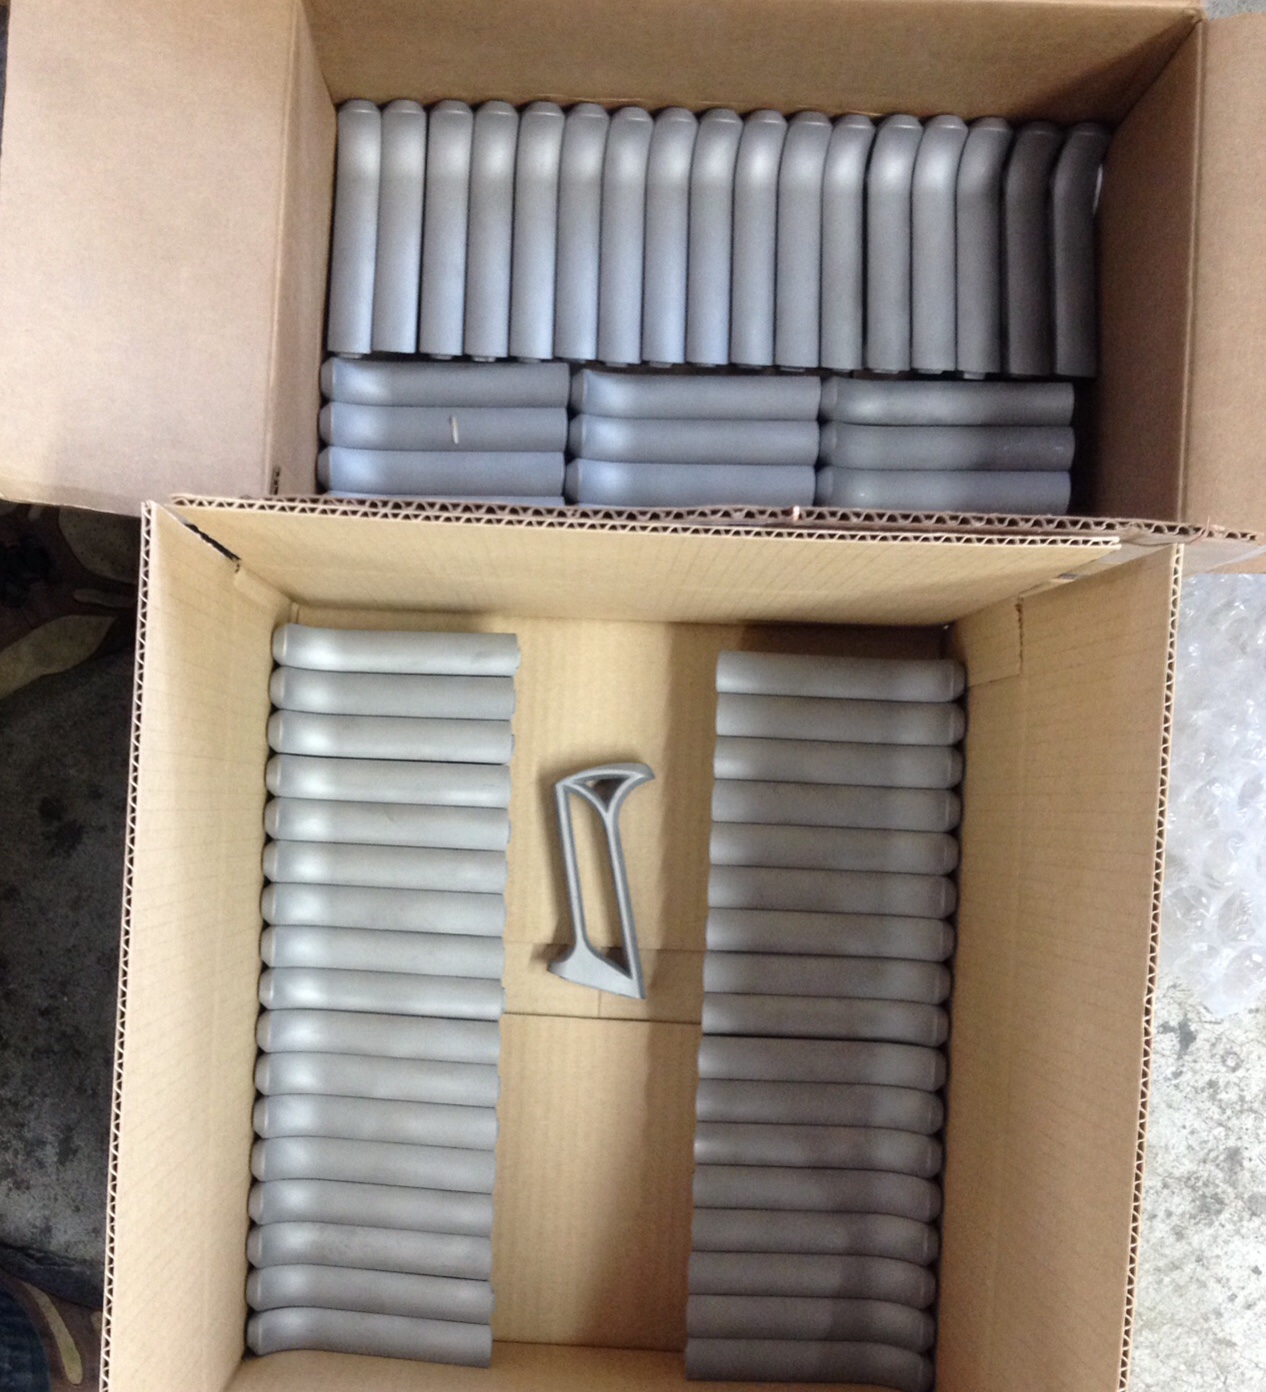
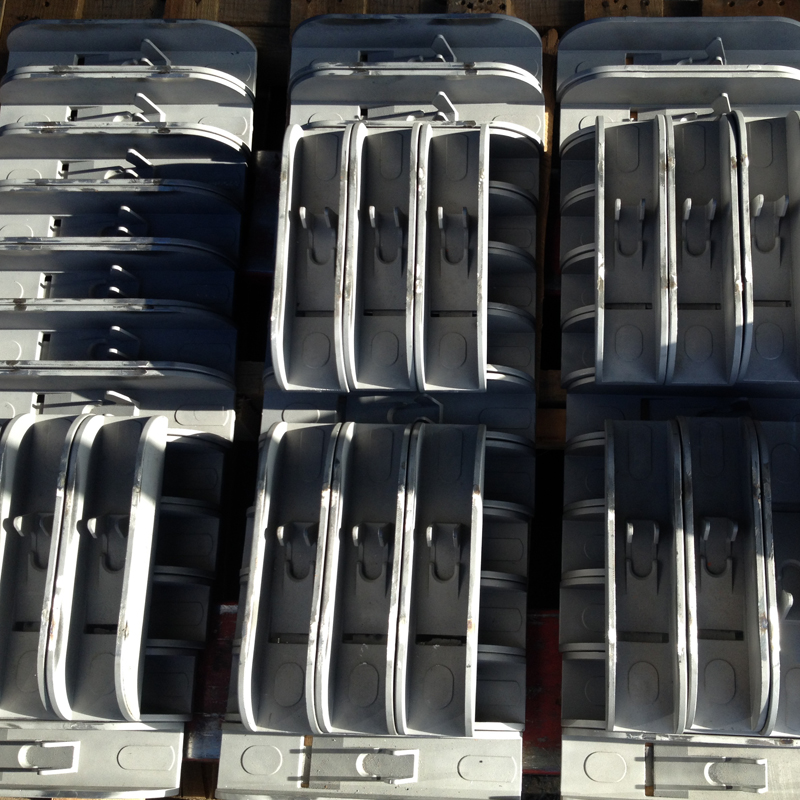
08/08/13 – Here are pictures of the Body casting. Lots of metal to remove, but all is on the outside surfaces. Very little on the inside gets touched.
08/22/13 – Foundry is still at it. That’s it really.
09/05/13 – Foundry is still at it. That’s it really.
09/19/13 – Delivery of the cast Rear Totes and Levers should be next week. Bodies are coming off the line too.
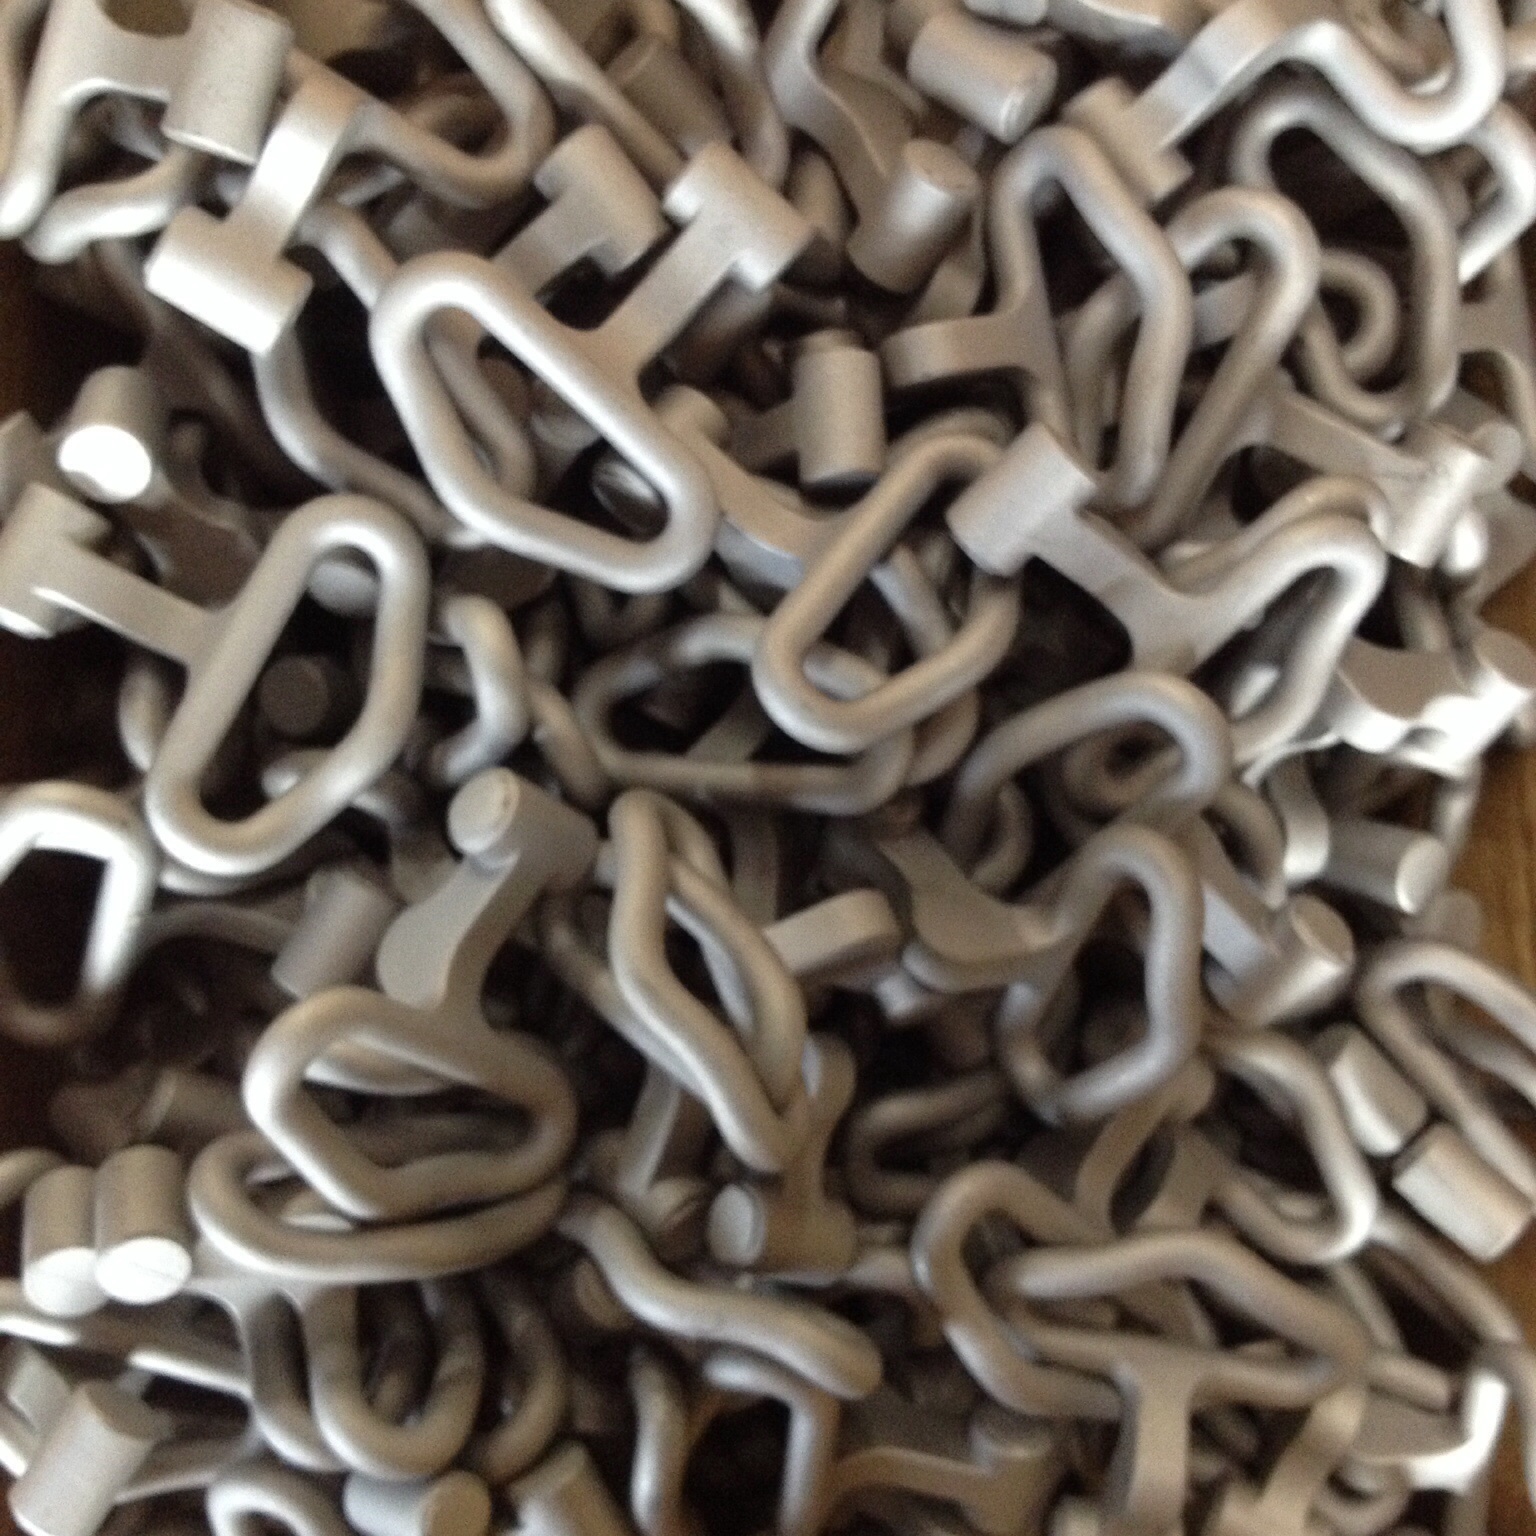
10/03/13 – Hey! Look at this! Totes and Toggles.
10/03/13 – Body castings are finally cranking along for bore. They had a distortion problem and all is good now.
10/24/13 – The body castings are at the heat treater and we should have some in hand next week.
11/7/13 – Still have not seen the shipment of castings. Today I was told that it will be on Tuesday. Not sure about the scheduling of the remainder yet but should get a good idea after parts are in hand.
11/14/13 – I picked up 400 lbs of castings today. Nice and clean. Take a look at them pouring something else today too. Not exactly sure what it was, but fun to see stainless steel in liquid form. Castings head off to the machine shop now
6/24/14 – We are hoping to start shipping these throughout the month of July. Please note that we will only be going down the waitlist for these after all pre-orders have shipped.
7/29/14 – 95% of the orders on record have been filled. This tool came out absolutely fantastic. It was an ordeal as you all know, but the results are stunning. If you would like one of these get on our wait list because as soon as we fill the wait list orders, if there are any remaining, the price will bump up to $2700. Everybody who got one got a great deal or made a great investment.
9/10/14 – Still processing all remaining pre-orders. We appreciate everyone’s patience with this gorgeous tool. We’re hoping to go through the waitlist by the end of this month.
11/3/14 – A few remaining are available here to order, and then they will be gone forever!
Aaaaaaaaa!!!!! My heart is still racing! Don’t do that to us old farts!
— Peter
Looks like the plane-buying population of Pennsylvania (i.e., Fred West) is not keeping up with the plane’s progress, John. But just to save any trouble, please feel free to send me his plane, and I’ll try to smuggle it to him. Someday.
— Peter
Michael, I am so sorry to hear about your serious eye disease. I mean that is the only the thing that makes sense where somehow you can mix up Pennsylvania and PORTLAND!!!!! 😮 😮
By the way, as much as I like your blue plastic molded handle, I would prefer that my handle be made out of the stainless steel. 😮
Fred
That law only applies to eastern Pennsylvania — ALL other parts of Pennsylvania (my plane) are OK with the rest of the country excepting California of course.
LOL!
— Peter (in SoCal)
Is there only the one mold for the handle? Do they pour the handles one at a time, or can they do a few at a time?
How do you avoid bubbles? I see a small channel at the top, presumably for air. But there are lots of nooks and crannies where a bubble might form.
— Peter
Peter,
They make waxes in the mold that you see in the pictures above. Many waxes can be made…oh shoot, just read this wikipedia hi jacking…
Casts can be made of the wax model itself, the direct method; or of a wax copy of a model that need not be of wax, the indirect method. These are the steps for the indirect process:
Model-making. An artist or mold-maker creates an original model from wax, clay, or another material. Wax and oil-based clay are often preferred because these materials retain their softness.
Moldmaking. A mold is made of the original model or sculpture. The rigid outer molds contain the softer inner mold, which is the exact negative of the original model. Inner molds are usually made of latex, polyurethane rubber or silicone, which is supported by the outer mold. The outer mold can be made from plaster, but can also be made of fiberglass or other materials. Most molds are at least two pieces, and a shim with keys is placed between the two halves during construction so that the mold can be put back together accurately. In case there are long, thin pieces sticking out of the model, these are often cut off of the original and molded separately. Sometimes many molds are needed to recreate the original model, especially for large models.
Wax. Once the mold is finished, molten wax is poured into it and swished around until an even coating, usually about 1⁄8 inch (3 mm) thick, covers the inner surface of the mold. This is repeated until the desired thickness is reached. Another method is filling the entire mold with molten wax, and letting it cool, until a desired thickness has set on the surface of the mold. After this the rest of the wax is poured out again, the mold is turned upside down and the wax layer is left to cool and harden. With this method it is more difficult to control the overall thickness of the wax layer.
Removal of wax. This hollow wax copy of the original model is removed from the mold. The model-maker may reuse the mold to make multiple copies, limited only by the durability of the mold.
Chasing. Each hollow wax copy is then “chased”: a heated metal tool is used to rub out the marks that show the parting line or flashing where the pieces of the mold came together. The wax is dressed to hide any imperfections. The wax now looks like the finished piece. Wax pieces that were molded separately can be heated and attached; foundries often use registration marks to indicate exactly where they go.
Spruing. The wax copy is sprued with a treelike structure of wax that will eventually provide paths for molten casting material to flow and air to escape. The carefully planned spruing usually begins at the top with a wax “cup,” which is attached by wax cylinders to various points on the wax copy. This spruing doesn’t have to be hollow, as it will be melted out later in the process.
Slurry. A sprued wax copy is dipped into a slurry of silica, then into a sand-like stucco, or dry crystalline silica of a controlled grain size. The slurry and grit combination is called ceramic shell mold material, although it is not literally made of ceramic. This shell is allowed to dry, and the process is repeated until at least a half-inch coating covers the entire piece. The bigger the piece, the thicker the shell needs to be. Only the inside of the cup is not coated, and the cup’s flat top serves as the base upon which the piece stands during this process.
Burnout. The ceramic shell-coated piece is placed cup-down in a kiln, whose heat hardens the silica coatings into a shell, and the wax melts and runs out. The melted wax can be recovered and reused, although often it is simply burned up. Now all that remains of the original artwork is the negative space, formerly occupied by the wax, inside the hardened ceramic shell. The feeder and vent tubes and cup are also hollow.
Testing. The ceramic shell is allowed to cool, then is tested to see if water will flow through the feeder and vent tubes as necessary. Cracks or leaks can be patched with thick refractory paste. To test the thickness, holes can be drilled into the shell, then patched.
Pouring. The shell is reheated in the kiln to harden the patches and remove all traces of moisture, then placed cup-upwards into a tub filled with sand. Metal is melted in a crucible in a furnace, then poured carefully into the shell. If the shell were not hot, the temperature difference would shatter it. The filled shells are allowed to cool.
Release. The shell is hammered or sand-blasted away, releasing the rough casting. The sprues, which are also faithfully recreated in metal, are cut off, to be reused in another casting.
Metal-chasing. Just as the wax copies were chased, the casting is worked until the telltale signs of the casting process are removed, and the casting now looks like the original model. Pits left by air bubbles in the casting, and the stubs of spruing are filed down and polished.
Prior to silica-based casting molds, these molds were made of a variety of other fire-proof materials, the most common being plaster based, with added grout, and clay based. Prior to rubber molds gelatine was used.
Thanks, Michael. Bummer about the air pockets. Hope the next version is perfect.
Things are always more difficult than you think they’ll be, aren’t they?
— Peter
Very impressive casting! I can hardly wait to hold one!
— Peter
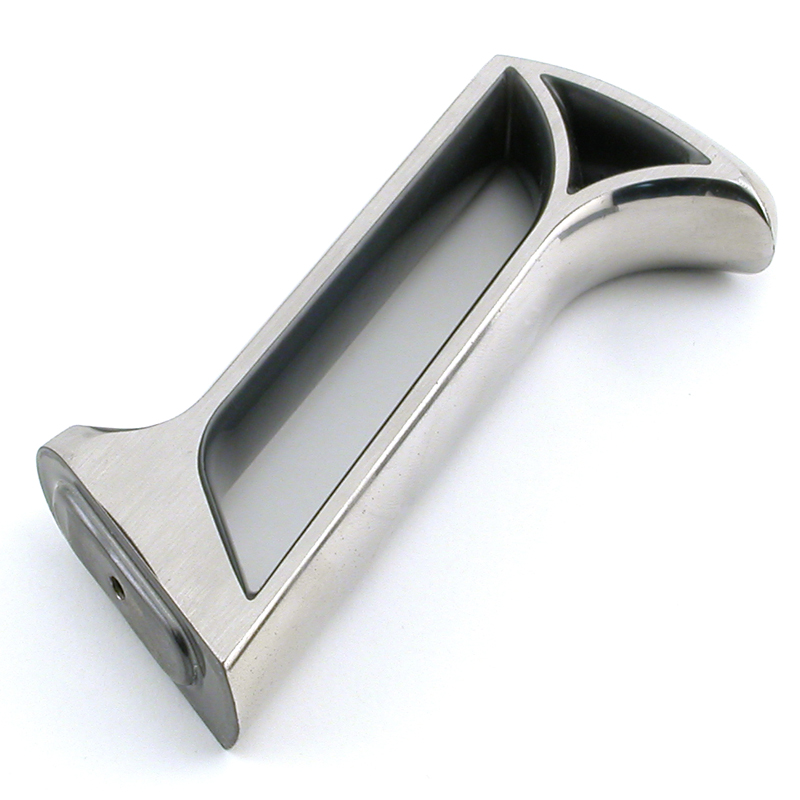
Dang, that handle is gorgeous!
-Rutager
Indeed, that tote is gorgeous!
— Peter
Ditto, Rutager & Peter’s comments. The entire plane is magnificent!!! What are the chances of it actually being made and delivered in my lifetime which seems to be shortening by the second???? :o( I used to want my MTV but I have had that for awhile and it also now sucks. :O Now, I want my CT-18SERabbetHP-10Rabbet!!! 😮 😮 Fred
My goodness, I ordered my plane so long ago I had forgotten all about it. Then I went south for the winter & thought perhaps it was shipped, left on my porch & found a new home somewhere. Hopefully it will ship before next November so I get to see it before I leave home again…
Very cool, seeing the casting sitting with all those other rad BCTW tools! How will the holes in the blade hold-down mechanism get drilled in the supports?
— Peter
Nice observation! The holes line up with a few of the cutouts on the outside of the plane.
We’ll machine the cutouts and then drill and ream the holes on those inside bosses after.
Smart! It’ll be fun seeing the holes and chamfers drilled in the castings.
— Peter
I was just comparing the casting to the image of the CT-18 on my desktop – there’s a LOT of milling to be done! The sides have to be taken down quite a bit, don’t they? Is that done incrementally, or with one big cut?
And how will you mill/polish the inside surfaces?
— Peter
I was comparing the shape of the casting to the shape of the mold in the image just above (from an earlier post). It looks like you had to make an entirely different mold (one that looks a lot less like the actual plane shape). What’s up with that?
— Peter
The mold is more of a universal mold. We’ll be able to use this mold in the future for a different project.
The excess material can be milled away quite easily.
Clever! Of course, now we’re all going to be wondering what “different projects” will be coming from the mold…
— Peter