____________________________________________________________________________________________________
“It ain’t ignorance that causes all the trouble in this world. It’s the things people know that ain’t so.” — Edwin Armstrong
____________________________________________________________________________________________________
I have been fairly inactive on this blog for the past month and when that happens you can bet one thing: I am not getting any sleep. Do you think I am a perfect candidate for Propofol–or at the very least a prescription strength stool softener?
THE NEXT NEW TOOL FROM BCTW IS…
I can’t remember in our 28 year history of ever designing a tool specifically for me. And yet, over the past 6 months, that is precisely what I have been working on. I am calling this project my “one man war against inertia”.
For all the wonderfully precise things you can accomplish with the JMP v2, it is woefully inept all by itself if you want to do more than crosscut. To take advantage of the finest cut in the land I dare say, one needs a bit of help. Admittedly, I have obscure desires for this tool–as mentioned prior, making wooden gears is one such odd notion. The inertia that needs to be overcome are the plethora of jigs, clamps and fixtures that I need to make in order to make what I have designed. I just would rather have a system.
About six months ago I set out to solve my odd needs. I didn’t spend much time pondering looks–I refer to the JMP as my “early 1950’s Soviet submarine” aesthetic. I want the ability to do what I want fast, and as pragmatically as possible.
What I am about to share is the first tool that I can remember designing for my needs. And in so doing we hope you will agree, our new fence system takes the Jointmaker Pro v2 to a whole new level of capabilites.
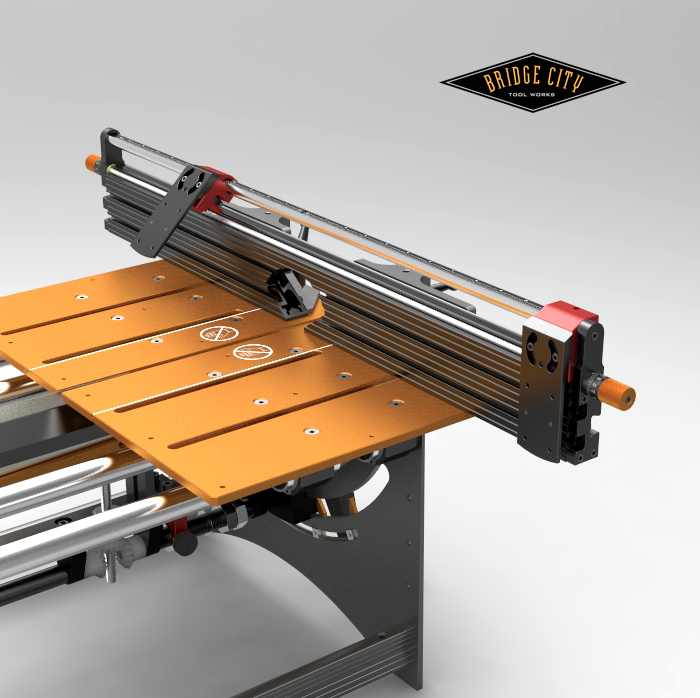
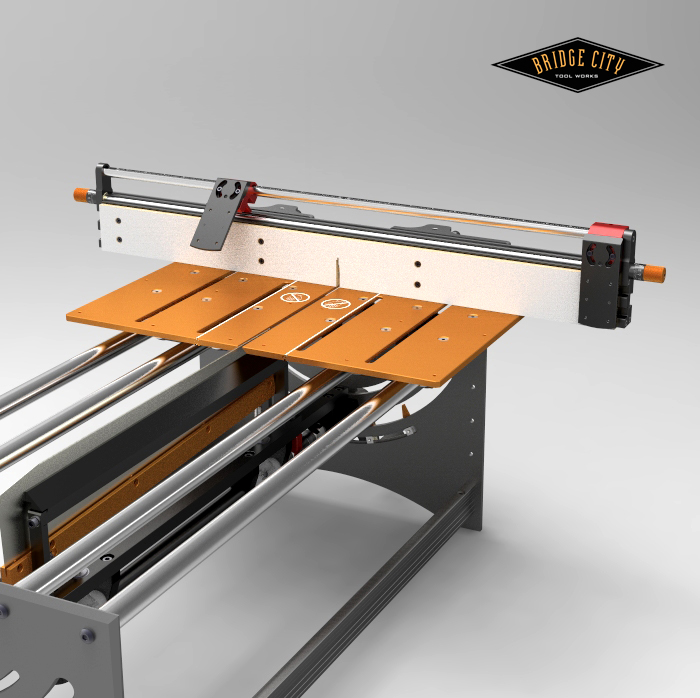
The fence system begins with a new foundation. Don’t fret, your old fences are still going to be useful, just not in the same spot. As you can see, we have incorporated lever locks–we needed to conserve table top real estate. As shown, your existing wooden trap fence and the square wood fence can still be attached. I suspect most will appreciate that this set-up is now adjustable without tools.
The extruded aluminum fence body slides on and off with ease. Notice the two stops–they engage a lead screw that allows them to be adjusted in 0.001″ increments and yet can quickly disengage for rapid traverses or flip completely backward for a squaring cut prior to a length cut constrained by the stop. They are the shape they are for several reasons, they can pivot, be removed and are drilled and tapped for our accessories or yours. It is our version of an open source stop system. Lastly, there is zero backlash in the lead screw or in the heads when engaged. This is really important and awesome to boot.
The system comes with one pre-drilled melamine/MDF skin that slides onto the fence. This bridges the cavity in the extrusion which is required when the fence is tilted. The fingers also contain a nylon adjusting screw that allows you to square the surface of the finger to the tables. This is imperative for a couple of the attachments to avoid compound cuts. The finger thickness is ideal for the KM-1 Kerfmaker and the TM-1 Tenonmaker.
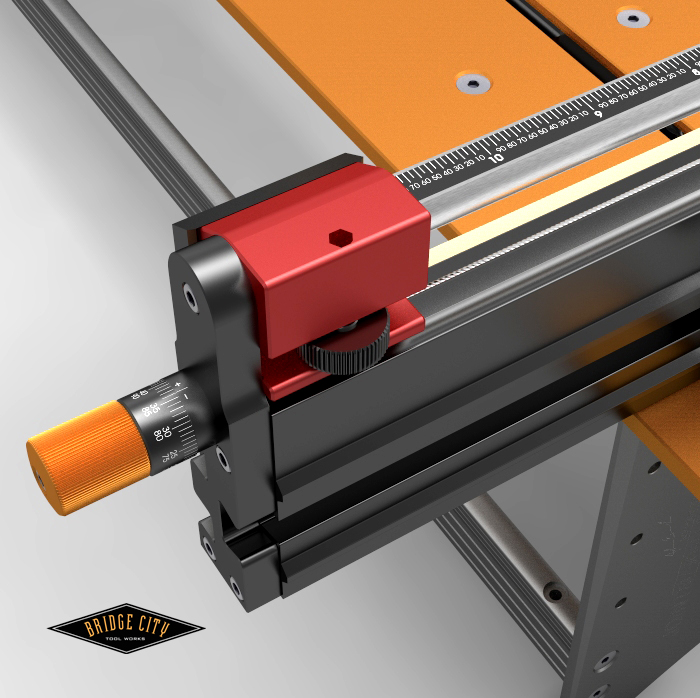
The stops are fast and positive. The thumb wheel raises and lowers the acetyl head lock (won’t scar the extrusion) which removes the backlash in the head. Stops can be used on the either side of the saw blade. There are left and right reading rules in the traverse bar. If you know your cut length, you can get a stop in place that will not require more than one revolution of the micrometer adjustor. Both the rules in the traverse bar and the graduated rings on the micrometer adjustors float–meaning that you can cut a short section of stock with a stop, measure the piece with a caliper and calibrate the fence to the correct distance. This takes only a couple of minutes and need only be done when the fence has been moved. The plus and minus signs indicate which direction to turn the adjustor to lengthen or shorten your cut length.
The system reads in .001″ increments and is repeatable (it is affected by temperature). Here’s how it works; if the red stop is between the 4 and 5″ mark, the first number is 4. Next, notice the location of the red head on the rule–in this hypothetical example it is between 2 and 3 tenths of an inch (marked 20 and 30), so the second number is 2. If the head has not crossed the .050″ hash mark, then using the image above we would read the inner ring of numbers which is 36. The stop is set to cut lengths of 4.236″. What is amazing is how quickly this can be achieved. No clamps, no wood scraps, just set and go. The finger thickness is ideal for both the KM-1 Kerfmaker and our TM-1 Tenonmaker. We are working on a metric version. AND we are working on a similar version for a table saw sled system–I want one of those too!
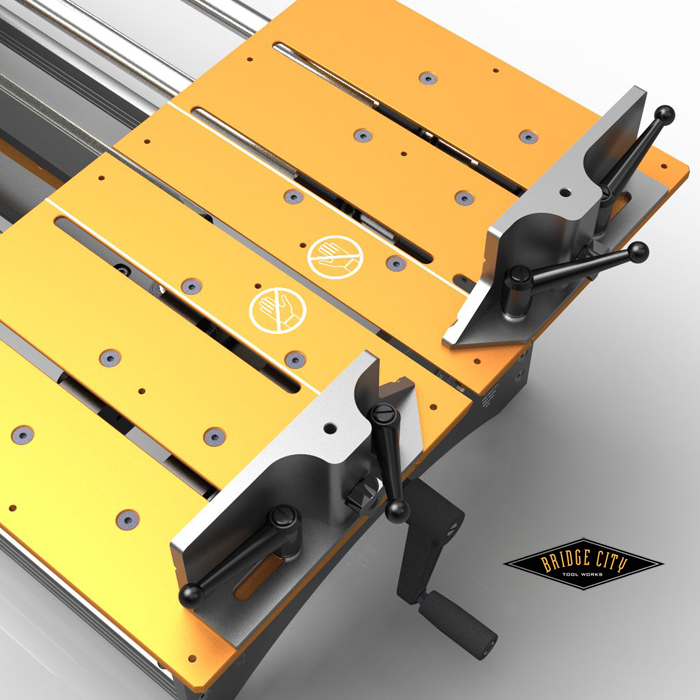
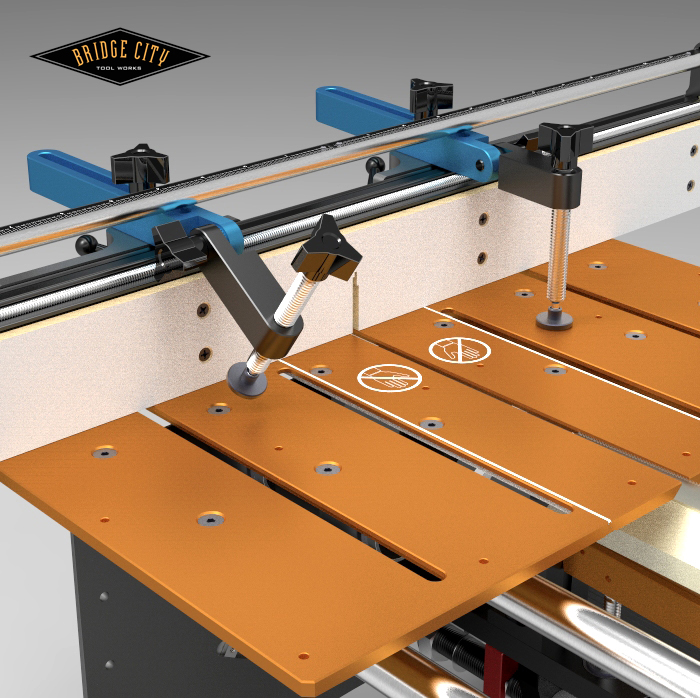
The space beneath the traverse rod allows for our new articulated clamps. They pivot on the fence and can be angled in 5 degree increments. For many crosscut applications this is all the clamping needed to keep the stock from riding up on the blade.
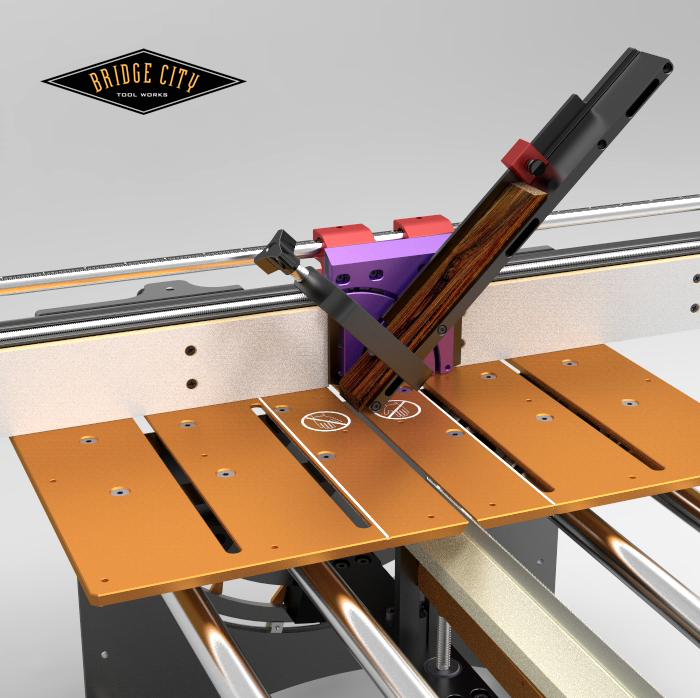
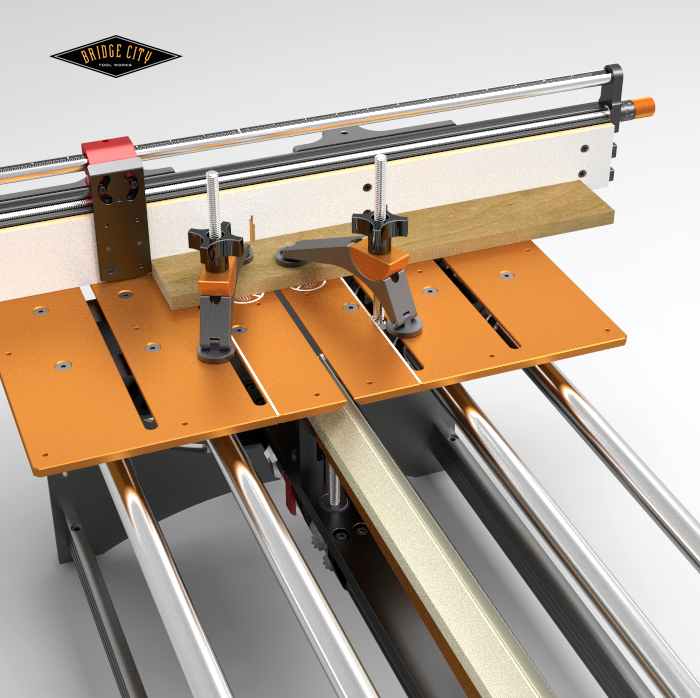
Miters are so much EASIER when you can tilt the stock. Our new miter/tenon attachment makes these cuts brain dead easy. Used in conjunction with our AngleMaster Pro v2, and you will be making perfect miter cuts without test fitting. That is no exaggeration. The aluminum C-clamp friction fits into the arm–this is crazy handy. And no, you can’t cut the C-clamp with the blade at it’s highest position.
I overheard a conversation at WIA that the JMP would be lousy choice for the type of shoji pictured below;
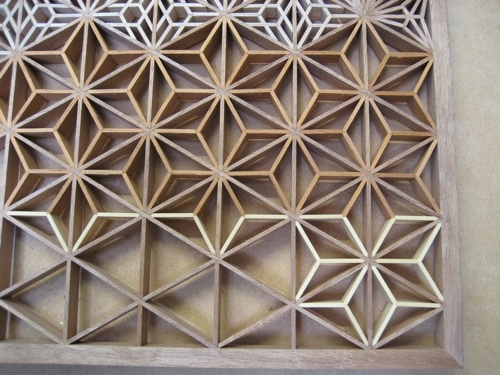
It might have been an accurate assessment five weeks ago. But now I think the JMP may be the most accurate and fastest way to do this work. All thoughts are welcome.
Our new pivot clamps work fantastic. The swivel pads really help from damaging your stock. I actually positioned these in the wrong place, the part pressing against the tables should be inline with the screw line of the bearing blocks. Oops. These clamps can be used on a number of other jigs in your shop.
Mentioned earlier were the original fences–they are part of the system too. For example, they can be switched to the opposite table, reversed and used as trap clamps. In addition, depending on the width of your stock, you can move the old fences forward on the tables and orientated to 45 degrees and still be able to make 90 degree crosscuts without moving a thing. This will work on stock width just under 3″.
This fence is a huge boost to the capabilities of the JMP and eliminates the tedium of making one-off jigs and fixtures. I call them one-off because the next time you need it you can’t find it…
I am still working on my gear cutter–it will attach to dual fingers. And sometime next year we will offer an accessory that will allow you to cut tenons and half laps on mitered ends. Tomorrow I will post an image of the “V” Block accessory. That said, everything you see here is out for pricing and we hope to open pre-orders late next week.
We are really interested in your feedback and eager to learn if we have overlooked one of your burning needs as a JMP owner or FUTURE owner! Now is the time to speak up.
–John

I want one! Got an estimated delivery date?
Great addition! This is very much like the fence I envisioned (without all of the details of course) on the first trial run of the JMP. This fence will dramatically increase the functionality of the saw.
Well Done John!
Dennis
If all goes according to plan, which never happens around here because of me, March of 2012 is the target.
-John
@Dennis: Thanks!
Hi John,
Looks good.
A couple ideas – I’m not a fan of the small triangle-shaped knobs for things that need constant tightening/loosening. Those are fine in a few places, but how about a handle more like we see on a bar clamp for the screw-down clamping?
Also, a quick release on those would be nice. Something spring-loaded that you can push in and the threads will disengage allowing quick movement. I’ve seen something like this on a drill press depth gauge, but I don’t know if it would work with clamping pressure.
Okay, we’re getting closer.
Can the whole fence be turned/pivoted to crosscut 45 degrees on 5″ boards? Or does it have to remain perpendicular to the blade? If it does pivot, how easy is it to recenter?
Options to improve it:
1) Add an extension that comes out of the side of the fence that allows people to use stops to cut longer pieces. These stops are limited to the length of fence on one side of the blade. Dare I say you dirty your creative approach by looking at the higher end Incra miter gauges for inspiration?
2) Incorporate a place to put a white tape or other replaceable writing surface next to the ruler on the top of the fence. That way you can make a story stick and repeat cuts. Another approach is to make a tiny gizmo that locks onto the lead screw that would you allow you to move the stop and then return it to its original position.
3) The articulated stops look good for wider pieces, but what if you’re cutting 1/2″ wide stock? They appear to reach too far out on their minimum setting.
4) Make sure you soften the corners/edges of the fence. When kids run around the shop (or you do), it can be easy to bump into the fence ends and gash yourself on sharp edges of aluminum. For example, the back of the fence looks like it has some exposed sharp edges. Remember, this fence sticks out beyond its footprint, so it’ll be easily bumped.
Future wish list:
A) Table side extensions to be used to support long stock. Even with those clamps.
B) Still looking for a ripping solution 🙂
Cory-
Thanks for the comments, and I agree, those knobs can be painful and I am speaking unfortunately from experience…I have arthritis in my right index finger and it can be rather humbling at times. We have major space constraints here and that spells compromise- can you send me examples of what you like? I am interested.
-John
John, can’t wait to upgrade though the Navy’s likely to move me out to Hawaii before the fence is available, (not looking forward to shipping costs!) My only request is that when you blog about new tools that you include gift ideas for wives who may or may not know how much quality and craftsmanship costs. My wife doesn’t ask questions when UPS/FEDEX drops something off for the shop if they also have a present for her. The gal doesn’t need any more purses/clothes/shoes/jewelry, and I’m running out of ideas!
I really like what I’m seeing, but I’m hoping there will be some compatibility with the Jointmaker SW?!
I must say it looks like a tour de force…well done.
I’m a bit puzzled by the miter attachment…or I’ve had one too many Negroni…but it appears you first have to crosscut it to length and then cut the miter. Or am I missing something.
John- sharp addition. I do feel compelled to clarify something, though. it is regarding the conversation you overheard about shoji and the JMP. Unless the Coincidence gods were.in mid-bacchanalia, I would have to assume what you (mis)overheard was a conversation I had with PM regarding my interest in kumiko work similar to what you show.
If I am correct about this, then I should mention that I was asking about the differences of the pro version and the SW, and after Paul-marcel explained the functional difference, I commented that the SW would be the wrong choice for the work I had in mind, which requires dead-on accuracy with mirror-imaged angle cuts. This seemed to be one of the few situations where the Pro is clearly superior. it was the SW I rejected in favor of the two wing Pro. Not the JMP itself. The reason I was inquiring in the first place was because the tool looked so intriguing and ideal for such work.
Unless of course there was another conversation about decorative shoji work in your booth. In which case I’m an ass.
Raney
The JMP has looked from day one to be ideal for such work. I would not
John, the best example I can give for a knob is the plastic/rubber mix on a bessey clamp. You can grip with the whole hand on those. Probably enough grip to warp the the aluminum tables, but maybe a half-size version of that would work.
Here’s a picture:
http://besseytools.com//asim_images/Graphics/Pic6/00011435_0.jpg
I’ve spent way too much time thinking about how to accessorize my JMP and not enough time actually using it for projects, I’ll sketch out some of my other ideas when I get a chance.
Oops. I hate typing on this damn iPhone. Please ignore the words after my sig in my comment.
(Also loved the apropos quote you open with, btw 😉 )
r
I have a large shoji to build and was going to build it with the JMPv2, but as you said, it requires jigs. Hopefully this will arrive for my birthday (end of March!) and I’ll start my shoji then!
Some stellar ideas there and some nice improvements to the early design I got to hear about.
As for jigs, the flip stop’s holes will be a gem for them.
Also like the improvements to the pivot clamps from the prototypes; I’m so used to popping a piece of scrap under the clamp head that I’ve never thought of a pivot for spreading the load.
Lastly, I drooled just a little bit when I read that a version of this will be available for the table saw.
Bravo!
I also hope some compatibilty with the Jointmaker SW. But from the pictures I’m not so sure it is.
Funny all this shoji talk. I have a cabinet I’m building right now for a client and I talked her into incorporating some kumiko like work in the upper portion. Having just received the JMPv2 the first of the month I’m still trying to wrap my head around it and what it’s going to take to accomplish the myriad of cuts.
SFPaul
Wow! That’s a serious system, John. With your JMP, Kerfmaker, Tenonmaker, DJ-1, new fence, etc., you’re turning into Festool – all the tools working together to enhance the utility of any individual tool. There are so many beautifully thought-out details in your fence system: the stops, the adjustment, the miter attachment, the articulated clamps. I can see why you haven’t had any sleep in a month. This is very exciting!
– Peter
As a new owner of a JMP v2, I am delighted to see that John has a number of proposed accessories coming in the near future.
I live in a high rise condominium and this puts limits on the level of noise I can impose on my neighbors. Power tools that are noisier than a toothbrush are not an option for me and I decided a few months ago to acquire a number of BCTW tools, including the JMP v2.
The new JMP v2 accessories John describes will be god sent for me by reason of the type of woodworking I do or plan to do: shojis, kumilo art, andon lanterns and small pieces of furniture.
I will probably acquire all the accessories that will eventually be offered. I would hope they will become available soon… real soon.
PS How about offering pivot clamps right now?
Wow John!
I’m still absorbing it all, will post some thoughts within a couple of days.
btw, I seem to be having a problem with the upload on my mac – I can’t seem to find the link for Michael’s video on the new fence system.
cheers,
roger
So when is it going to be posted on the tool section, so I can start saving my pennies.
John,
Did I miss the 90 degree fence for cutting tenons we talked about? BTW, this is great stuff. Everything you showed us and sooner than expected. Perfect!
90 degree tenons are cut using the tenon/miter arm. I will address tenons on mitered ends later.
-John
“11. Rip cutting by hand is hard work. Maybe not for long…”
That is the phrase that keeps bringing in my back to the BCT website week after week. More than anything else, hand powered, precise rip cuts on arbitrary stock lengths is the problem I’m looking for you to solve. Fingers crossed.
On the plus side, I purchased my very first BCT tool this morning. Excited.
I’m also thrilled to hear there is a metric version of the fence system. Base 10 for the win.
Matthew,
WELCOME! We hope you enjoy your new Bridge City citizenship.
I am working on the rip project-but we are small and there are limits to our R&D abilities. That said, we will solve this!
-John
The miter attachment. At this point what is the length capability of the jig? To me it seems too short right out of the box. I understand that you can’t make it too long or it becomes in the way much of the time. Is the stop attachment micro adjustable and repeatable? The stops don’t appear to be able to flip out of the way.
The main fence. Again, what is it’s length capability at this point and once again to me it seems to be a bit too short. But again, what do I know?
SFPaul
Paul,
Good questions. Regarding the miter attachment, think of it as a clamping platform with an integral stop for smaller stock (think shoji). For longer lengths, you lose the integral stop capability by attaching a shop made extension.
Regarding the fence length capacity, as designed now, one has about 11″ per side for the stops to read direct. This is aesthetically a sensible length. That said, there is a compelling reason to split this fence into two halves and bridge with a plate and I am working on this version for the table saw–and may change it for the JMP. This will allow us to offer the fences in customizable lengths and by removing the bridge plate, use either side for miter work without removing the extruded fence. Make sense?
-John
The entire system looks great and very well thought out.
I’ve one critique though. The clamps look effective, but slow to use. Did you explore options to make them faster acting? I’m thinking along the lines of De-sta-co clamps or some sort of cam action. I can imagine 90% of the time spent clamping the next piece in place and 10% to zip through the cut.
It does make sense. And that seems like a good solution.
I guess to me the saw has a pretty well defined set of abilities to work certain stock sizes and the whole fence system should be designed with those standards in mind. To buy the fence and have to start fiddling around with cutting something 12″ to length seems to go against the reason to build the fence in the first place.
Did the jig for mitred tenons and half laps happen?
If not, could an angled block be placed behind the finger with the tenon jig attached to set the angle?
Or maybe there’s a better (more elegant) solution. I do have access to a small CNC mill that could make a few acetal parts to accomplish the job if needed.
Mitered tenons and half laps can be done with the precision fence as is. The only attachment I am working on is for making gears.
Great. That’s my decision made. A JMP it will be.
Sometimes you start searching for a solution to a problem and end up totally down the wrong path! Such as if only I had a saw with SawStop technology then I would feel a little more comfortable making smaller things held in ever more creative home-made jigs. Then you realize, a table saw is just the wrong tool. Even when you get setup and get the basics cut you end up still faffing around with chisels trying to perfect the fit due to the issues of working with 100mph spinning blades and 5cm long pieces of wood.
And with the JMP I get the added bonus of been able to make Currywurst with my hot dogs 😀
Funny sorcery…
When we made the squigglewood video years ago, Michael Berg and yours truly were laughing our butts off. We then decided to do a SawStop parody video using the JMP to cut a hot dog.
That is just one of several genius ideas that never materialized behind the scenes at BCTW.