____________________________________________________________________________________________________
“Man’s mind, once stretched by a new idea, never regains its original dimensions.” – Oliver Wendell Holmes, Jr.
____________________________________________________________________________________________________
First Things First Department:
Last week I needed a shoji screen image to illustrate the new capabilities of the Jointmaker Pro Precision Fence System. Using Google Images, I found one that helped explain how these miter cuts will be possible–it was located 23 pages down in the search with no indication of the source.
After posting I received a thoughtful email from a JMP customer who identified the image as belonging to professional shoji maker Des King–of Australia. He does extraordinary work–you can learn more about his shoji practices here. Had we known the source we would have given Des due credit… for which I apologize. Here’s a big thanks to one intrepid customer for making us aware of our transgressions and turning the Drivel Starved Nation onto the work of Des King.
You Spoke and We Listened Dept:
The feedback and dialog last week was invaluable to us as we finalized the design of the new JMP Fence System. We are done and I am thrilled to share with you the changes;
- The new fence(s) will work equally well on both the JMP Pro and the SW.
- The left and right fences are now joined by a removable bridge, and when removed, will allow one or both fences to pivot up to 45 degrees.
- Thanks to the bridge, it is now possible to simultaneously employ two stops, one on each side of the blade.
- The new stops will allow you to pivot the stop out of the way keeping your original setting locked to the lead screw.
- Both the micrometer adjustor and the stops are backlash free.
- The system reads in 0.001″– the metric version in .05 mm.
- Between the two new clamps, we don’t think you will ever need to use the wooden trap clamps.
- Overall height of the fence (top of the traverse rod) is 3.75″
- Full 12″ of stop positions on each side.
- The table saw sled kit (you supply the table material) allows for 18″ of adjustability on each side of the blade.
This system is going to allow you to do things that are unimaginable today. It is fast, repeatable and enhances the strength of the JMP to new levels. Thanks to all of you who pitched in with your comments.
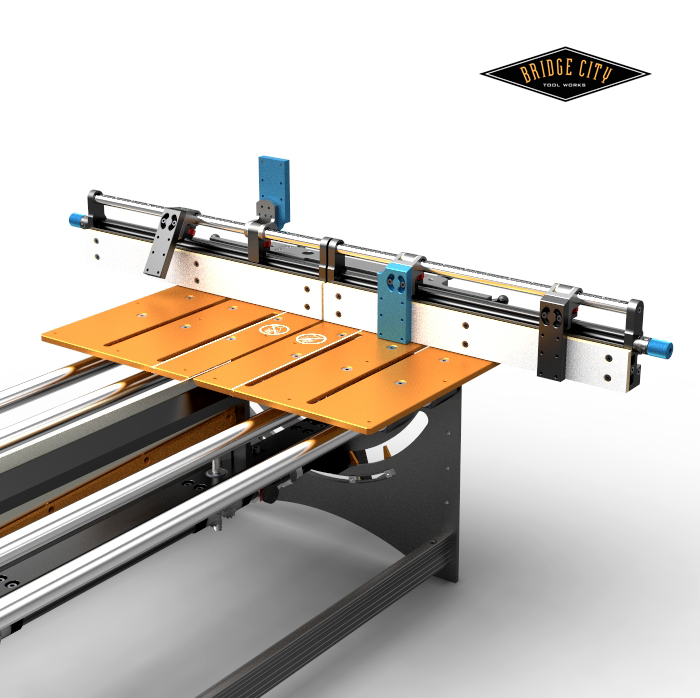
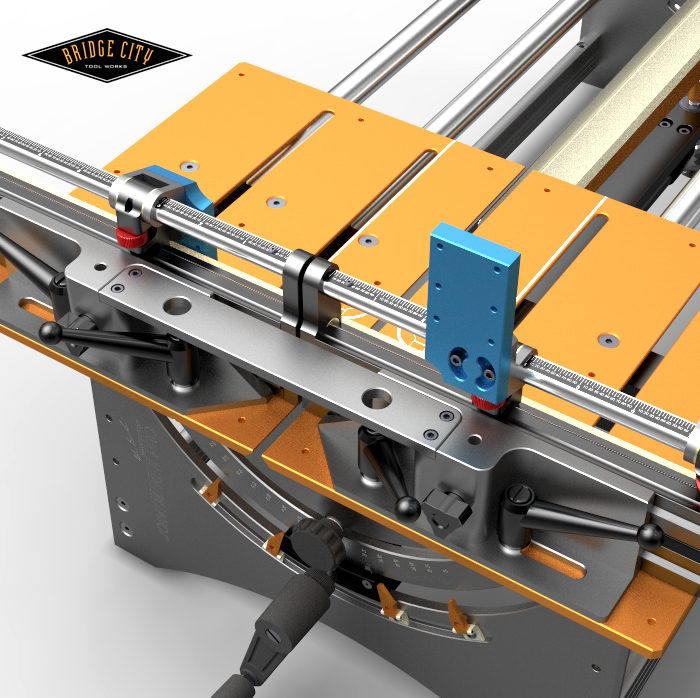
Here are some final images, including the table saw sled kit;
The flip-stops have been redesigned to allow for crosscuts without losing your micrometer setting. In addition, it is now possible to have independently adjustable stops on each side of the blade.
The bridge unites both tables but can be removed so one, or both fences, can be tilted up to 45 degrees. The imperial version (inches) has a 12″ capacity on each side and stops can be adjusted in 0.001″ increments. The metric version has a 300 mm capacity per side and is adjustable in .05mm increments.
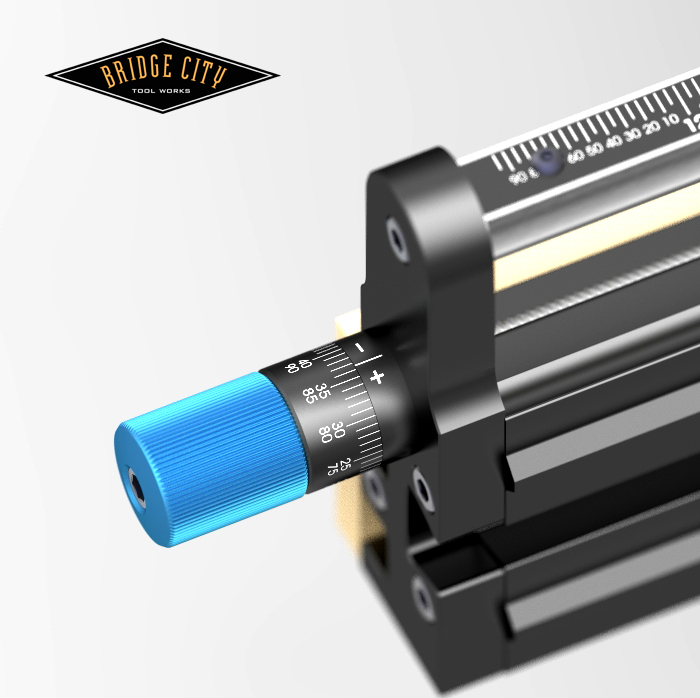
The micrometer adjusting knobs are color coded to the stop they reference and they are blue to tie in with the original JMP color.
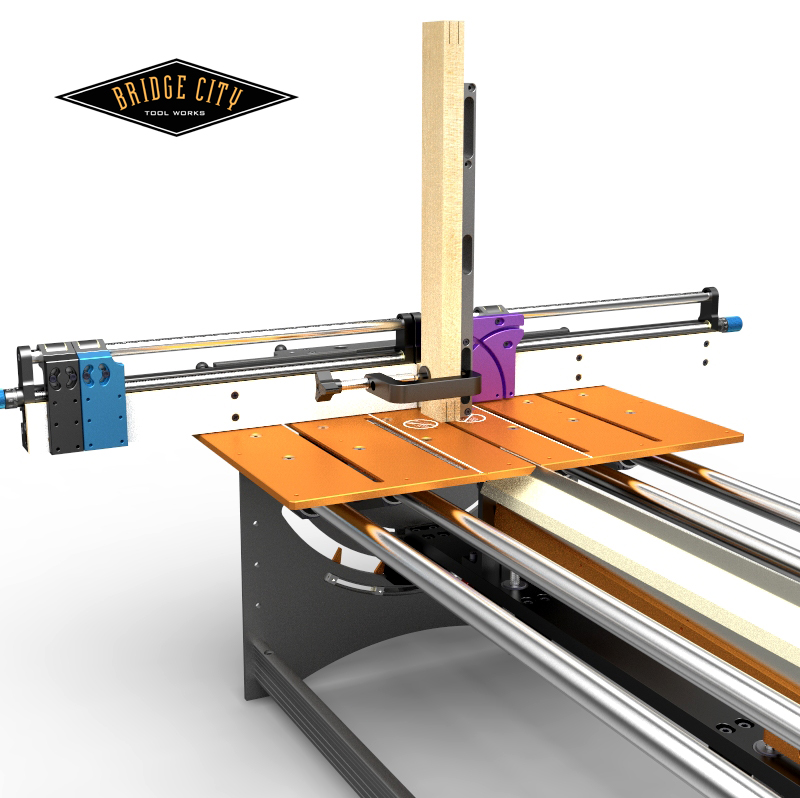
The miter/tenon head replaces both fingers on the stops and can work on either side of the blade. It is adjustable over a 90 degree quadrant and it is adjustable to keep it perpendicular to the tables to avoid compound cuts. With the fences now adjustable it is possible to cut compound miters without tilting the blade. How cool is that? Also, one could conceivably put a second tenon/miter head on the other fence and the saw would be capable of cutting two different angles without adjusting a thing.
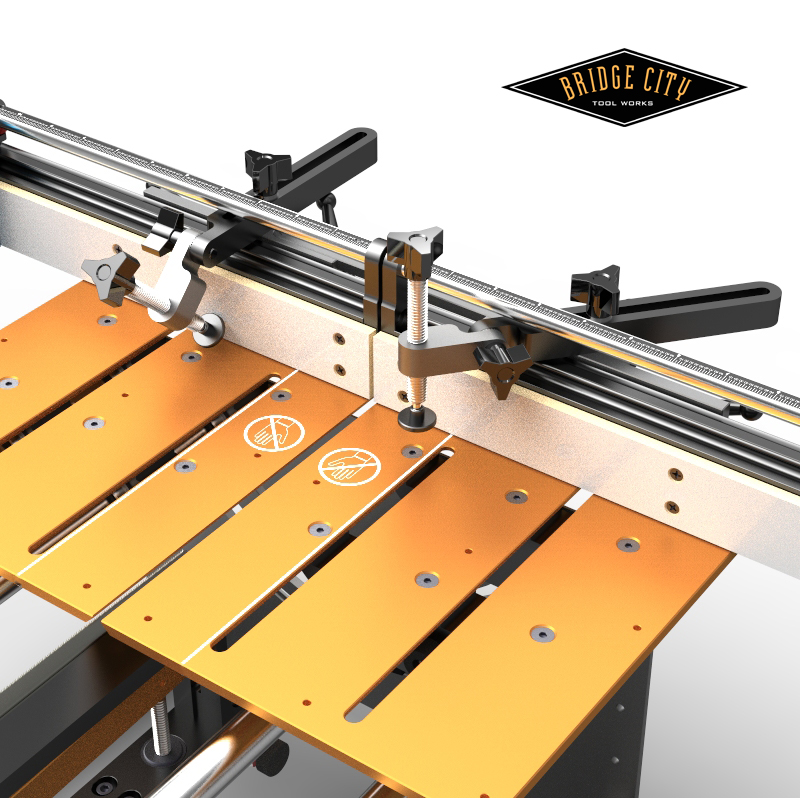
Our new articulated clamps will be able to quickly trap your stock to the tables for the majority of your crosscut needs.
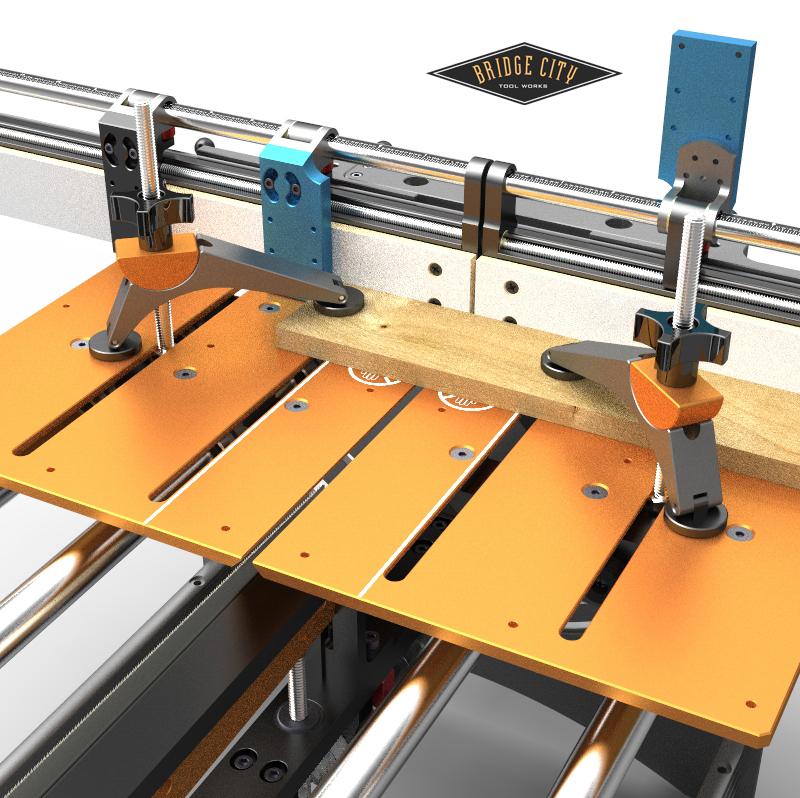
The optional pivot clamps work really well on the JMP and are useful on other shop tools in your shop.
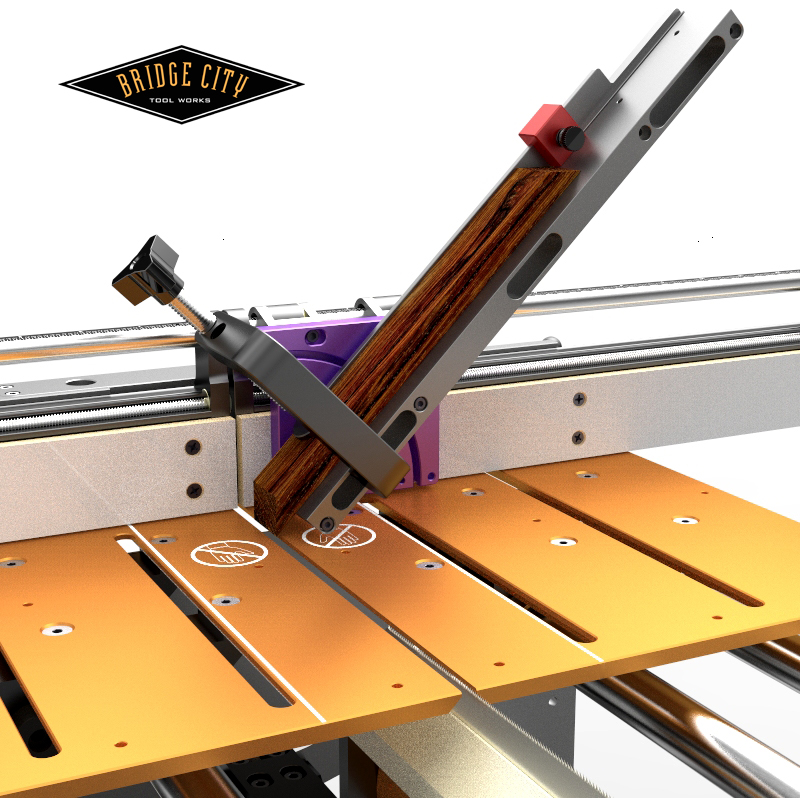
We believe the ability to cut miters at any angle between 0 and 90 degrees without tilting the blade is huge. We know it is a much easier setup. And, with the ability of the fences to be angled, one can now cut compound miters also without tilting the blade.
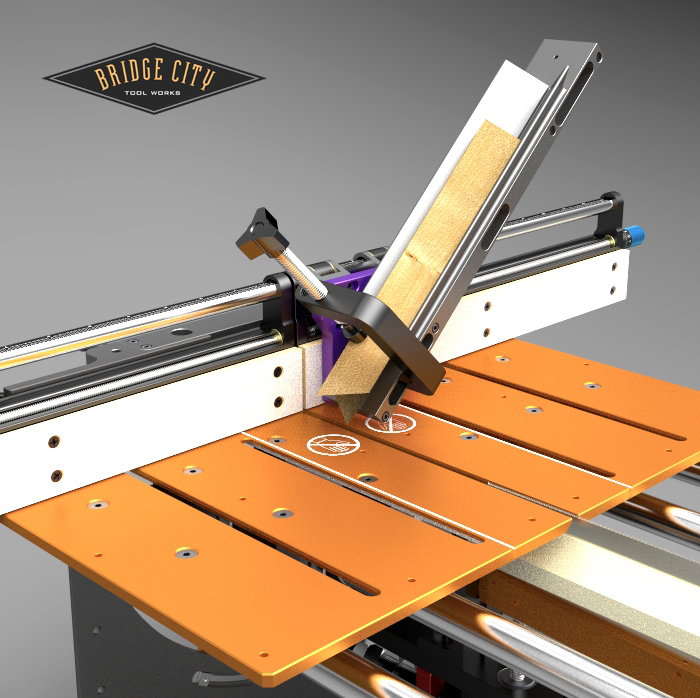
We call this setup cutting on the bias. When done correctly, it creates a beautiful, and unusual joint.
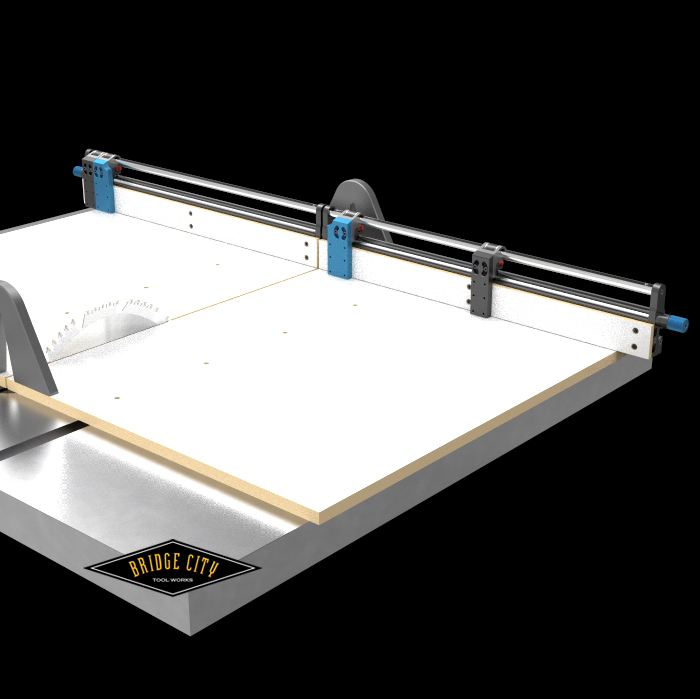
The table saw fence kit will include a left and right fence, two aluminum bridges, mounting hardware and two 1/4″ x 3/4″ drilled and tapped guide bars. You will get to determine the size and material of the sled base. All of the JMP operations pictured above can be done on your table saw with this new crosscut sled fence.
We are excited to get this project rolling and whether you own a JMP or a table saw, this fence system will make your woodworking life way more fun–yes/no?
PLAY CLOSE ATTENTION DEPT:
The pre-order window for both of these products will open this Wednesday at 5 pm (Nov 23). We have a special holiday treat in store for all early-bird (it’s a holiday pun) orders placed through Sunday, Nov 27th. Order cut-off will be Dec 30th. Details coming to your inbox real soon!
–John

Neato.
“The system reads in 0.001″– the metric version in .5 mm”
Should that perhaps be 0.05mm? Otherwise, there’s a factor of 20 difference in resolution between the two.
-Steve
Steve-
What a difference a zero makes…thanks for spotting my error. Fixed.
John
John,
Sorry to be the bearer of bad news: you fixed it in one place but not the other. 😉
-Steve
Steve,
Yet another reason why I dispise Mondays. Fixed. And thanks.
-John
Big improvements. Very nice.
John,
First question: why would I need to ever cross cut on a table saw any more?
Second question: if I still need to use my table saw and it has a sliding table; any chance that you will offer just one side without bridging hardware?
Thanks,
Rutager
One thought. In case one wants to skin the saw tables with a thin plywood in order to make a zero clearance plate, I’m assuming there’s enough clearance under the stops for that?
Rutager;
The Jointmaker SW version is one side only, so as long as you can figure out how to attach this to a sliding table, I don’t see a reason why it would not work.
-John
The stops reference against the bottom of the extrusion so the thickness of the sled components are not relevant–if I understand your question.
Smacks forehead…of course!
Looks like a winner!
Fantastic, John. A very impressive and adaptable piece of hardware.
.
I’m wondering whether you might want to extend the ordering deadline so that your fence system can permeate the table saw-owner’s media, to enhance your sales. You know – PW, FWW, etc. This might be the opportunity to sell enough of them to buy your island. After all, it’s not cheating, and it enhances your ability to use a power tool. Which (other than the KM and TM) is very un-BCTW. In some ways you’re breaking new ground here, and it would be nice to ensure that your product is seen by as many potential customers as possible, and that they don’t get all pissy about your business model.
.
Just a thought.
.
Man, I love all those clamps and stops. Very, very cool.
.
– Peter
John, as I look at the fence, its screw system, the joining bridge, etc., it occurs to me to wonder: where do you put your fingers to push it?
.
I don’t see any obvious places for your hands. Do your fingers drape over the rods? Under them? Behind them?
.
Also, I see some interesting machining on the inward-pointing faces of the bridge. Is that a 45 degree angle for getting perfect miters? It looks like there is some other angle on the opposite side, to form a point where the two pieces face the blade. What’s going on there?
.
– Peter
John,
The update on your designs are really fantastic.
The only questions that come to mind at the moment are concerning the clearance space between the blade in its extended setting on both models. With the JMP model what is the clearance space between the top of the blade all the way up and the bottom of the crosspiece that joins/locks both fences. In the table saw model I take it that upside-down “V” locks the fence (can’t see in the picture) rather than the flat bar on the JMP version. Does the tablesaw version take into account the higher reach of the blade? And also the wider kerfs than the JMP blades.
I could probably articulate these points more, but I think you catch my drift.
roger
Peter-
The new JMP fence system is not as tall as the square wooden fence supplied with the JMP. You can put your hands in a myriad of spots, especially considering that for the vast majority of cuts, the stock is clamped to the tables.
Once the bridge is removed on the JMP fence, the fences can pivot up to 45 degrees. Because the fence base has a single pivot point, material in the fence bases needs to be removed to accommodate a fully extended and tilted blade. There cannot be a circumstance where any part of the fence system can intersect the cutting plane–that would be rather bad form from my perspective.
–John
Peter-We don’t advertise in magazines and really don’t expect any of our products to be mentioned. We will see the new fence system pick up steam when we make the second run and have user feedback to support our always outrageous and over-the-top marketing hype. 🙂 I do appreciate the thoughts however! Lastly, we are on year nine of this bank free “business model” . That alone should be enough for the sane to support us…
-John
Damn John, that is a simply stunning fence. I am so glad that I did not pitch in with any of my stupid ideas and instead left it you and the other geniuses on the blog. You have done yourself proud and I believe that based upon this incredible fence all of your new tools should be made for you. Thank you. Fred
Thanks Fred. In my shop, I don’t have time to mess with shop built jigs and fixtures so this project was all about hassle free capabilities–I can’t wait to get the production versions on my units. The fact that it ports to the table saw is nice benefit too.
-John
John,
It’s incredible to think of the “quick” options that will be available from a sculptural perspective. Especially when one wants to fashion a one off piece where making a jig for that one piece is usually an exhaustive
exercise.
John – Killer design. I’m ready to order!
It appears you are showing 18″ fence components on the JMP above. Can you clarify if those are 18″ to each side or 12″ to each side of the blade?
Thanks!
neil
Neil,
Always enjoy your enthusiasm. We are recommending the 12″ fences for the JMP. The table saw sled kit has 18″ fences on each side.
-John
Will the table saw fence kit fit on a joint maker pro if I decide to get one later?
Regards george.
George-
The Table Saw Fence System is identical to the JMP version with the exception of length and the way the two are attached to the tables. If you purchased the Table Saw Sled Kit, and later purchased a JMP, the only thing you would need to add is the base fence and bridge. That said, it is only fair to state that the Table Saw fence fastens directly to your sled tables via captive nuts that slide in the extrusion. To remove from the sled, you will need to remove one end cap (not a big deal, just clarifying the process), loosen the screws from the bottom of the sleds and slide off the captive nuts) and re-attach the end caps.
The fence on the JMP, because it pivots, is fastened to a base fence via a sliding dovetail nut that slips in the extrusion.
-John
What material would you recommend for the sled? I am concerned about very easy sliding.