Fact: Portland, Oregon resides smack in the middle of the world’s largest temperate rain forest.
Fact: John Economaki, your favorite Tool Potentate lives in the Portland area.
Fact: John Economaki’s deck was eaten by carpenter ants.
The winter of 2008 dumped a freak 21″ snowfall on my back deck (everywhere else too)–and when it all melted, I noticed the deck not only dropped 6″ (not good considering parts of it are seventeen feet above the ground), but it also liberated itself from the house and this is where the story begins…
The lot of Casa Economaki is part of the Tryon Creek watershed, one of five in the Portland area that annually funnels five months of rain back to the Pacific Ocean. What this really means is we have no yard–our house is just enough to the side of a ravine that it stays put–except for the aforementioned rear deck which now too was on its way to the Pacific Ocean. Basically this is a residential lot where one can pee in the yard anytime–something I have been meaning to try.
There was no laborious, gut wrenching decision to make, the deck had to go. Fortunately, while at the Portland Home and Garden Show, I saw a deck guy who was wearing the hat of my favorite college football team, you know, the only team in 2008 to beat USC. I knew right there this was an omen, and Patrick at Northwest Deckscapes made me an offer I couldn’t refuse–yank, and dispose of 750 sq. ft of rotten deck for $1K. Isn’t college football great?
Patrick, who has built hundreds of decks informed me this deck made his top five MOST ROTTEN DECKS. Why? All of the structural beams were HOLLOW because of carpenter ants. And if this sounds bad, IT IS only because carpenter ants have their own freakin’ website!
Determined to foil the ants, I perused the internet for options. It seems Ipe, a hardwood from Brazil is the wood de jour for a somewhat maintainable deck. However, the more I learned, the more it became apparent this is a terrible choice–it IS NOT a sustainable yield product, and it is, like many tropical hardwoods brought into this country under less than credible circumstances. What to do…
I researched fake wood (not me), concrete, concrete pavers and slate as I was convinced that a wood deck in the world’s largest temperate rain forest was a poor choice. The problem is that the deck is elevated. Alot. So, what does this have to do with Arnold Palmer you ask?
Years ago I attended a golf tournament and while relieving myself in the woods, a golf ball trickled by–struck by none only than Arnie himself. He had two options, punch out to the fairway or hit the ball between two trees about twenty yards away–through a twenty inch gap…
He took a club out of the bag and lined up for the shot between the trees. At the last minute he put the club back in his bag, grabbed another and turned to punch his ball back into the fairway.
“That’s the way Arnie! That’s what I would do!” screamed a fan.
Arnie slammed the club back in his bag, reached for his first choice and without hesitation, dialed an incredible shot between the two trees that landed on the green and as you might expect, the crowd went wild–which was awesome because nobody saw me pulling up my zipper.
When you consider stone or anything heavy for an elevated deck, the internet is rich with definitive suggestions–all free of course.
“Don’t do it.” Or, my favorite, “Only an idiot would put stone on an elevated deck.” And thanks to Arnie I knew what to do.
After more research, I discovered a brand new product called Silca Grate from SilcaSystems. Made from ABS, this stuff is fantastic–the contractors price was $2.50/sq.ft. Leg one done.
Next, I was exploring concrete pavers at the local Home Depot and discovered a pallet of 6″x12″ slate (petrified mud if you need to know) pavers from Turkey. I was able to order five pallets and the cost was $2/sq.ft.
Tallied up the dead sq. ft. weight (13,000 pounds of slate) and Patrick did all the load calculations and frame design work. (this deck will hold 300 people which is about how many people I owe money…) We agreed upon a price for the pressure treated deck framing and all new footings. Leg two done.
I don’t know squat about pavers, mortar or masonry but in my internet travels I discovered polymeric sand and it seemed too good to be true. It is not sold in box stores (yet) but I did find some organic polymeric sand in town–about $12/55lb bag and I needed 12 bags. Leg three done.
I really liked the stainless steel cable railings however at $90 per lineal foot and with eighty feet of railing, I had to explore other options. The cheapest metal railing I could find, which was so ugly I couldn’t imagine living with it, ran about $40/ft. So I decided to design my own railing out of extruded aluminum and 1/2″ conduit. Leg four done.
It’s been a fun summer project and perhaps the following pics will inspire others. (The links provided are for educational purposes only and represent my experiences and my solution–in other words I am sharing without payola.) It is my hope that I will croak long before the deck succumbs to slate worms.
Louie Dog before his favorite napping place was ripped out–

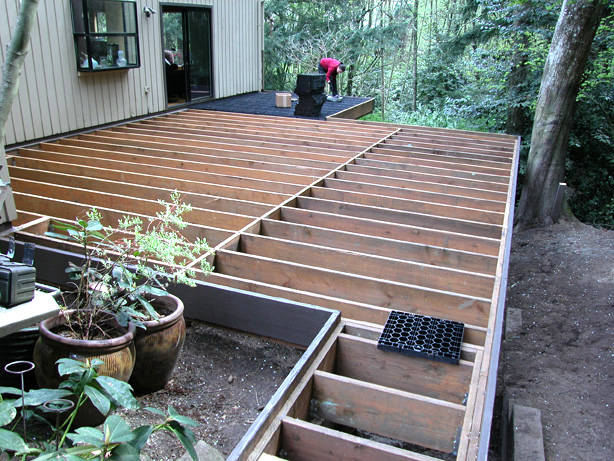
The new deck frame and the beginning the Silca Grate installation–
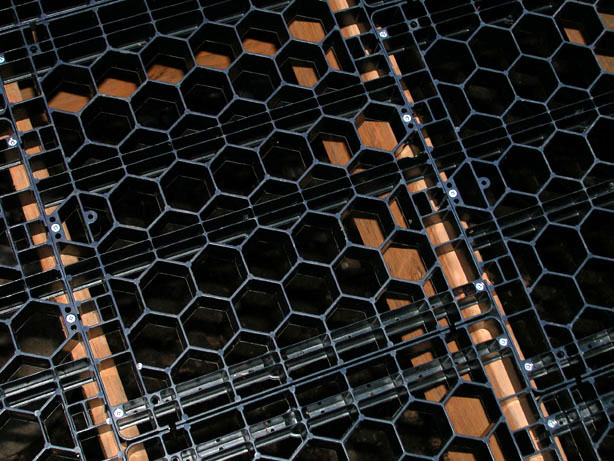
Silca Grate is made from ABS–just about indestructible. It was easily cut on my table saw using a triple chip blade. It took me two days to put in the 2700 stainless steel square drive screws purchased from McFeely’s—
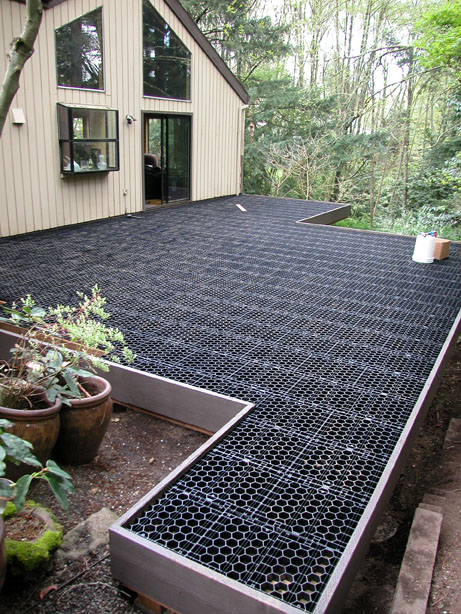
After three days (could of finished in two without beer), the Silca Grate is fully installed–the bucket was my installation seat and knee saver…
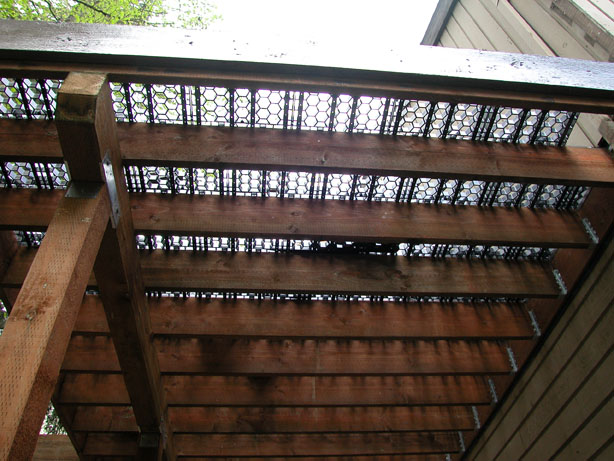
Here’s the view the coyotes see–
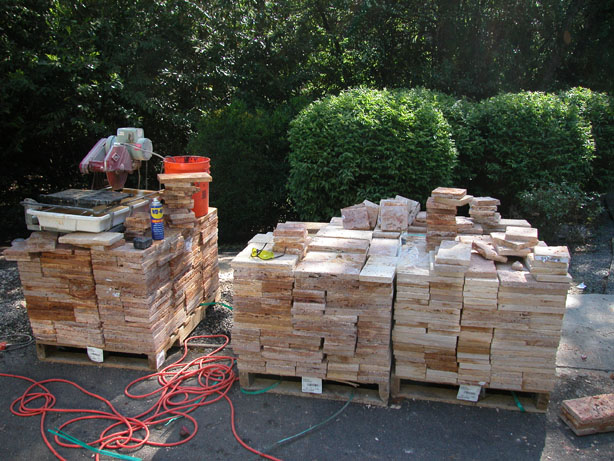
Although I tried to minimize cutting the slate, I found it to be remarkably easy with the masonry saw (diamond blade) I rented for the week. The cutting was all done in my driveway–did I mention this is really easy?
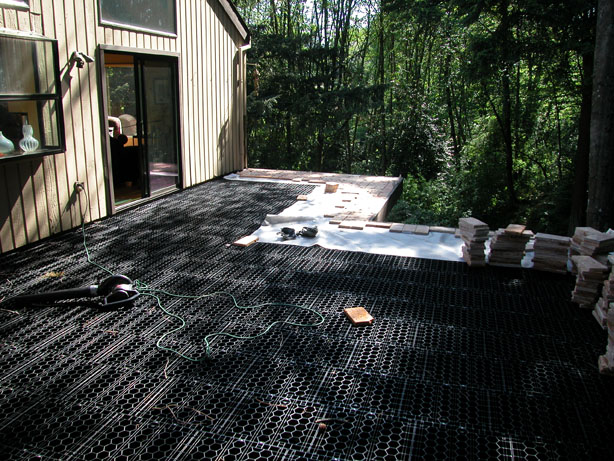
Prior to laying down the slate, I rolled out a strip of landscaping cloth to prevent the polymeric sand from leaking to the ground below–
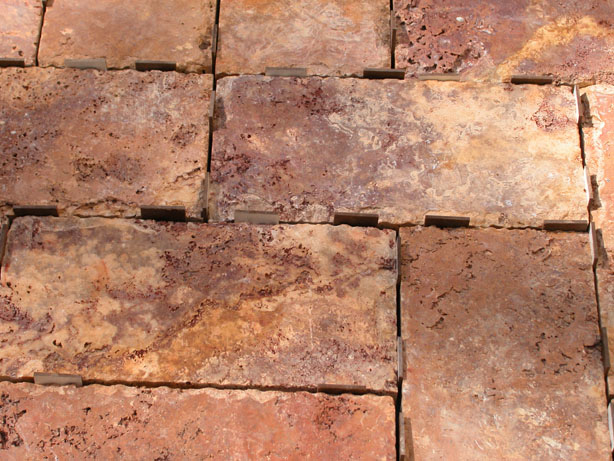
The tile spacers available at the box stores were too little to be of use so I cut up three sheets of 1/8″ Masonite into 1″ square spacers visible below. This was laborious but tolerable once the stereo was loud enough to bother my neighbors–
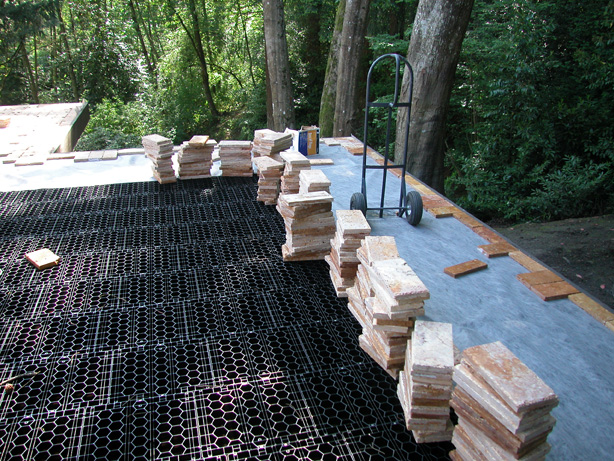
The shortest distance from my driveway to the back deck deck was through the house. All 13,000 pounds of slate were hand trucked through the kitchen. It’s no wonder I am such a popular guy around the house…
Almost done, sorta–
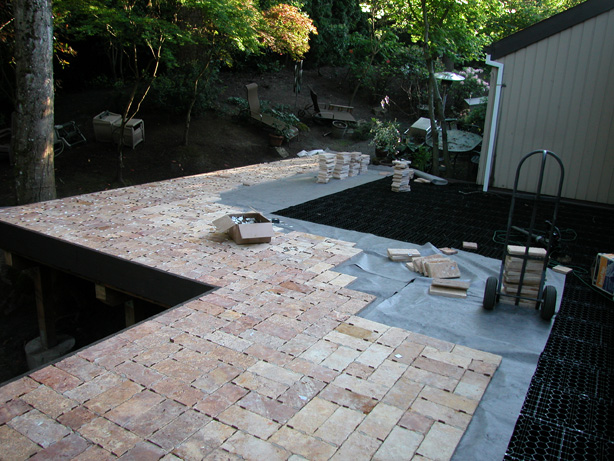
Once all the slate pavers were in place, I broomed a layer of polymeric sand over the top surface of the pavers. Then, in what was the most boring part of the entire job, I sat in the sand and pulled out the spacers with a pair of pliers/vice grips. A second layer of polymeric sand was broomed in to fill all the seams.
This deck is in the woods and I decided that any kind of “pattern” would be incongruous with the surroundings. I opted for random placement of the pavers without ever exceeding five in row or column. And now when I think about it, this is indeed a pattern but it fits in better with surrounding trees.
Using an electric leaf blower with the nozzle almost parallel to the surface and only a few inches away, the sand was blown off the deck creating a 1/8″ reveal between the pavers. To make the polymeric sand turn to concrete, I lightly misted the entire deck surface–this is crucial because too much water will wash the polymers away. This is the deck prior to misting;
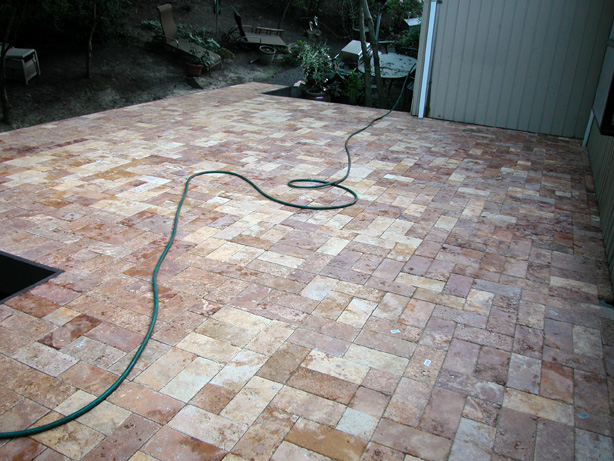
After the polymeric sand dried the surface was sealed with a low luster masonry sealer. I tried several brands on test pieces and liked the product from Behr the best–here’s the finished deck;

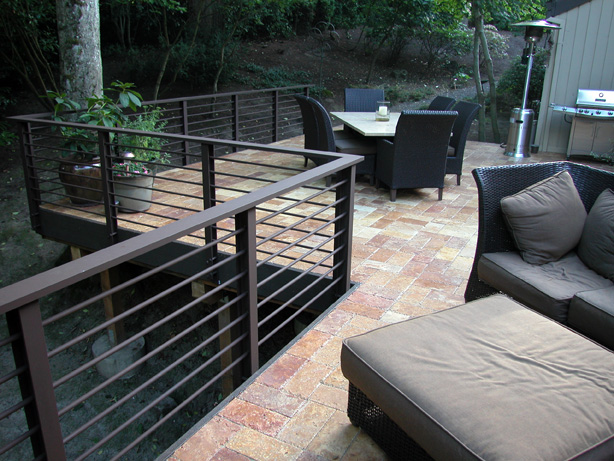
The deck rail which came in at half the price of the cheapest metal railing I could find was made from aluminum “I” beam, 1/2″ electrical conduit (EMT) and 1″ x 4″ extruded aluminum. The aluminum was delivered in 22 foot lengths and all cuts were done on my table saw using a triple chip blade (for non-ferrous metals and composites). I also became quite adept a drilling holes.
The top cap miters were much easier than I thought. I clamped each long rail section to the top of the table saw at 45 degrees with strap clamps and raised the blade up and through the extrusion to complete the cut–this worked perfect for a one-man operation on long, heavy stock–it was a reverse chop saw move.
What saved my bacon, and what always saves my bacon is McMaster Carr. I love this company. Through them I discovered tube connector nuts (they are at the bottom of the page). These nuts allowed me to fasten the ends of the EMT to each other with threaded studs and to the rail posts. This is so cool you have to try it!
All of the parts were powder coated (including the heads of the lag bolts) and were installed to the fascia boards with the lag bolts and an impact wrench. Too keep the threads of the lag bolts from showing, I cut small sections of conduit to fit between the flanges of the “I” beam. It was a lot of cutting (used a De Walt 18v reciprocating saw, which is also one of the best garden trimming tools ever invented) but the results are professional–unlike this blog.
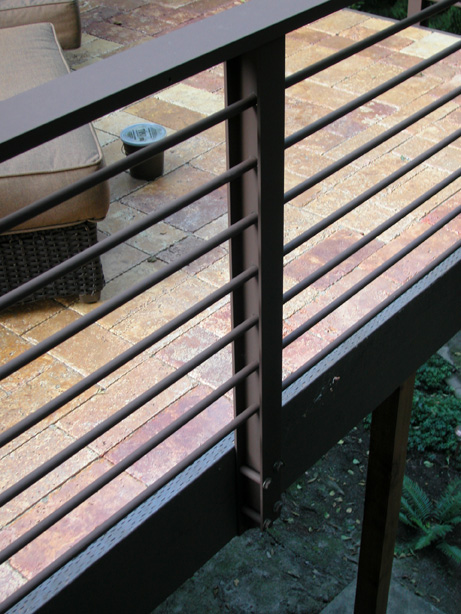
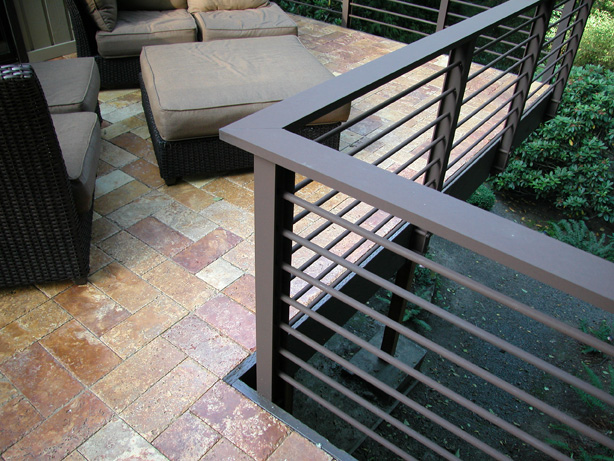
I made plenty of mistakes along the way. One of the pavers was put in upside down and I thought I could chisel away the polymeric sand…dumb me. I think I will leave it.
The lesson here is that Ipe was about $6 a square foot and it is now possible to entertain much more durable options for around that same range.
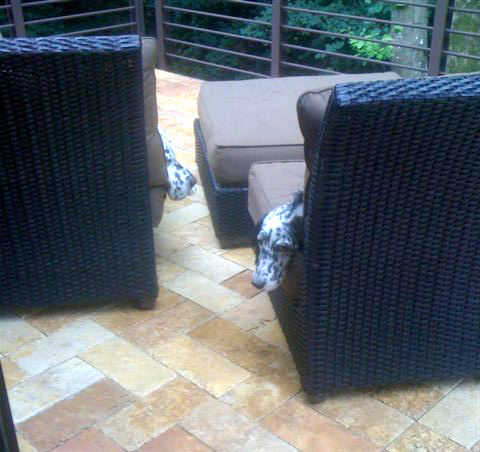
I hope I have the last deck I will ever need. It was a long project (I have a full time job you know…) and I really haven’t had as much time to enjoy the space as much as Louie and Jitter.
–John

John,
Awesome deck! I bet you thought up several new tool designs while working on it. A property you can pee on, it truly is a great thing, I can be seen by people anywhere on my lot, I have a friend who’s house has a spot where you can pee in private, his wife always laughs and say’s “you can go inside and use our bathroom.” I always say ” then why would I come over here”, she thinks I’m joking! Enjoy the new deck, maybe you could do a twist on the outdoor kitchen thing and make a outside silent woodworking station.
Rutager
John,
That Silca system look pretty cool, even for an on the ground application. I’m planning a new patio this next spring/summer. I’ll have to give this product a closer look.
By the way, your deck looks fantastic!
Mike
Mike;
You will need to do some more research but they make a Silca Grate for the ground (it is not black). This also intrigues me because you can do so many things with pavers but for an old back, tamping sand is a pain. The Silca Grate on the ground makes a great foundation, it can be filled with sand, pavers positioned and then use polymeric sand to keep them all in place. I am going to do this next year after my checking account recovers.
–John
Beautiful deck, John. And thanks for sharing your thinking and execution with us. Very educational.
I guess my worry is this (and feel free to tell me how it’s wrong): if the old deck decided to give in to the gravitational pull to the river, why won’t the new deck? Surely the carpenter ants weren’t the cause of the gravitational attraction of deck-river? Will your new footings be stable?
The deck itself is gorgeous, and I await my invitation to join you in a beer on it, while discussing how we could improve the world through woodworking, tools, and wine. Or beer. And I have to agree with Rutager: any part of your property that you can pee on without the neighbors caring is a good piece of property. I love my back yard!
– Peter
P.S. Thanks for the new post. It’s nice to know where your energies have been occupied…
Peter;
As you know, nothing is forever. This deck was engineered, and the other was not. Also, the structure of the old deck (it came with the house when I bought it) was not pressure treated material. The new footings are bigger, deeper and I am not too worried. That said, anything can go wrong I suppose.
Now, if you find yourself in PDX, there is always an open invitation to Casa Economaki–at least you know where the restroom is…
–John
Great call with the polymeric sand! It’s the most expensive sand you’ll ever buy but worth every penny. I laid a 15′ x 13′ paver patio out back of my house this past spring and the polymeric sand was a god send. Looks great, locks them in tight… can’t go wrong!
One question though… aren’t you going to miss that new deck when you move to your new island?
I don’t know why polymeric sand is such a secret–it is the most amazing stuff.
Which brings up another use–I am going to completely cover my island with polymeric sand for all of my helicopters. Right now, I have right of first refusal on Greenland and Australia as everything else is too small.
–John
John,
What a magnificent deck. Since you and Michael are going to be out here for WIA as will pfranks and some others, I am more than willing to have you build me a new deck using the same materials but this time not making some of the mistakes you were speaking about. I know, it is amazingly generous of me but that’s just the way I am. I will even get each of you a beer. :o) Truly a beautiful job but I have to say the 13,000 pound portion thought put my back in spasms. :o)
John, thank you so much for the discount on the dead blow mallet. I ordered one and can’t wait to try it out. I also can’t wait to get my KM-1s. Did you say September for them? The reason I am asking is if it is going to be late September and you would rather just bring them out with you that would be just fine. Whatever is best for you.
Fred
Beautiful deck–well thought out and nicely executed, but…
I’ve reread your description and not once could I find a reference to using either the JMP, the DJ-1, or the HP-6v2!
John,
I am very intersted in the specifics of your deck railing. I am at a stage in my deck building where I am trying to find a nice-looking and reasonably priced railing option. I really like the idea of the aluminum I beams as well as the top rail. Do you have the specifics (wall thickness, etc…) on the I-beams and what is the extruded top rail – is it channel or rectangular extruded tube? Any help in this area would be greatly appreciated.
Thanks,
Troy
Troy;
The top rail is 1″ x 4″ rectangular tube (http://www.alaskancopper.com/pdf/al/rect_tubing.pdf). I am glad I used this rather than channel because I may take it off and retrofit some low profile and low voltage down lights next summer.
The I Beam is 3″ x 2.5″
(http://www.alaskancopper.com/pdf/al/6061_Ibeam.pdf)
The rods are all 1/2″ EMT
You can likely come close to figuring out your budget by my recent experience-
I have approx 80 lineal feet of deck rail. Here is what this stuff cost me;
All aluminum; $900 (it comes in 20 foot lengths, and I have a lot left over–I did not want seams on the straight runs.
The EMT approx 600 lineal feet; $80.00
The hardware; $200
The powder coat cost was $1,000
So materials ran about $27 per foot.
I did all the design work, cut the material, and drilled all the holes. The top rail is fastened to the I beam via Bennet Clips.
This rail rocks, you can actually use the top rail to hold stuff…such as beer. And it is easy to clean, and will not rot.
Lastly, I did buy a mill/drill from Enco which made my life much easier–and that was $1,000. Added in my rail cost $40/foot and I have a mill drill and enough aluminum left to redesign my front porch next summer.
All told, with free labor, this rail was cheaper than the ugliest metal rail available.
By the way, using the table saw and a triple chip blade, I was able to cut end caps for the rect. tubing out of the I beam scrap–worked and looks great.
Let me know if I can be of further help.
Best-
John
Thanks for your help John. I think my deck rail will turn into a winter project. Hoping to get some costs from our local metal supplier this week and go from there. I was really looking at the stainless steel cable railing for infill, but I am not sure if the cost are going to work out. Turnbuckles alone would run over $800 then add the cost of the cable, etc… I’ll keep you posted on my progress. Thanks again.
Troy
John,
Do you have an email address that I may write you to ask you a few more questions in length concerning your deck railing. Not sure if you want me rambling on your blog about some of the detailed questions. Thanks for your help.
Troy
Troy;
I can be reached at Bridge City;
john@bridgecitytools.com
-John
John,
What an ingenious railing; it’s the best I’ve seen! I’m in the process of building a deck myself and have hit a roadblock as far as the railing is concerned. I was set on cable railing until price and some other factors led me to believe it might not be the best option. I like the look and function of your railing and have a couple of questions.
In regards to the conduit, the end fastener you used looks like the star nut in a bicycle’s steer tube; you pound it in and then the bolt tightens it up. On your end-of-run I-beam posts, would you drill smaller diameter holes (just big enough for the bolt that you insert into the end of the conduit) than on the middle section posts? On those middle section posts, are the holes slightly larger than the conduit itself? I want to ensure that I don’t scratch the powder coated conduit as I “string” it through all the posts. On my particular deck, I have a run of 18 feet. Were you able to find long enough single pieces of conduit or did you have to join several smaller pieces to make one long run?
I looked at the Bennett Clips online, and they look simple enough. When you actually attach the toprail to the posts, what type of fasteners do you use? I didn’t see any bolt heads, etc. sticking up through the actual toprail.
Any other miscellaneous advice you might have would be much appreciated!
Thanks,
Steve in Seattle
Steve;
The conduit nuts were purchased from McMaster Carr–yes you pound them in, and they will not pull out. Look at item number 94290A510. This fits perfect and receives 1/4-20 screws.
The end-of-run I-beams indeed have 5/16″ holes for 1/4-20 truss head screws–this screw is black and has an over-sized head–again from McMaster Carr. Looks nice and professional. Look at item number 94779A880.
The middle section posts have 3/4″ holes. The conduit itself is around .710″ and after powder coating of both the conduit and posts, they slide right in place without issues or fear of scratching the finish.
An 18′ run is no problem for the aluminum top rail (21′ lengths) but is for the EMT which is 10′ (I imagine longer stuff is available, I didn’t look that hard). All you need to do is plan your conduit seams to fall on the web of one of the posts. Nobody will ever know there is a seam. I recommend you keep the distance between posts around 50″ or less. On an 18″ run I would likely have my posts spaced for 5 or 6 sections which is 6 or 7 posts total including the end-of-run posts–whichever looks best to your eye.
I fastened the Bennet clips to the posts prior to powder coating with machine screws and nuts. I positioned the painted top rail on the posts, used a Sharpie to mark the Bennet clip holes, flipped the top rail and pre-drilled all the holes to receive self-tapping sheet metal screws (stainless steel). They are not powder coated but they are also not visible.
I too liked the stainless steel cable, but it was out of my budget and it would not have fit my 1970’s house.
If you have access to a table saw/chop saw (triple chip blade) and a drill press this rail system is easy. Send me an email address and I will send you a couple of detail pics–I took them for Troy who inquired ahead of you.
The end caps were cut on the table saw from some of the I-beam scrap–I cut rabbets on all four edges for a press fit into the top rail–had just a little bit of filing because I did not know how thick the powder coat would be. I first tried Bondo but it melts in the cooking phase of the paint process.
The rail I built is for fascia mounting–but top mounting would not be hard, you would need to have bolt plates welded onto the posts.
You will need to check your local building codes, but down here a 4″ diameter sphere cannot find a way off the deck.
I am pleased you like the rail–it is beautiful, functional and best of all, I will be long dead before this thing needs maintainence. Talk to your powder coater and inquire as to whether they can do this without holes and if not, you will need specify where it would be OK to drill holes in the top rail for hanging in the oven. I did not do this, and had to fill a couple of holes after the fact with epoxy.
Also, I do believe that Alaska Copper and Brass has a Seattle warehouse.
Let me know if you need further clarification.
Lastly, if you want to take a day trip to PDX, I can demonstrate how well the top rail holds a beer–or two!
Regards,
John
john@bridgecitytools.com