Here is a brief overview of our AMPv2 app (still in beta) for the iPhone, iPod Touch, iPad. All of this info will also be available via our website after AMPv2 run is completed.
Having spent all day yesterday making angled cuts and testing this and that, and at the risk of sounding like the complete huckster that I am, the AMPv2 is the most confidence inspiring tool that I have ever used. What great relief it was to know that if my cuts did not nest perfectly in the AMP or to t-bevel set to the AngleMaster Pro, I knew it was me, not the tool. This knowledge is powerful because you can chase your techniques and not doubt the tool.
Here are my thoughts section by section as the app progresses.
ANGLE FINDER
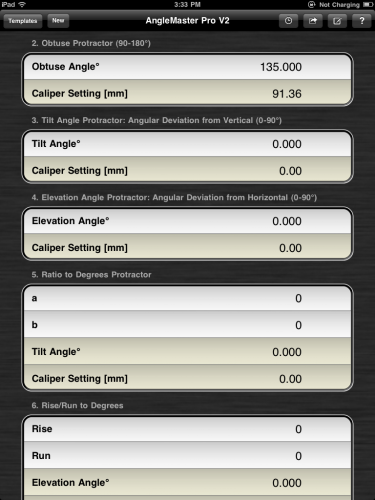
Anytime you need to find either an obtuse angle or an acute angle, you use this section. Obtuse angles read direct, simply align the legs of the AMPv2 to the source needing identification and your angle is there. Acute angles must be pulled using a t-bevel and then transferred to the AMP on a flat surface. This will identify the supplementary obtuse angle, which will identify the acute elevation angle. In this case the obtuse angle is 154.753. The Elevation Angle and the Tilt Angles are deviations from 180 and 90 degrees respectively.
Let’s say this obtuse angle is the angle of two walls and you want to put a handrail along the wall. The app tells us the miter angle for the rail is 102.624 (no, it is not 154.753/2, which is the sum of the two acute angles, we use obtuse for everything with the AMPv2). This is pretty cool. Fast. And mathematically, dead-on.

OBTUSE ANGLE
When you KNOW your OBTUSE angle, enter it here to determine the caliper setting for the AMPv2. This one is easy.

TILT ANGLE
One of the difficulties in developing a clear view of angles and woodworking equipment is dealing with the lack of standards. For example, we have seen miter gages when set to cut 90 degrees the indicator says “0”. Others say “90”. Same with the protractor for the blade tilt. So by using the standard angle nomenclature of elevation and tilt, it clarifies things. Now when you have a set of plans and it says to tilt your saw blade 7.5 degrees, this app will give you the correct caliper reading of 16.78 which is the obtuse eqivalent of 97.5 degrees but you don’t have to do the math.

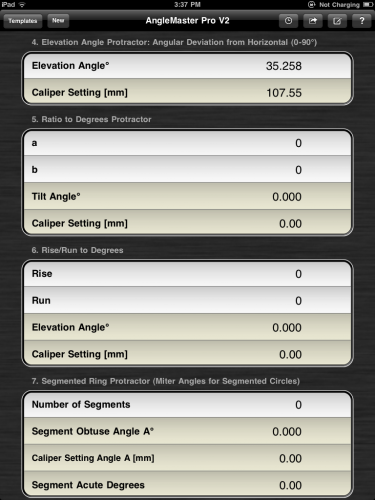
ELEVATION ANGLE
Perhaps you need a skateboard ramp, a wedge, or pie shaped segment that is an acute angle of 35.258 degrees. This is the section you use to help cut your stock.

RATIO to DEGREES
Many projects are still discussed in terms of ratios. Rise/Run, and many woodworking angles. For example, if you ever wanted to know what the angle is of an 8:1 dovetail, it is discovered here.
This calculator specifically determines tilt angles.

RISE/RUN to Degrees
Very similar to the ratio section but outputs the complementary elevation angle.

SEGMENTED RINGS
In one of my sessions at Marc Adams there was a class on segmented ring bowl making across the hall. I had a chance to watch how they work and thought, “if only their angles were dead on, they would not have to hand fit the last section”. So yesterday I spent about 10 minutes dialing in an angle for a 16 segment ring and it came out great. Since they were all using chop saws, I don’t think it matters but it would on a table saw. Your work always reflects the quality of your equipment.

90 DEGREE MITER with DISSIMILAR STOCK WIDTH
I really like this particular calculator as it helps add interest to projects. That said, you may need to make a fixture because most miter gages will only tilt 45 degrees each way. Some of these angles are more acute than 45 degrees.

COMPOUND MITER ANGLES FOR 360 DEGREE BOWL FORM
This is powerful information. “Bowl Form” helps you understand that the top is wider than the bottom. That said, a compound mitered pedestal stand for example, is a bowl form turned upside down. Either case, the math is the issue for most and now it’s not. Nor is the setup. You can only tilt your saw blade one direction (most saws anyway) and we give you the obtuse setting. You can tilt your miter gage either direction, but you can only measure obtuse on one side. There is not much to ponder–or screw up. There is a lot of info in this section and I will add trim angles (if you want your form to either sit on a flat surface, have a lip parallel to the ground or both).

COMPOUND MITER ANGLES FOR KNOWN ANGLES
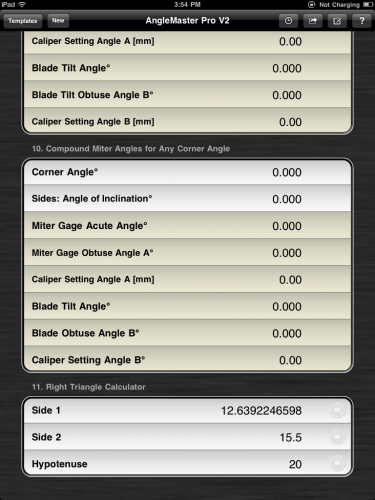
First, the numbers in the image below are incorrect–but that has been fixed.
It was brought to my attention by a DSN member that framing hacks create corners that are not 90 degrees. That is but one example of trying to figure out miter angles for non-square corners. It is pretty cool to know that you can now do whatever you want by concentrating on your cutting set-ups.

RIGHT TRIANGLE CALCULATOR
I wrote this section because it is fun. And, there are times where this info can be valuable. I could ad all the angle opposite stuff, but it gets confusing. If you want it, let me know. What I like about this little section is that I can change any of the three legs and then select which leg to change without trig calculations.

Anyway, that is a quick overview of the app. Combined with the AMPv2, there is no excuse for not attempting projects that involve angles.
Think about this;
The AMPv2 is the equivalent of owning 15,240 angular references, each as accurate as the finest machinist square.
–John

John
Just looking at the AMPv2 versus the original AMPv1.
I assume the app will work equally well for either. Are there any differences in the two tools as far as cutting angles? I know you are working on accessories, the magnetic legs, etc.
Thanks –
neil
Neil;
Both versions share the same triangle geometry, so the app will be a big help for the v1 folks. The v2 version has magnetic legs, better bearings, accepts shoes, and a much better caliper clamp.
–John
The guys at the Marc Adams school making segmented rings could knock out the segments – even compound-miter segments – in a quarter of the time, if not faster, on a table saw using the AMPv2 and a sliding cross-cut table similar to the Dubby (in-lineindustries.com).
Rob,
Agree-and we did demo this in the video we made.
— John