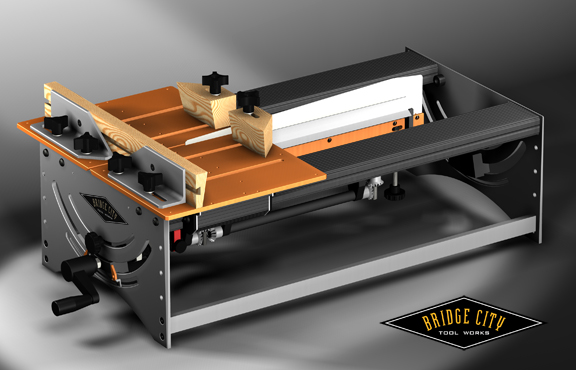
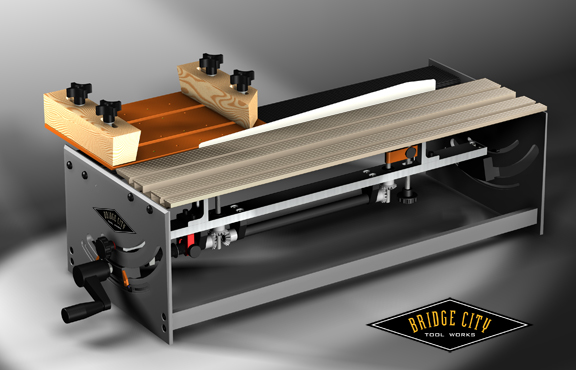
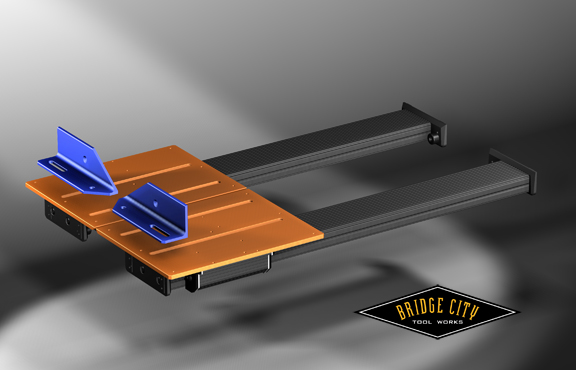
Here are a couple sneak images of our new Jointmaker Pro v2 and the brand new Jointmaker SW. Don’t tell anybody you saw them here first–I could get fired.
The image below is the Jointmaker Pro v2. The difference between the JMP and the v2 is in the linear table mechanism–the JMP v2 uses linear ball bearing sliders for a more efficient (less effort) user experience. In addition this version runs dry, meaning there is no lubrication required. Full info will be posted on our web catalog in the next couple of days. The retail price will remain at $1195 and the optional stand is $195.

The Jointmaker SW is pictured below. This version employs one linear table and one static table. It will make all of the cuts of the JMP (some not as convenient) for much less $$$. The JM-SW will retail for $795 and the optional stand is $189.00 More details will be posted on our web store in the next couple of days and most of the Q & A regarding our entire Jointmaker line can be found on the JMP user forum.

Existing owners of the JMP can upgrade to the JMP v2 by purchasing the upgrade kit below. It will be available for $395.

We are excited about the continued development of the Jointmaker line. All of the above are “Make to Order” items and will be available in March/April, 2010. Full ordering details will be available on our web store early this week.
And if I get fired for leaking these images it’s your fault.
–John

Hi John,
Since you’ve already put your job at risk, can you give an update on the BCTW essentials? Maybe a hint of what’s coming and of course where we are in the series? I won’t hold you to any delivery dates!!!!!
Thanks, Rutager
Rutager;
The next Bridge City Essential is the Tool Too Sexy for Mass Production; We will begin taking pre-orders sometime this month.
And then we are going to introduce woeris.,c coos nq[poiwj0- and aone it will be completely aeorhd,d [p090nd.
Keyboard is acting up….
John,
Do you have a price range on the tool too sexy for mass production?
John,
I will, of course be ordering the TTS for MP.
I think I’m going to need two of the next tool HOLY COW that thing is AWESOME, form and function are top of the heap, it will be the engineering feat of this century if you can pull it off, I can’t wait! I bet Peter’s wife will even let him get one!
-Rutager
Rutager
Sharon says, “We’ll see about that!”
Actually, if I told her I needed it, she’d say, “Well then buy it.” It’s a clever technique – now I have to be the conscience. And we all know how hard that can be when it comes to BCTW tools! My brain hurts!
– Peter
John,
On your twitter website, there are some pictures of your tools sitting on a table at a show. I think I see something what appears to be a black chrome blum bob? Is that what I am seeing? If so, will this be something coming out in the near future?
Geez, you folks have the eyes of a falcon!
Michael had one of our brass plumb bobs black chromed and it looks spectacular. So, we yanked our inventory and they are in the process of all being draped in black chrome. It is (as of this writing) something we are only going to do once and there are not many of them.
We will keep you posted–and you will learn about here first or my name is Herman Sir Fransky!
–John
I’ll tell ya, that blum bob looks amazing! I will say it was kind of hard to catch. Nice look’n tool you got there.
John,
Do you think that you will be able to leave purchasing open until mid to late January? I can’t speak for others, but that might give my Visa enough time to breath after the holidays.
Dave
Dave;
Your request has been expressed by others–we will keep this open until the first week of Feb and delay the delivery until April/May. We probably should have thought about this…
–John
Hi John,
The upgrade looks really appealing. But I must say I’m a bit annoyed. Offering a major upgrade less than a year after the original version shipped and then asking us to shell out 1/3 of the cost of the original machine to get the upgrade seems a bit arrogant. The worst part is expecting existing owners to come up with $400.00 in a couple of months or face having to buy a new machine to get the upgrades. Like anyone and anything else in these rougher economic times universities have been hit hard. Scrounging together the money is about as easy as looking around for enough lost change to make $400.00.
From our perspective, the upgrade package (which is an option) was created as a courtesy for existing JMP owners as the original JMP is now discontinued. Keep in mind, the quality of the cut does not change.
Regarding the cost–if you can, please take a moment and research linear motion tables on the web, what we have been able to engineer is phenomenal for the price and remember there are two of them involved in this device.
Like all of our offers, if the timing is awkward, please give us a call and we can always work something out. From a manufacturers perspective, it would be completely irresponsible on my part to inventory these kits. We try to make 3-5% over our pre-orders but they are often sold after we commit to the run. This is not necessarily how I like to do business either, but it is the reality for small businesses in this banking environment.
Thanks for sharing your comments, I hope this helps a bit.
John
John,
Thanks! You guys have always had top-notch customer service, keeps me coming back for more, (ok, ok, the tool porn is what brings me back, but ya’ll are nice, too)
Dave
I’ve ordered the upgrade kit for my JMP. I’ve worked with linear bearings and I can already “feel” the improvement. I agree with John that the saw will perform equally well “as is”. I view the upgrade as more of a “creature comfort” in that perspective, but it will make the saw effortless. I think it is worth the cash to upgrade. What I really need is a lesson in clamping on the table. I confess, I tend to put larger pieces on it since I have been working on projects with larger piece requirements, and when I have tried to do small pieces I’m a bit lost as to how to get the pieces clamped tightly and the cuts “dead on the money”. I know that with all of the testing done on the saw there are many very ingenious ways to do what you want, but it would be really valuable to me to have a 20 page “quick guide to clamping” for the JMP based on your accumulated knowledge. I prefer to focus on my project rather than thinking about how to set up a clamp for the piece I want to saw (you see I am really mentally lazy) – I multi-task all day and want to only think about ONE thing at a time in my shop….I don’t want to try to remember what someone has done in a video or in a posted picture. I want to be in my shop and pull out the quick guide, pick a good choice and go on with my project. I think this is a really great idea the more I’m thinking about it…..sorry – got carried away with that..
Food for thought…
Dennis
John,
First let me apologize for my absence. Secondly, I have to agree with Dave in that somehow my wallet has been decimated. 😮 😮
It really amazes me over and over the incredible products you are able to bring seemingly out of thin air that no one else apparently can even envision much less produce. You and Michael are really a blessing to this world.
Fred
Dennis; Let’s do this–give me specific details of the stock you are cutting (john@bridgecitytools.com) and we will replicate the cut here in front of the video camera and post the original question and our solution on the JMP forum. Hopefully this question will be answered but maybe others will have a better solution.
–John
Dennis,
Next week I’ll be receiving the loan of the “prototype” rails form those two wizards in Portland and over the course of the rest of December I’ll be documenting my review of the assembly process, the benefits in relation to the cost, and the engineering of the upgrade kit. I throw in a whole bucket worth of pennies/thoughts of how I feel it (the upgrade kit) would effect my work on the JMP either at home or in my shop. ( At home I’m starting to work on some jewelry size projects where in the shop the projects tend to be larger in scale) That being said on the “jewelry” size projects I have in my mind to work on – I have been playing around with some “small object” clamping methods and in the course of the JM-P Jointmaker Upgrade Kit – “Review” I’ll be detailing some of those methods.
Roger
John,
I have happily placed my order for the table/bearing upgrade. I’m sure you’ve been taking some “heat” about price and fairness from some of those who bought the first model. The way I see it is that you have a successful product that you could have easily kept making the same way and still would have had many orders, but I for one am thrilled that you keep trying to make every product the best it can be, and have made the older version upgradable. So please never stop trying to find ways to make better tools!
Thanks, Rutager
Rutager; Thanks.
–John
Rutager – clearly you have too much money. I’d be happy to help you out with that: why don’t you purchase an extra JMP (with linear bearings) and send it over to me? It’ll help out your wallet, BCTW, me, my woodworking – everybody wins!
Waddaya say? John has my shipping information.
– Peter
Peter,
You’re not the first one to suggest that my buying someone else tools is somehow better then me buying me tools. Since this has been told to me more than once, it must be a good idea, so why don’t you go sit by your mailbox and wait and see if anything shows up!
It’s not that I have too much money(I’m a blue collar city worker) it’s my charm, wit, and looks that are keeping the ladies away from my wallet lately! Leaving me to drown my “sorrows” in sweet, sweet tools!
Anyways, I have it under good authority, that Sharon is going to get you a JMP-v2! Darn it, I let the cat out of the bag again! Well, you know the drill, act suprised when you unwrap it.
-Rutager
What is the cut off date for ordering? Thank you.
Cut off has been extended to the first week in Feb because we failed to account for the holiday season–for which we apologize.
–John
PS: We will have everything correct on our website next week.
So – do you guys not do holidays at BCTW? Sounds more Grinchy than Clausy…
– Peter
Rutager,
I must say that I am a little perturbed that you are claiming MY charm, wit and looks as I am the original fugggitaboutit when it comes to the ladies. 😮 😮 😮
Luckily, as do you, I also drown my deep sorrows in my wonderful tools. Of course, I also have my pups and they NEVER talk back to me and ALWAYS agree with whatever purchases I feel that I need, you know like right now. 😮 😮
So, where, oh where is my beautiful palm brace and drilling jig?????? 😮 Without them I start to drop into severe depression and start thinking bad, horrible thoughts like “Stanley”. Arrrgggggg
Fred
Fred
Are we still going to see the CS-12 this week?
Maybe not–waiting on info regarding the graduated blades.
–John
John,
Thanks for your reply. To be honest, I don’t have a specific example. I’ve used the saw mostly for cutting miters using the wooden trap jaws and I did devise some top down clamps to help hold the pieces from moving. I put 80 grit sandpaper on the face of the trap jaws and set the blade to the lowest rise setting, turning the crank 1/4 turn per cut. This seems to hold the piece ok. I was cutting 6″ wide pieces of walnut that were about 5 ft long for box sides.
I’ve tried to hold a 1″X1″ piece about 4″ long, rip sawing it the long way, but had trouble holding the piece. Again, I ended up holding it down from the top to keep it from moving. I also put some stops along the sides of it, clamped to the back fence for support. this time I was cutting white oak.
I’m sure there are very easy and repetitive ways to hold various cuts, but I have not figured them out yet. I probably need to watch your videos a few times critically and would pick up what I am missing. Just some general pointers would help me out I think. An example would be: “put a stop against the back fence and hold the piece against it rather than try to clamp it down” as example. Some pointers like this would be good “general guidelines” for me to follow.
If I’m making sense and you do have some of these, I would be interested in them. Although I haven’t attempted to use the saw for this yet, I do plan to cut some very small pieces (for a ship model) some time also.
Thanks much,
Dennis
Darn! I logged in and seen you said it was going to be posted on your blog yesterday.. I understand that it’s just the nature of the business as it is with mine.
Dennis;
The JMP (all versions), much like a chop saw, is not adept at rip cutting and here is why;
First, it is the nature of wood grain and the nature of rip teeth (square faced) that conspire against efficient rip cutting on this tool. It can be done as you have found out, but it is slow. Basically we are asking the saw to do something it was not designed to do.
When we refer to rip cutting here, we do so in the context of joinery. Tenon cheeks and dovetails for example (technically rip cuts) may be good uses for the rip blade if you have many to cut. Actually here, we use the crosscut for everything.
With a crosscut blade, the sawdust is forced to the left and the right and then down. With the rip blade, the sawdust from the cut is pushed into the gullet necessitating frequent cleaning.
To be sure, small rip cuts are incredibly smooth, so are crosscuts. But just like on a table saw, rip cuts are nowhere near as efficient as crosscuts.
I will work on how I would hold a 4″ long 1 x 1 for ripping…
John
Thanks John,
Don’t take too much time away from designing our next tool though…..
By the way, will there be a selection of scales for the new CS tool, and perhaps a long scale? More for your money you know…3 tools for one so to speak. I LIKE this “black chrome” stuff. I REALLY like the way it tarnishes (it doesn’t)!
DJ
“By the way, will there be a selection of scales for the new CS tool, and perhaps a long scale? ”
So that would mean that in addition to the three 18″ scales, there would be a choice as an “accessory” – a set of three 24″ scales?
or an addition of one 24″ scale to the three 18″ scales, with the other two 24″ scales being an option.
Just voting for and trying to clarify.
Roger
.
I’d like to see some black chrome mixed with some burnt orange. I don’t think it could get more sexier then that.
Roger,
Sorry, I thought the blades were 12″. I guess they aren’t. Again, good news.
“Sorry, I thought the blades were 12″. I guess they aren’t. Again, good news.”
Opps, I checked the earlier blog on the subject, your right!
Wishful thinking on my part I guess.
So where I said 18″ …….fill in 12″
and where I said 24″ ……..fill in 18″
roger