Drivel Starved Nation;
Our Skunk Lab is full of tool parts that are being boxed and will soon be on their way to our fulfillment facility. Soon, you will be able to make sliding dovetails completely by hand. Bunch of other stuff too!
I spent last week and four days this week putting our HP-6 Tapered Sliding Dovetail Kit through its paces. The results are stunning – the image below is 3/4″ thick Ash and the joint is 7″ long.
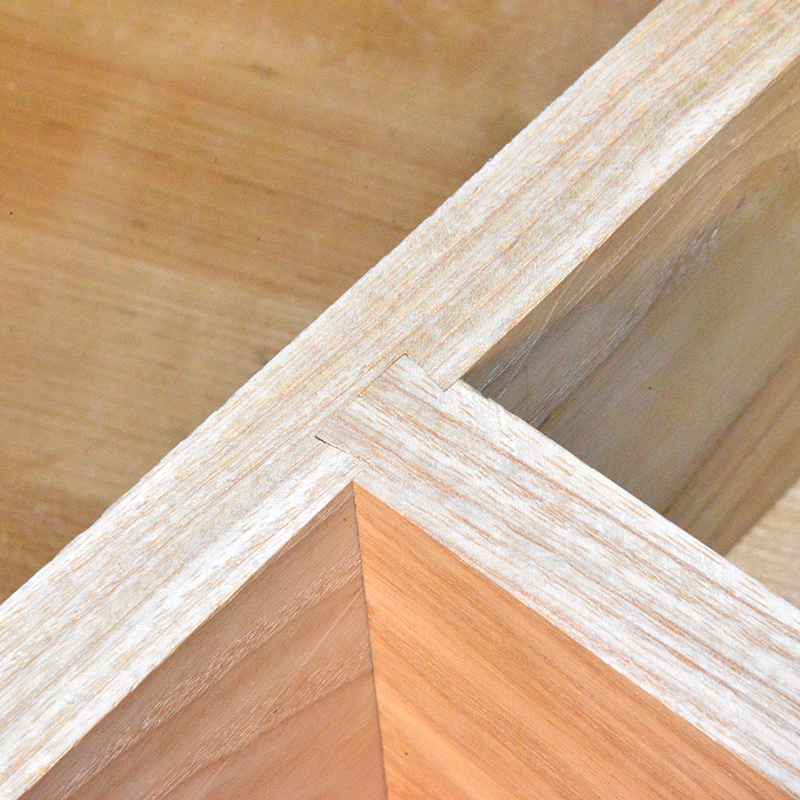
So far, I have made tapered sliding dovetails in Brazilian pine, poplar, ash and walnut. All were 6-8″ in length, and all were tests. Before I take you through the process here are a couple of caveats;
This joint is a compression joint and there is no “one setting” answer when making this joint in different woods. Before you begin any project, you have to make one practice joint! This will tell you where the taper starts to lock so you can make the necessary adjustments prior to cutting your project pieces.
In one of my tests, (Brazilian pine), the plane jammed on me half-way through cutting the female dovetail. I completely freaked out until I discovered what happened. It turns out, side cutting end grain in spongy ring porous woods the blade clamp can be/is insufficient – it “sucked” my side cutting iron INTO the wood and jammed. I suspect it was a combination of the iron dulling or the depth of cut was too deep. Either case, if it happens to me, it will happen to others. So, I modified my plane body by putting 4, 5-40 threaded holes in the body of the plane. The set screws not only fixed the problem but made the sensitive blade adjustment MUCH EASIER! If you are comfortable drilling and tapping holes, you can make this mod yourself. If not, we will do it for you for free. Not all of you will need this mod – those that purchased new HP-6 bodies with this kit will have the mod. For those of you who are planning on purchasing the HP-6 FX body (they are in production as we speak even though we have not opened the pre-order window) it comes with these threaded holes. In a follow-up blog post, I will detail the hole locations and the drilling and tapping and details for sending us your body.
Every cut for tapered sliding dovetails is across the grain creating a small amount of tear-out on the exit. Each species is different, but after all the joints I have cut I have determined the most expeditious way to handle this issue is to make your stock a tad bit wider than you need, not only to clean the edges, but it makes the “timing” of the joint SO MUCH EASIER! When Michael gets back from yet ANOTHER vacation, we will film a complete video tutorial and my stock will be anywhere from 1/2″ to 1″ wider than my intent. When done, I will trim the components back and it will be dead perfect. And one last thing; if you follow my instructions, you will have a joint that is almost impossible to take apart if you whack it home. For some projects this is desirable, for others not. You need to understand this before you get crazy with the dead blow mallet.
Lastly, the images below were shot during ALL of my joint making tests and feature different woods and whatnot. Don’t freak out because they are not a pure sequence in one species or you spot an inconsistency – the upcoming video tutorial will be perfect. In this tutorial I am assuming that you are using two separate HP-6 bodies, one for the dado and one for the dovetail cuts. Let’s get started…
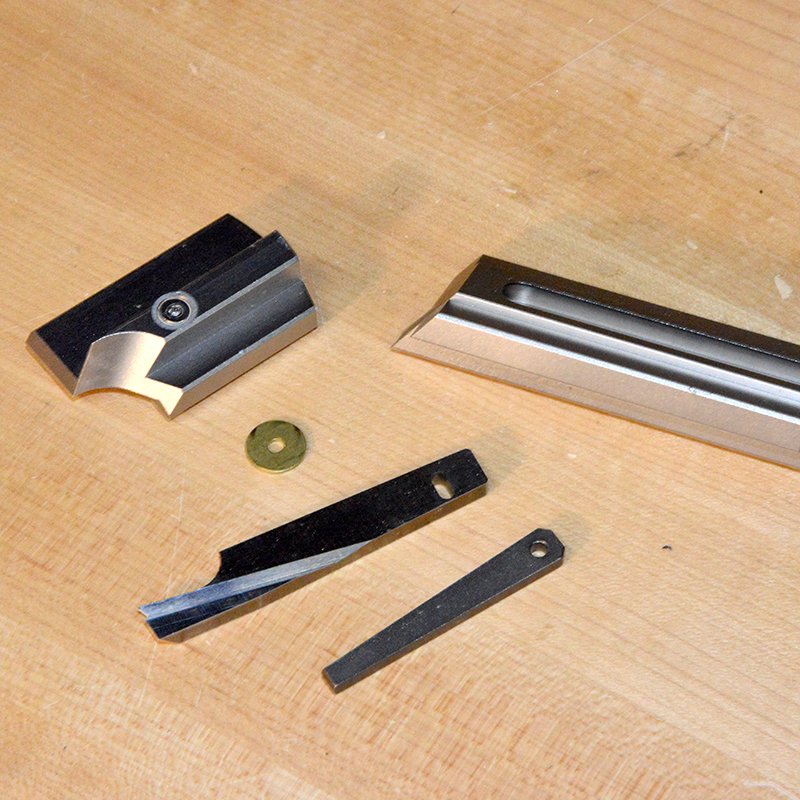
The dovetail kits consists of front and rear soles, the iron, wedge adjuster and a shim washer. This washer is required because the iron is adjusted laterally and the body of the HP-6 was designed to accept two widths of irons. The washer prevents the iron from falling into the narrow iron slot in the plane body. The wedge adjuster is helpful during the initial blade adjustment.
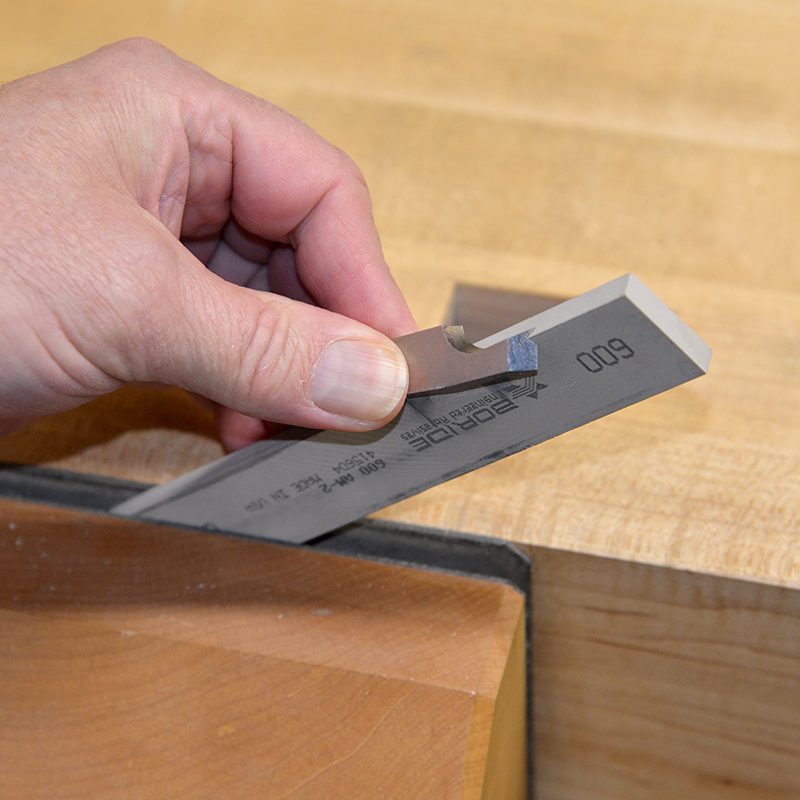
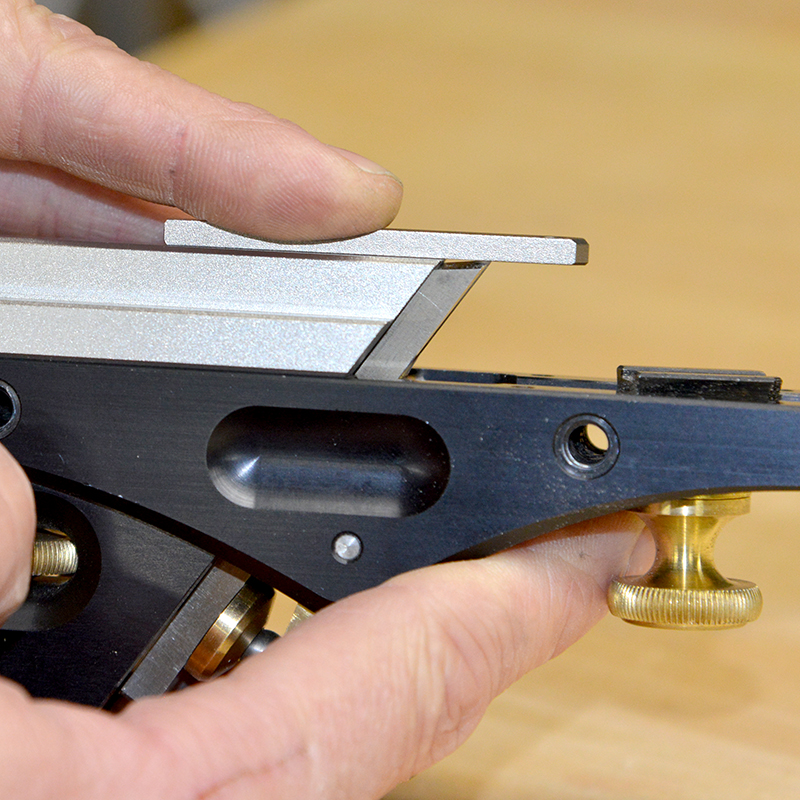
This is the easiest to sharpen iron I have EVER sharpened! I am using a 600 grit square edged slip stone in a vise.
Here’s a pic of the body mod and the shim washer in place;

You must use a wide iron to align the rear sole. (If you don’t have one, a piece of .250″ x .875″ and a minimum length of 3″ of hardwood will work.) And yes, this body is pre-mod.
With the wedge adjuster resting on the sole bottom, advance the dovetail iron so the tip is a hairs width below the sole surface.
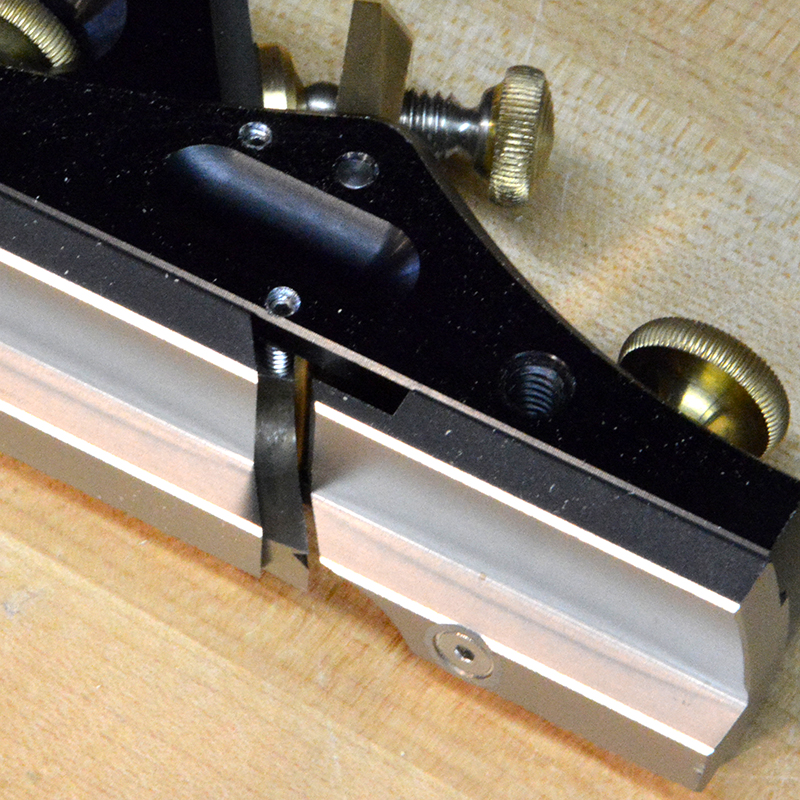
When assembled, the initial throat opening is about 0.020″ – cross grain shavings easily clog the throat.
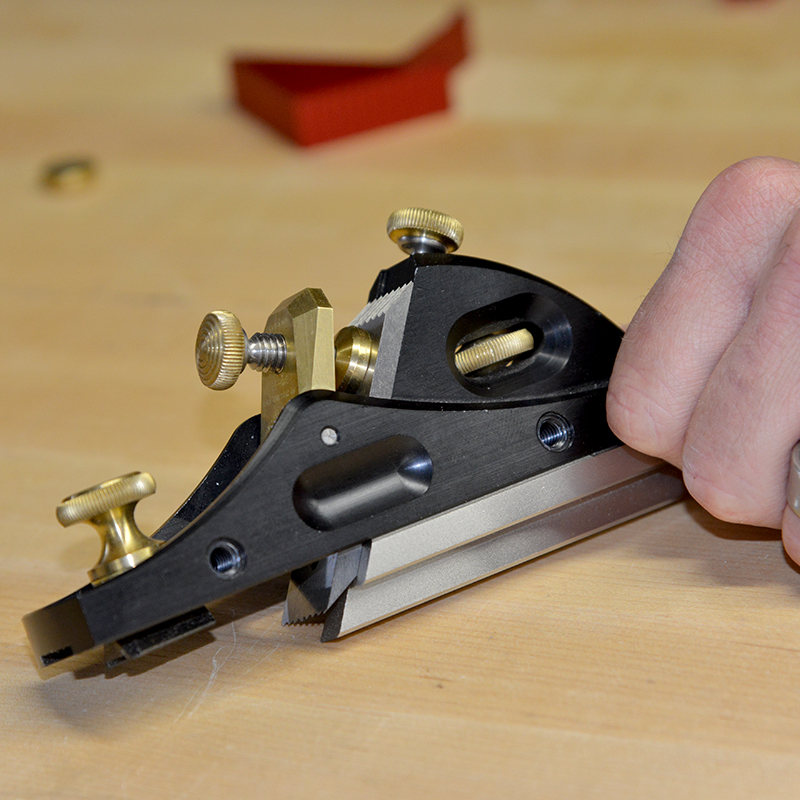
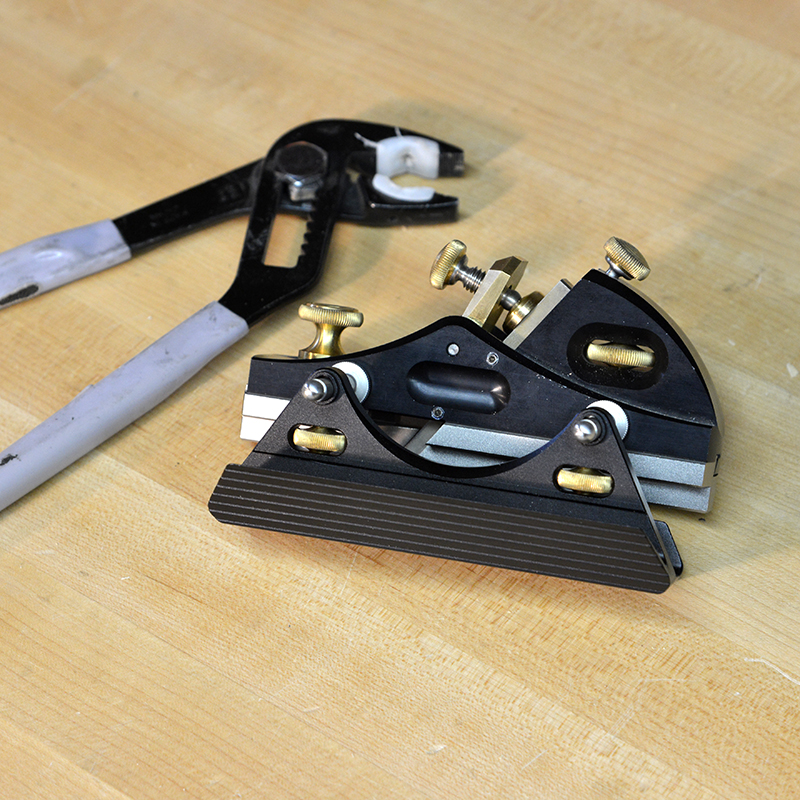
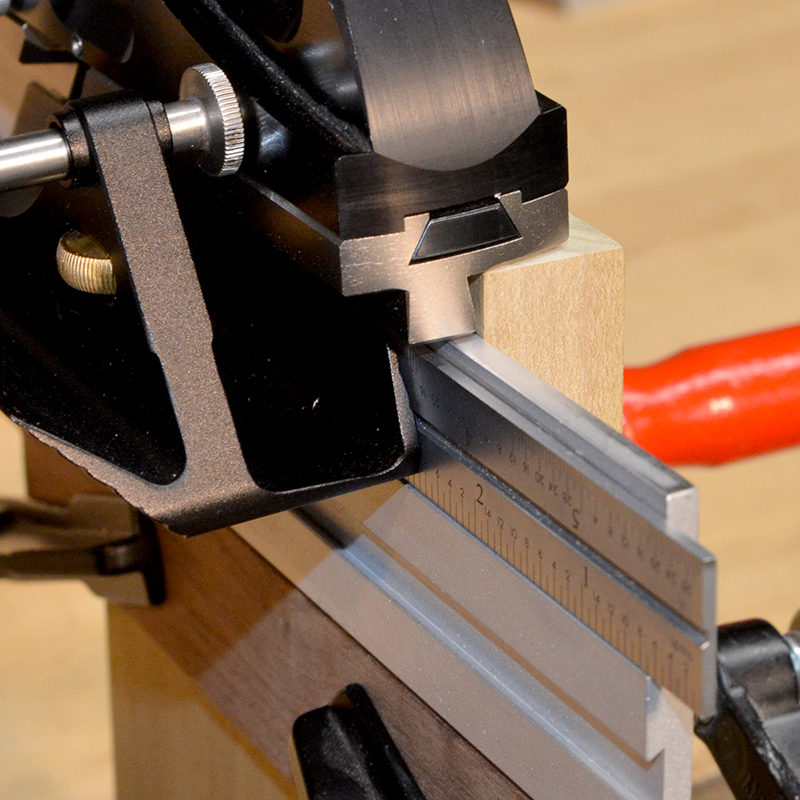
Here’s the HP-6 with fence attached. I always use soft jaw pliers to tighten the fence posts to the body.
This system requires that the male tapered dovetail be made first. Here you can see that the taper guide is hung from the stock end. Notice the little piece of wood that protects the aluminum guide, I hate it when my tools look like crap. In addition, you can see a strip of anti-friction tape – this stuff is awesome. Lastly, please note that the you must locate the end of the taper guide because you will repeat this exact same setup for the other side. This is important to keep your male dovetail centered – this system works off of center lines.
 .
.
Properly setting the fence is crucial to do the least amount of work. The fastest, easiest and most repeatable way is to trap a 6″rule or the DSS-6 blade between the taper guide and and the fence on the plane.This must be done with the rear of the sole on the WIDEST portion of the taper guide directly above the end of your stock as pictured.
Take many light passes because you are cutting the shoulder and the dovetail face simultaneously. Your shavings should almost be effortless. If not, adjust your iron. The success of your efforts relies on this one very important step. I concentrate exclusively on keeping the sole of the plane riding on the endgrain surface of the stock and not rocking the plane from side to side which will trash your shoulder cut. Also, with light cuts you minimize tear out. 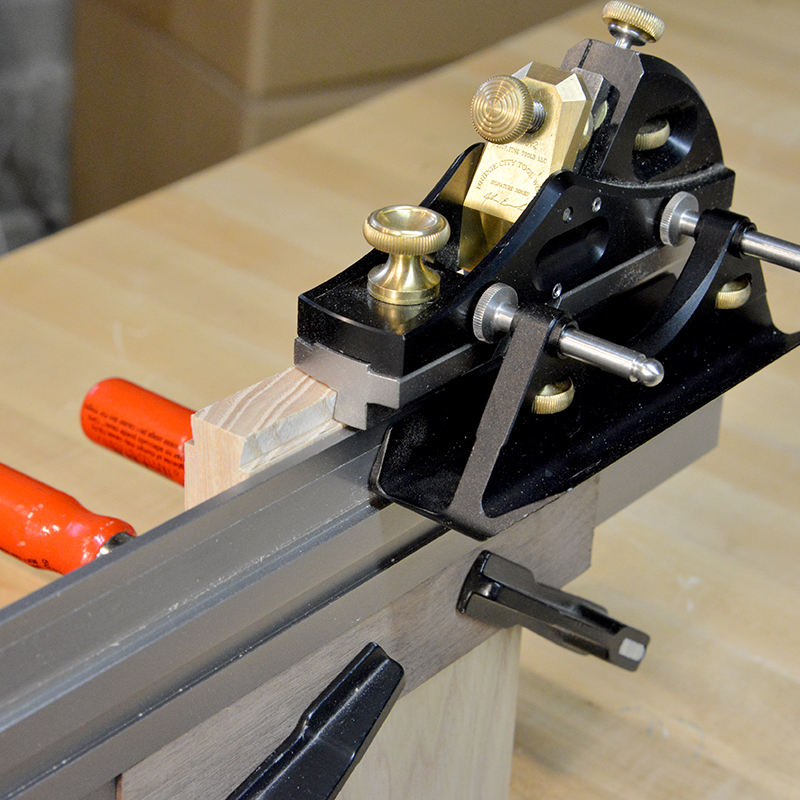
Doing work this fine was fun. 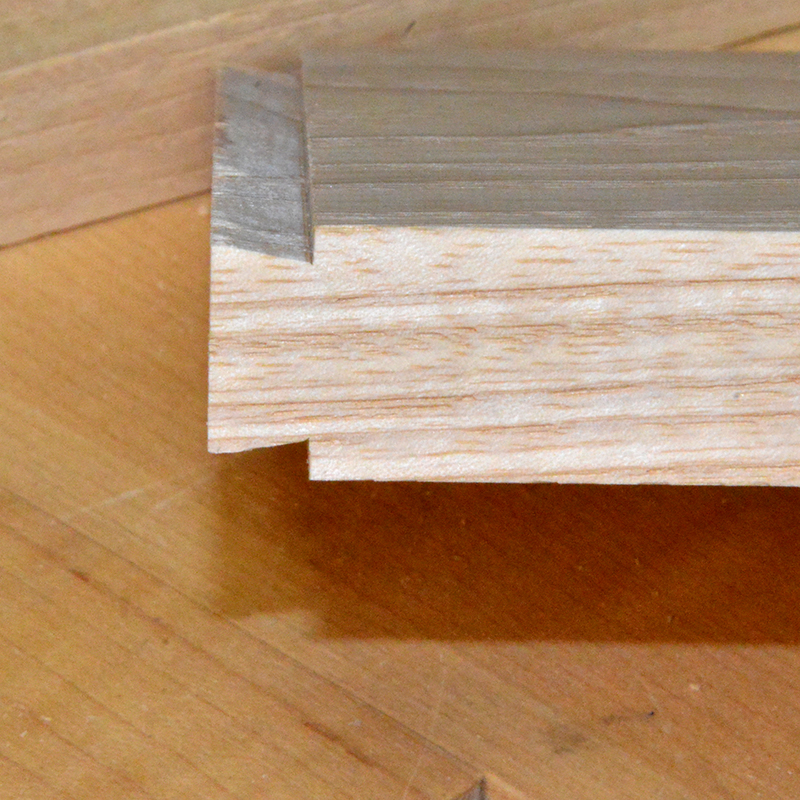
The shoulder cuts are perfect if you take your time to keep the plane steady as you can see here – and nary a torn fiber! 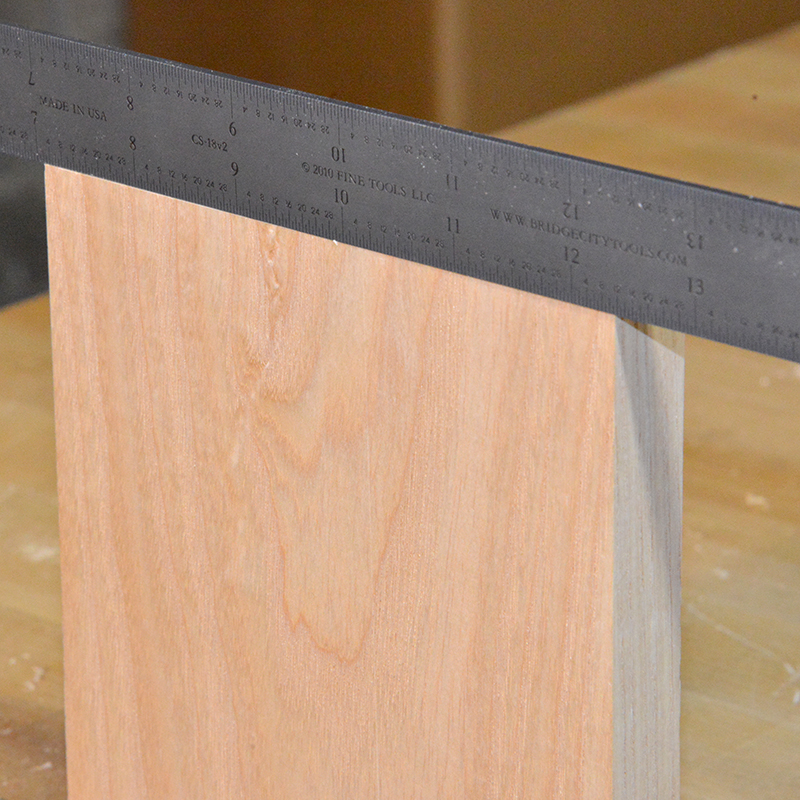
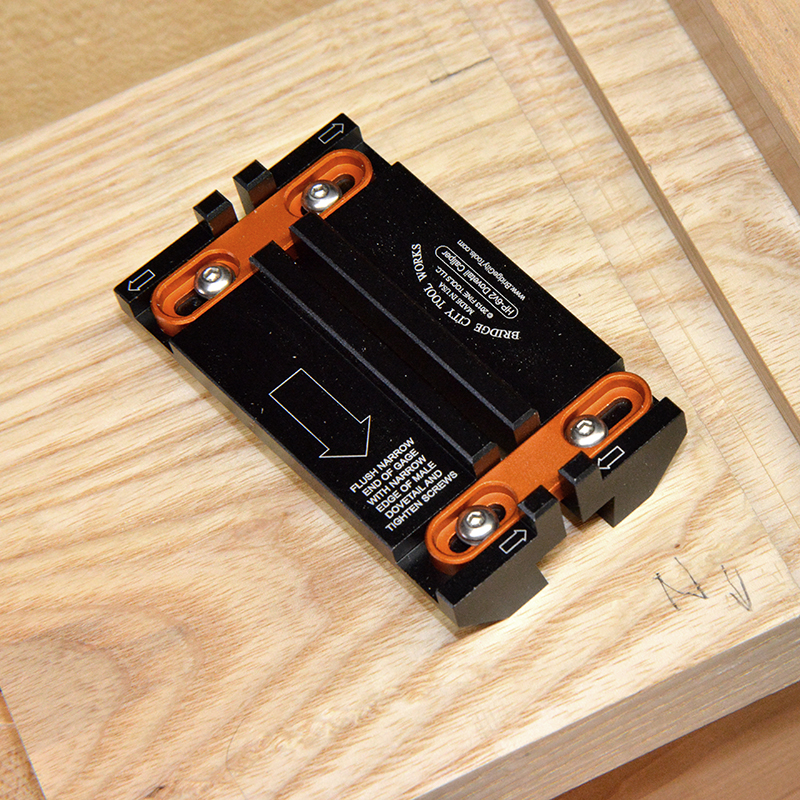
With the test male joint complete, it is time to use the dovetail gauge which will tell us the dado size required to hog out the waste of the female dovetail. (We want the dovetail plane to only cut the “ears” of the female dovetail.) Clamp this to the NARROW end of your dovetail. Through lots of trials, I recommend that you set the narrow end of the gauge approximately .750 from the narrow end of the male dovetail. This is for your test joint only. If you find your joint won’t slide together as close as you like, you make an adjustment of the location of the dovetail gauge. To increase the width of the female dovetail, take a measurement further back. To decrease the size, take a measurement closer to the edge of your stock.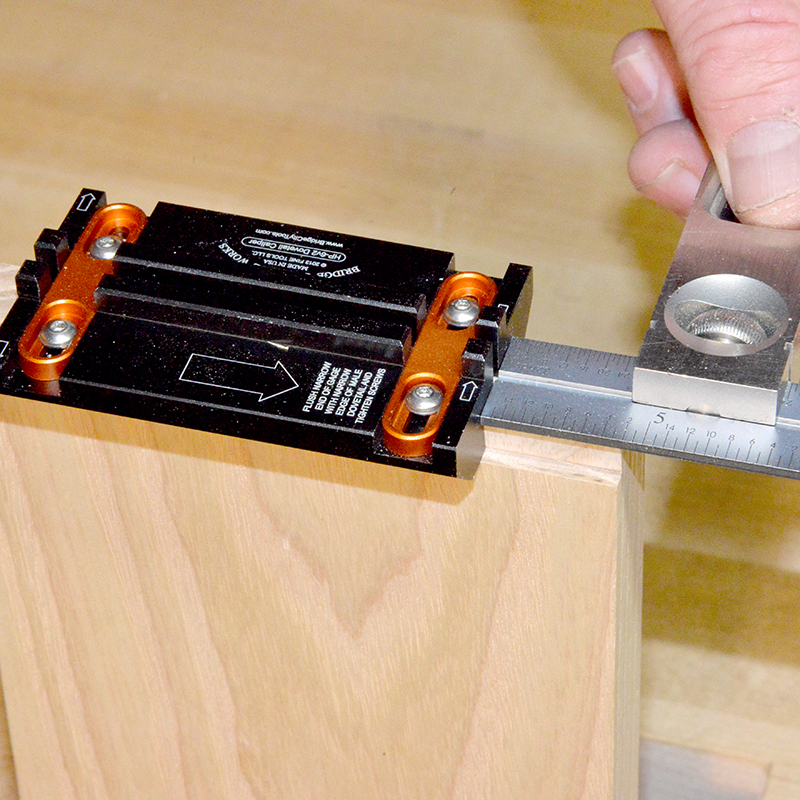
The male dovetail gauge is more complex than it appears. It is used for both determining the dado width required but also as a guide for cutting the female dovetail. Measure across the flange to determine your dado width – in this example the dado width is 0.585″. Write this number down so you don’t forget it.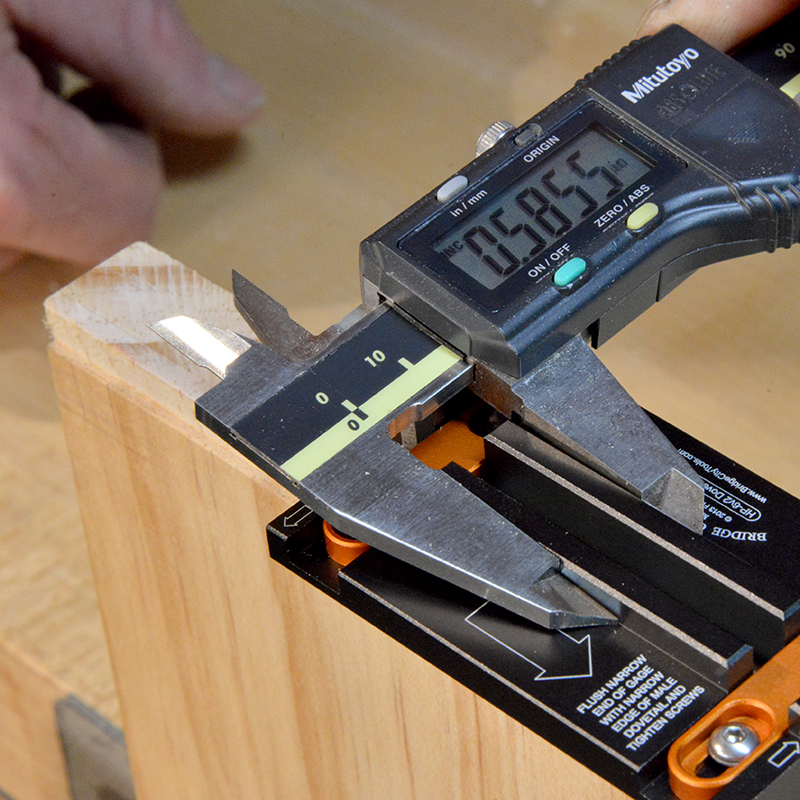
You can cut a dado width of 0.585″ precisely on a centerline with the 1/2″ HP-6 Dado Kit in two set-ups. But first we must set the depth skids to match the depth of the male dovetail. Here the skids are loose and the assembly is ready to be placed on the depth gage. Please note the cutout in the gage for the iron and scoring cutter.
The depth skids are now firmly locked in place.
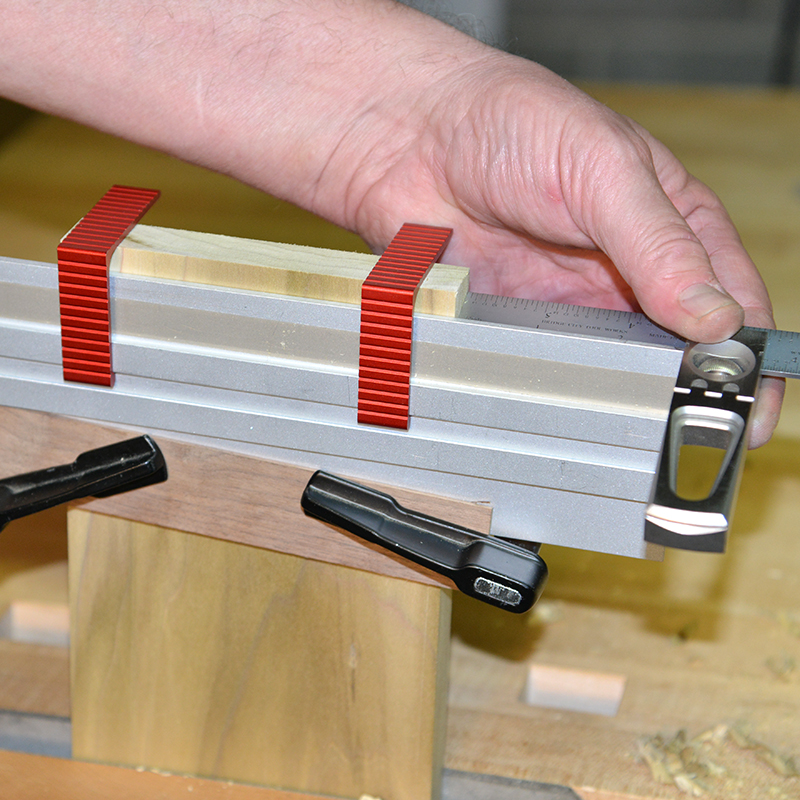
The layout of your stock should show a centerline and an additional 1″ offset line.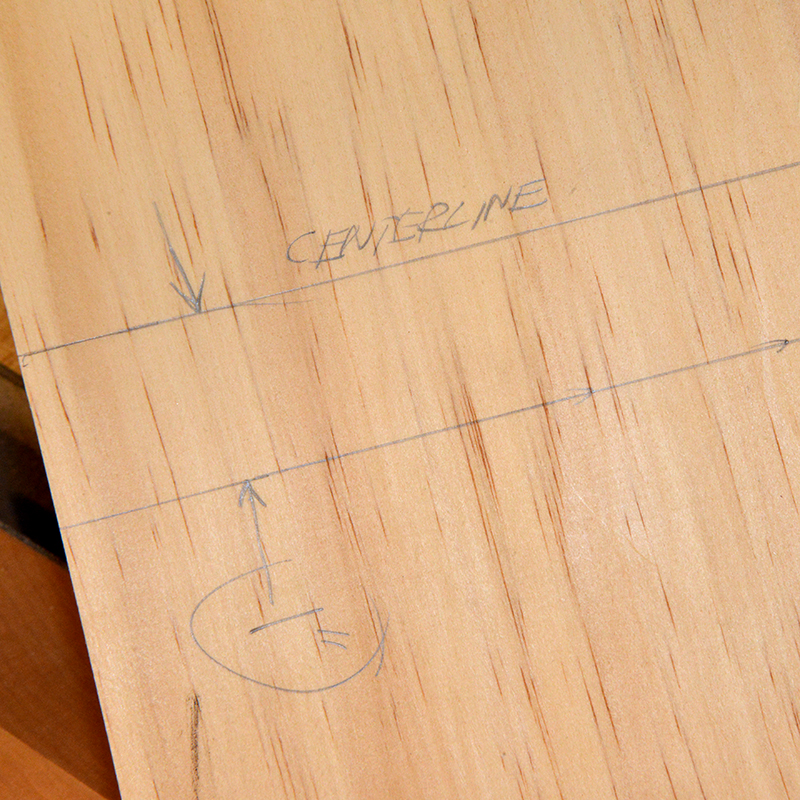
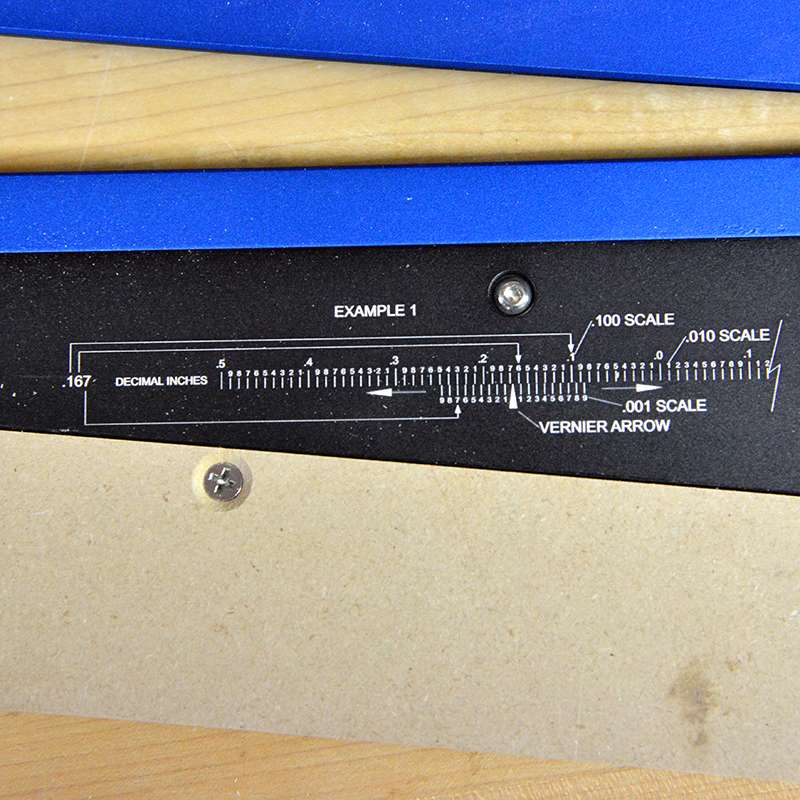
I believe you will be hearing a lot more about this adjustable fence – it allows you to make adjustments in 0.001″ increments (or 0.01mm in the metric version). It is an incredibly useful tool in many shop applications.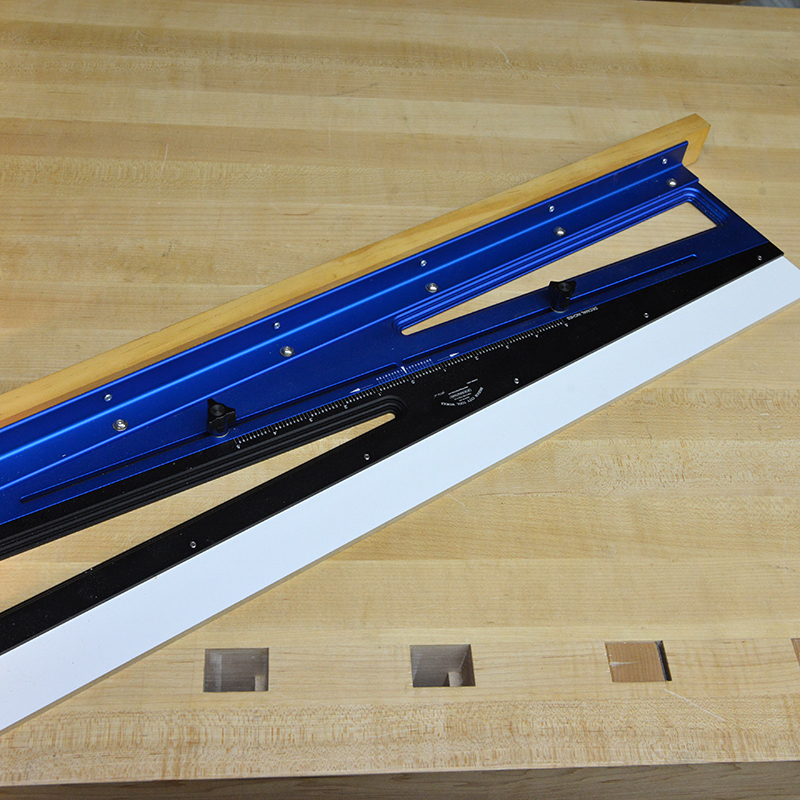
Set the Vernier Scale to ZERO.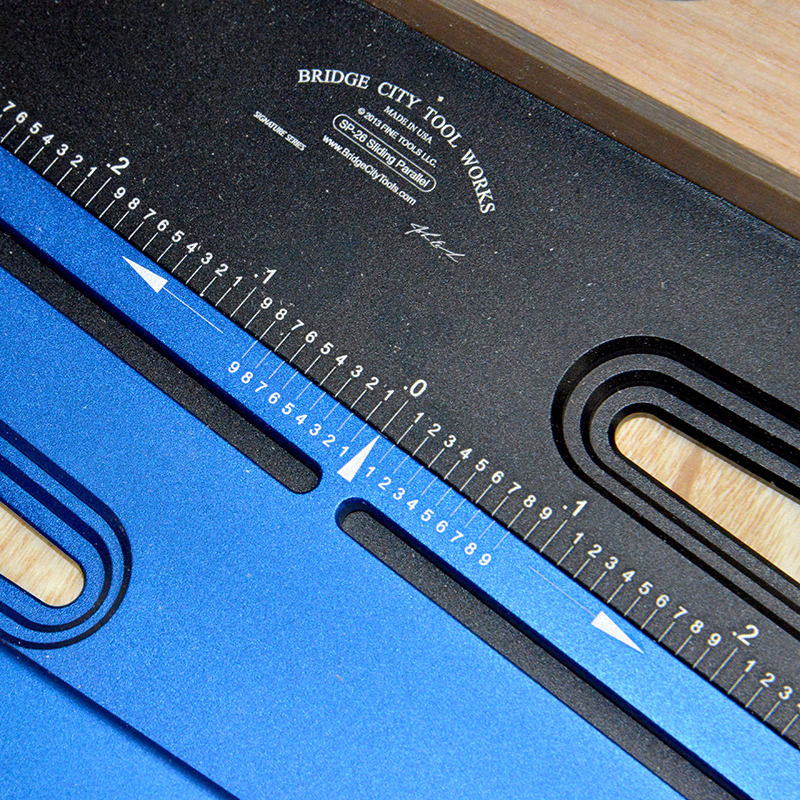
Clamp the fence to your stock and pinch both to your workbench top as I did here. The fence should be aligned exactly on the 1″ mark, the vernier set to ZERO. Remember the dado width of 0.585″? Here is how you are going to keep it centered on your centerline. Since the dado kit will remove 0.5″, we need an 0.085 adjustment. Loosen the lock knobs on the fence and adjust the fence 0.043″ from either side of zero. Lock in place and cut the first dado until it quits cutting. Keep it against the guide fence at all times. When complete, adjust the fence to 0.043″ on the OPPOSITE side of zero and make the final clean up. It is that easy.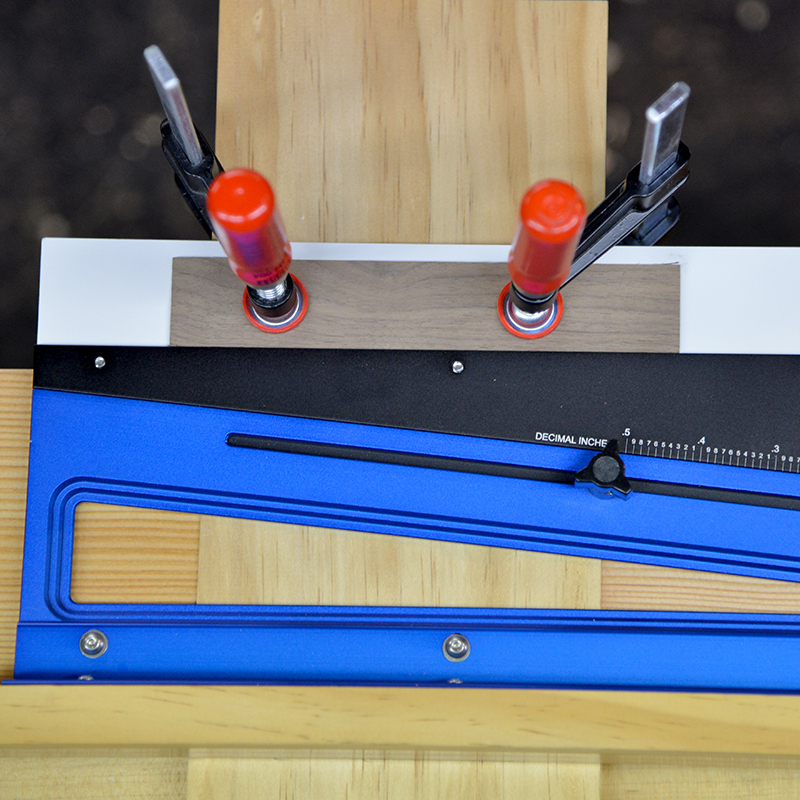
Don’t worry if you have forgotten how to use a Vernier scale. We have examples etched into the back of the tool.
Our dado kits cut very cleanly across the grain – depth of cut per pass was set for “easy”. Also, there is anti-friction tape on my shop made guide rail.
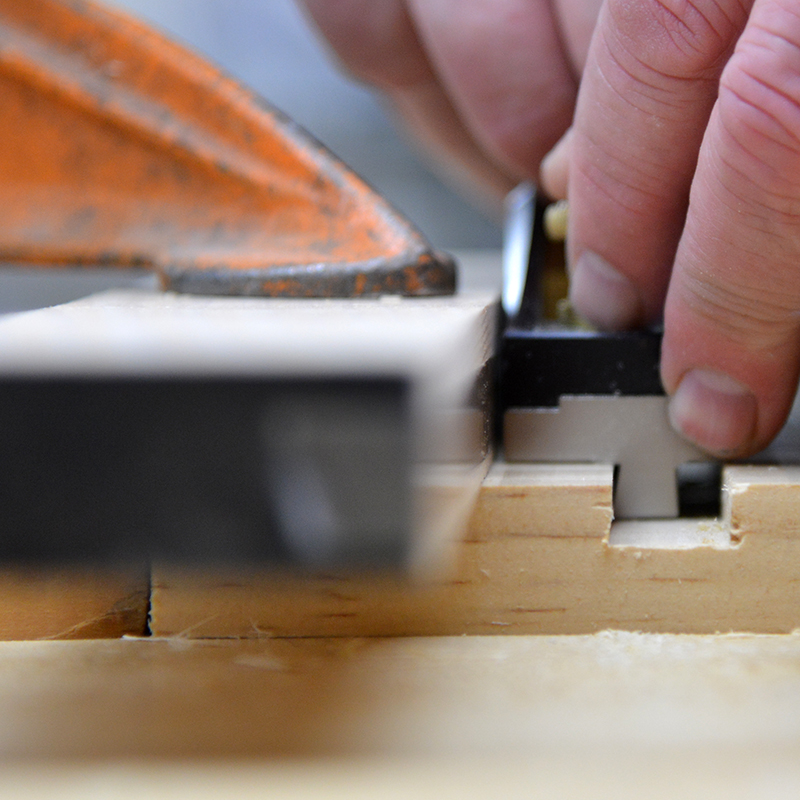
With your dado cut, place the dovetail gage in the groove. Note that the gage has a “Narrow end” and this should be aligned with the FRONT edge of your stock, not the back.
With the dovetail gauge properly placed, align a guide rail along the edge of the gauge and firmly clamp in place. You can now take off the dovetail gage, take the fence off the dovetail plane and start cutting one dovetail side until the body rubs against the rail and quits cutting. Then repeat the setup for the other side (you will need to flip your stock 180 degrees more than likely). You are now down with your test cuts.

Here you can see the “ear” of the dovetail starting to take shape.
The results are stunning. The shoulders of the female are glassy smooth and the edges are sharp.
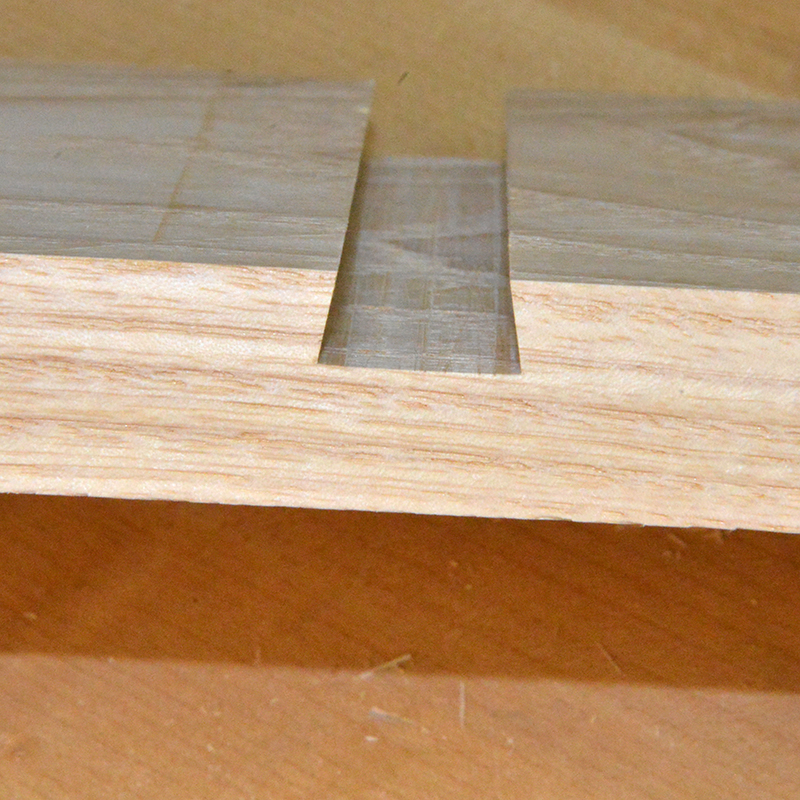
With practice you can now make a perfect 1/2 degree tapered sliding dovetail 7″ in length in under 1/2 hour completely by hand.

As mentioned earlier, we will do a complete video within the next two weeks so you can get a better sense of the cadence of the cuts and the setups. FYI, it took 20 times longer to make this post than it did to cut the joint.
-John
So, I’d love to be able to cut sliding dovetails by hand. Just out of curiosity, what would be the list of things I need to do that?
The system we are just releasing requires the basic sliding dovetail kit. In addition you need a minimum of one HP-6 mini multi-plane body (two is really efficient), and at least one dado sole kit (3/8″). This will allow you to cut tapered sliding dovetails as seen in this post.
-John
This is just so cool, John. It’s a very impressive system of components to make the job as fool-proof as possible. I can hardly wait to start playing with it. I’m sensing a bookcase in my future!
That fence system looks incredibly useful – I think it will play particularly well with my Festool guide rail system for routing and sawing. And the bandsaw.
Do you have a sense of when the new HP6-FX will be up for purchase and/or actually made? I’m somewhat loathe to drill holes in my HP6 bodies…
Great job. This is exciting!
— Peter
Peter-
The FX bodies are being made right now, I will see if we can open pre-orders next week, delivery in 3-4 weeks is my guess.
Lots of other things happening here right now – all good.
-John
Already in production but not open to preorder. John, are you loosening up on made to order for stuff like the HP-6***?
Whoa! 3-4 weeks!?! That must be a new BCTW record. Exciting!
And of course I’m looking forward to hearing about all the other fun things happening, too!
— Peter
Hi,
I am on auto order and wondered if I have to order the HP6FX or will I get one as part of the kit? It looks great.
Regards
Michael
Dave,
No, we are not changing – our HP-6 supplier hit a slow patch so I gave him some work.
John
Michael,
You will get the kit first and the FX body 3-4 weeks later.
-John
Are the plane fences available yet? How about the extended fence posts?
Alex,
I don’t know – and Michael is in Hawaii. I am just the concept guy around here.
I will post back on this a week from Monday.
-John
John,
I know you covered this at an earlier time, but a quick look through and I couldn’t find it. What are the min and max for stock thickness?
Thanks,
Rutager
Rutager,
There is no maximum stock thickness. There is a maximum dovetail height of 0.300″.
The minimum stock thickness obviously would be greater than 0.300″. Because the joint is a compression joint, if the “web” of the female dovetail is too thin, the tapered male will, with enough force, bend the stock.
That said, the system does allow for some flexibility – one could double-stick tape wooden shims on the bottom of the soles to decrease the stock 0.300″ joint depth.
Lastly, I would not attempt this joint without the 5-40 screw mod. After about 20 hours of cutting tapered sliding dovetails, I consider it mandatory in anything but the softest of woods. BTW, the HP6-FX Body will be released for pre-order next week with this mod built in.
Practice makes perfect and a sharp iron is a must.
-John
Okay John. Where do we all buy the soft jaw pliers?
I apologize in advance for the stupidity of this question, but once you’ve seated your sliding dovetails, how do you plane them flush without getting tearout? It seems that, no matter which piece you plane, you’re always going to be going across the grain of one of the pieces.
Do you just use a small plane and go really carefully? It would seem a shame to have to sand it after all that hand-tool work…
— Peter
http://www.mcmaster.com/#soft-jaw-pliers/=p4yx6d
Peter-
All four faces of a tapered sliding dovetail are cross grain.
After making a bunch of these over the last month, my suggestion is to make your stock 1/2-1″ wider than your need and trim to net prior to assembly. Solves all the tearout, and can provide you a way to “time” the joint.
-John
John,
Thanks. They’re already on their way. What a great company!
Mike
Let the fun begin! My set just arrived today. Unfortunately it’ll have to wait till Sunday to do a test run – got some travel coming up. Arrgh.
Now I have to wait for the HP6-FX – I don’t want to drill holes in my old-style HP6-v2’s…
The thing that really annoys me? I’ve run out of storage space in my tool cabinets. Curse you, John Economaki. Curse you!
— Peter 🙂
P.S. Thanks for the info on flushing the joint. I’ll probably just have to do a few practice ones to get the feel of it. Can hardly wait!
Hi John,
How is the wedge adjuster used?
I’m struggling with the need for such a narrow plane iron and the modification of the plane body to accommodate it. Wouldn’t it be easier/neater to just have a plane iron that is wide at the top and then ground at the bottom to the desired width? The washer and modification really seem to be like kind of an afterthought. Perhaps I’m not getting it.
I think this is such a cool idea for one of the most elusive prettiest joints in woodworking.
I’m very excited.
Thanks!
Bob-
The narrow iron is a concession to the capabilities of the manufacturer. Our first iron was wider but is more that two times more expensive than the narrow iron. It was cost prohibitive. We are talking about a $90 plane iron.
When you first place the iron in the plane body, you use the wedge to keep the geometry of the cutting edge to spec. Because we are laterally adjusting the entire iron this is crucial. With the 5-40 screw mod you simply tighten the iron to the wedge, and adjust the wedge up or down until you have a fine cut.
The 5-4 screw mod is not necessarily an afterthought, but it does indicate that we should have tested cuts with a dull iron. With the mod it is a complete non-issue. When the original HP-6 came out, this function was not anticipated. The new FX body coming soon addresses the issue.
The washer is the result of a mistake on my part. When we had to shrink the iron width, I completely missed the step in the body. The bottom line, even if we started this project from scratch, the washer would still be part of the kit due to the iron width constraint.
I hope this helps.
BTW, the new male kit is being run through the paces today.
-John
John,
I’m also having a bit of trouble figuring out the wedge adjuster; what side of the blade does it go on?
Thanks,
Rutager
The wedge goes opposite of the cutting edge.
One more under the category of “there are no stupid questions,” wider side up or down?
Thanks,
Rutager
Rutager,
Just as pictured here.
-John
This is a test.