The nutcracker pictured below is currently on display at the Museum of Contemporary Craft. I designed it in the winter of 1975 and made several to give away as holiday gifts – we had no money to buy anything. In 1977 it was photographed by Joe Felzman and was ultimately acquired by the Renwick Gallery in Washington DC. I have made several hundred over the decades and it is a fun project. Since the holidays are quickly approaching, I thought it would be fun to take you through this project so you can make it yourself.

TOOLS REQUIRED
Typical wood prep tools (Table, radial arm or chop saw, planer, jointer)
Wood Lathe
Drill Press
Router
Stationary Belt or Disc Sander
3/4″ Wood Threader Kit/Screw Box
1-1/2″ Dia. drill bit/hole saw
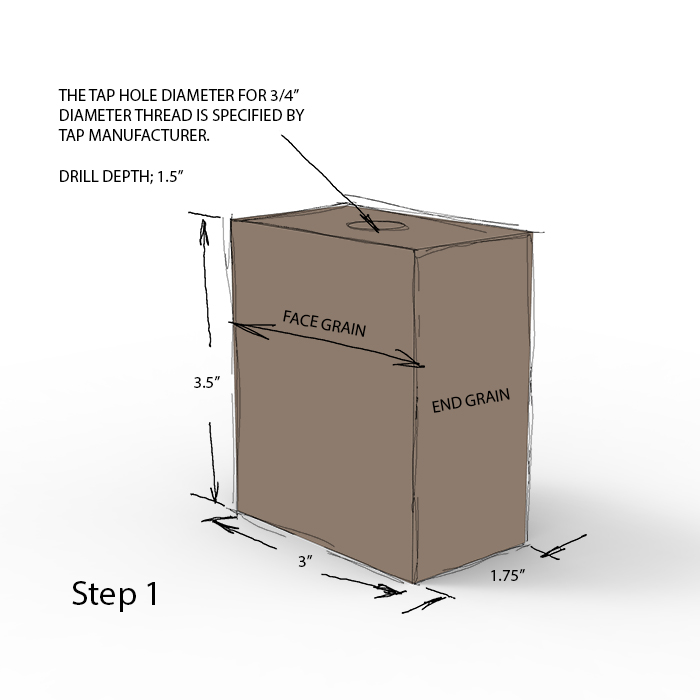
Your choice of material is important. Find the exact center of both ends. This is a cross-grain turning and I have ruined enough of these that the following steps are fool-proof. I would resist the temptation to make the screw and body of different colored woods – it will look like an accident.
I apologize in advance for the sloppy illustrations, I did these in an afternoon when I hit the wall on my latest project.
Pay attention to the grain orientation. Taping into end grain for wood threads is a no-no, all the threads have short grain for their base and will break free in short order.
___________________________________________________________________________________________________
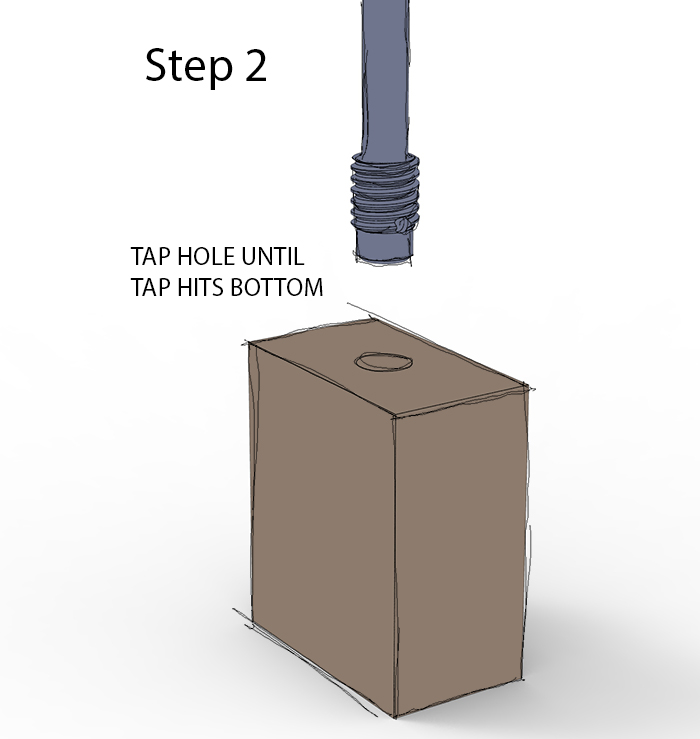
Tap hole until tap hits bottom. Don’t be a gorilla or you could split your stock in two. How would I know this?
You are tapping the hole now because if done after the body is turned, the neck will crack. How would I know this?
___________________________________________________________________________________________________
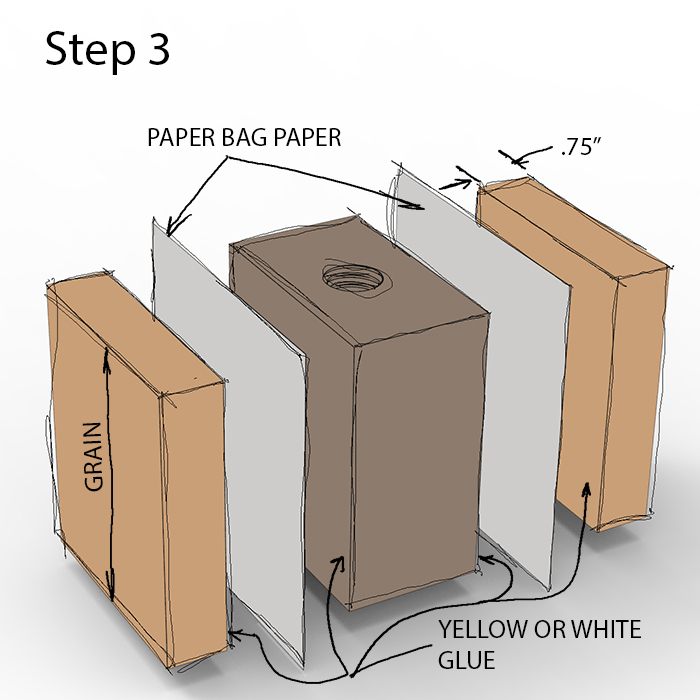
This is where you glue on scab stock to avoid chunks of the faces from ripping free. Make sure you have glue covering all of the wood faces.
___________________________________________________________________________________________________
Make a template (the colored area) using the guide below. The squares are .125″. Any 1/8″ material will do.

___________________________________________________________________________________________________
Once the clamps are removed, bottom out the tap on your blank. This will become the mandrel for turning using a chuck in your head stock.

___________________________________________________________________________________________________
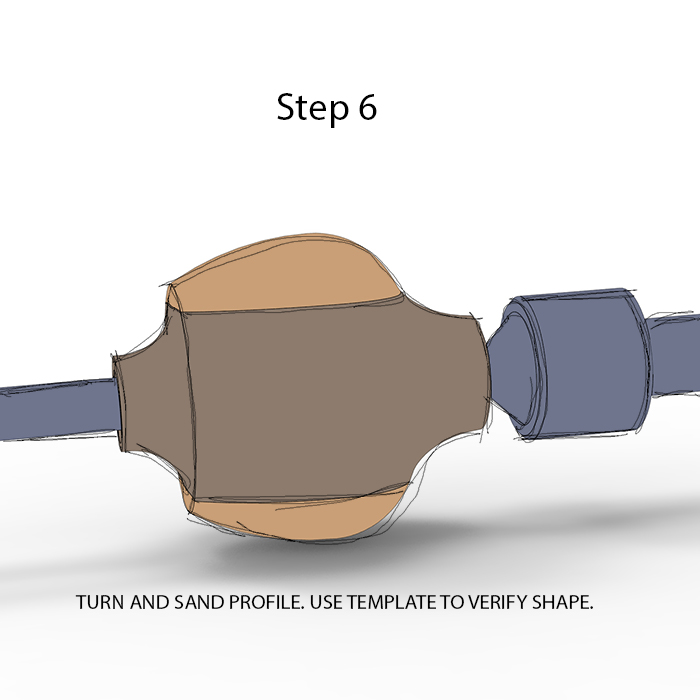
Turn until your blank fits your template perfectly. At this point go through the grits and completely polish.
___________________________________________________________________________________________________
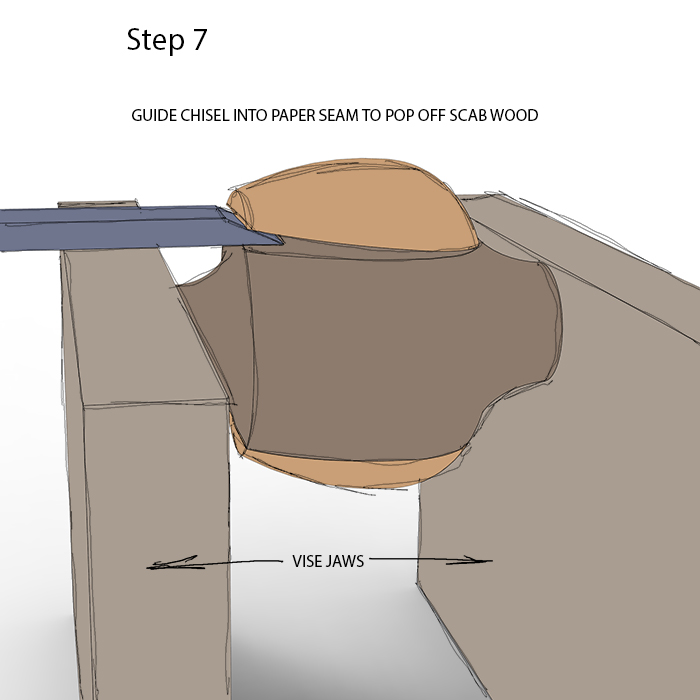
With your stock in a vise as show, the scab stock is removed by literally splitting the paper layer in half.
___________________________________________________________________________________________________
The two faces should be parallel and covered with paper residue. Notice how sharp all the lines are? You want to keep these hardlines throughout the project. Anybody can mush a hard line, but keep them sharp! Clamp to your drill press and drill the hole as shown. The hole is slightly off center visually and is closer to the top… about 0.050″.

___________________________________________________________________________________________________
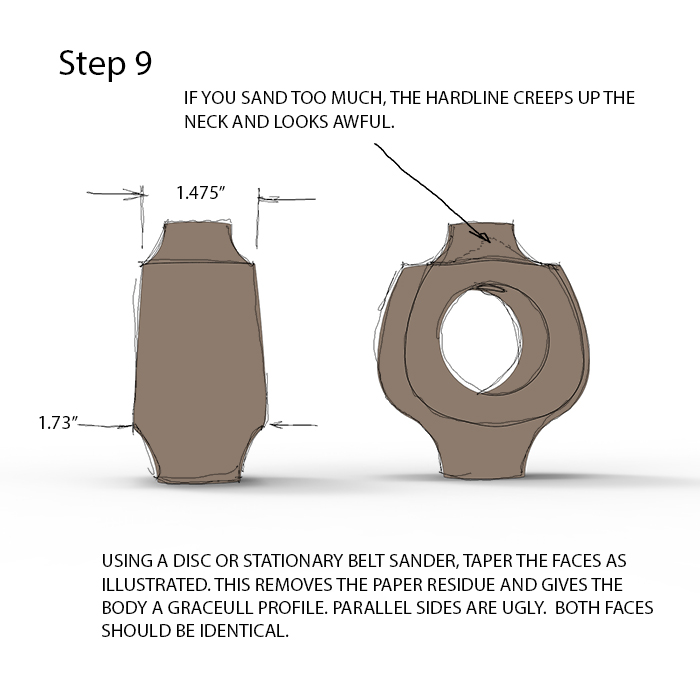
With the hole drilled, you can taper the sides which also removes all the paper residue. Be careful on the belt sander, there is not much wood to sand and it tapers FAST. Both sides should be tapered the same. If you sand too much, the hard line at the top of the body gets warped and looks like crap. How would I know this?
___________________________________________________________________________________________________
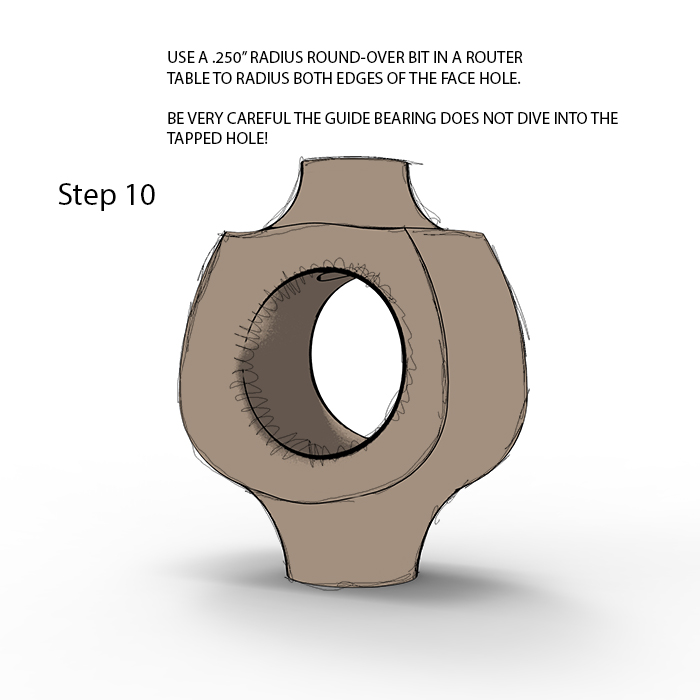
Using a 1/4″ round-over bit in a router table, radius the hole edges. WARNING! Do not let the guide bearing fall into the tapped hole. If this happens, you will need to scrap your body. How would I know this?
___________________________________________________________________________________________________
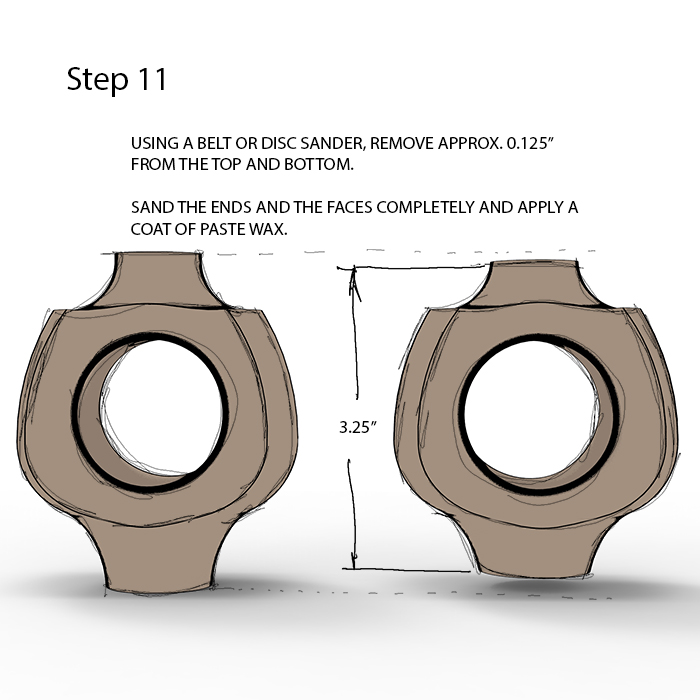
Here you will remove any remnants from the lathe. Shorten the top and bottom as shown (I used a belt sander but you can ruin your body really easy this way). Once it sits flat, polish the four faces and coat with paste wax. There should be no sanding marks anywhere.
___________________________________________________________________________________________________
Time to start the threaded portion of the nutcracker. Use a matching wood and precisely turn a .750 dowel AFTER SANDING. This polishes the thread crests. You will then thread both ends. If you are lucky you will end up with a spare.

___________________________________________________________________________________________________
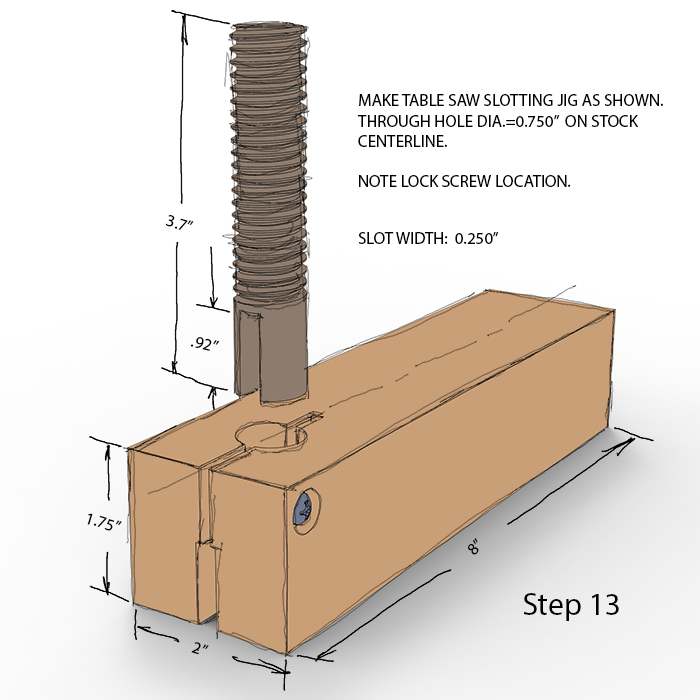
You need to make a jig for slotting the screw. This is what I used. Once built, slot away.
___________________________________________________________________________________________________
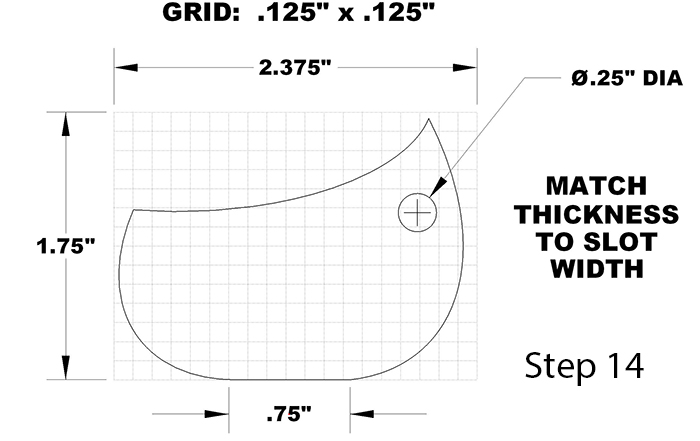
Here is your template for the handle or whatever it is called. I have always used a small piece of ebony for this component. Here contrast is a good thing. Don’t leave out the hole, it is an important visual element.
___________________________________________________________________________________________________
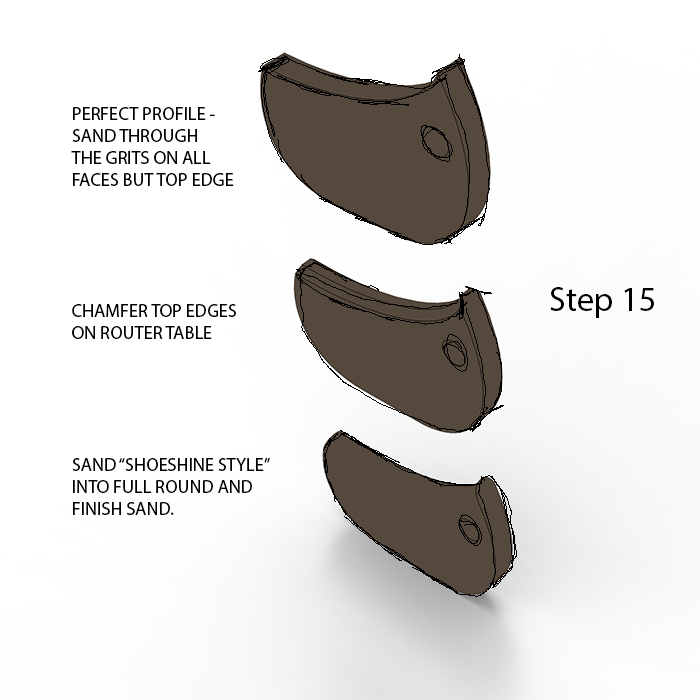
Once your blank is cut and free of all bumps, chamfer the top to make round over easier.
___________________________________________________________________________________________________
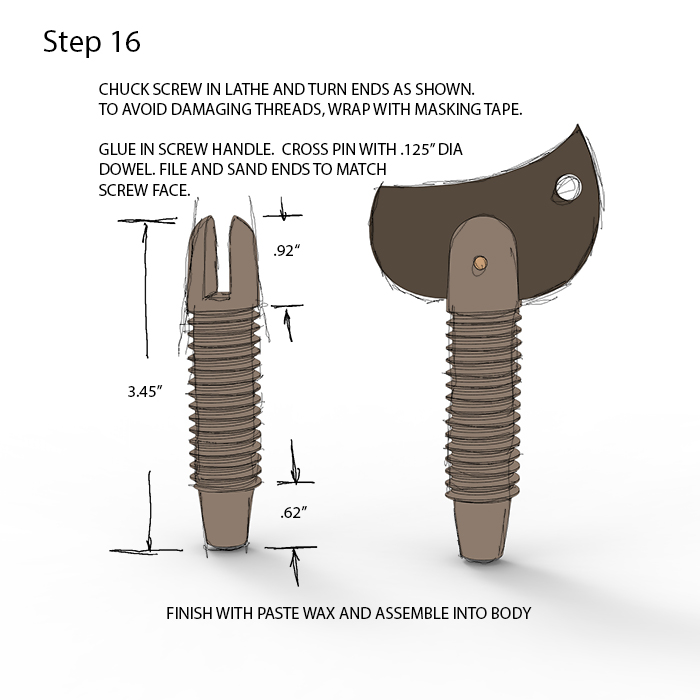
Final shaping of the screw is done on the lathe per the dimensions below. I had a soft-jaw chuck so this was easy, and I suspect you don’t so wrap the screw in two layers of masking tape to keep the chuck jaws from galling your wooden threads.
___________________________________________________________________________________________________
Regarding wooden threads, I had both a German screw box and the Beall threader that uses a router. I threw my thread box away. Jerry Beall is an old friend of mine and his threader can’t be beat.
I hope you give this project a try, they really come out nice.
-John
How to Build the Economaki Nutcracker
Thanks for a great project John! I’ve been looking for a reason (excuse) to buy a small wood lathe and this seems like a valid one. Very, very nice!
Thanks again.
Ron
Wonderful instructions, John. And I love the illustrations. Particularly the notes about the various design elements (holes, tapers, etc.). I would have enjoyed hanging around while you were zeroing in on the final design. It must have been a fun process.
Any tips on gluing the “handle” on the threaded shaft? I’m curious whether or how you deal with squeeze out – immediately, wipe off, or chisel off later?
Thanks again for sharing. Very inspirational.
— Peter
Peter, I always wipe off glue ASAP. The threaded portion is waxed, so it comes off pronto. Actually, it is easy and not a big concern.
A tight fit is the key here, with the cross pin it is permanent. I have an original that is almost 40 years old and it is solid.
-John
John,
What a cool thing to share publicly; analogous to Coke or KFC giving out their secret recipes!
What do you think about using the drilling jig for this? I haven’t had a drill press im my shop since a week after my DJ-1. I think that using the universal jaws on the DJ-2 and hanging a forstner through a bushing would work, maybe I’ll have to give it a try.
-Rutager
Rutager-
You need a backing board, but I think you could do it.
John
Beautiful old school photograph by Joe. Done without digital, without Photoshop…only film.
Love it.
Paul
John,
I was thinking maybe if you just left the one side’s sacrifical board on and drilled from the flat side? Now you got me wondering, of course I already have a bunch of projects I should be doing, although this one shouldn’t take too long, at least to get it to drilling.
-Rutager
Step #13- put into the bias arm and cut on the JMP?
That will work – you will have to pare the bottom.
Pay attention to grain direction gluing sacrificial pieces on, it is opposite of center piece. How do i know this?……
Isn’t learning fun! Did you rip a cheek off or just tear the crap out of it?
Anyway, send us a pic of your nutcracker when done!
-John
Tore the crap out of it. Will send apic when done.