Drivel Starved Nation;
Geez, do I have a bunch of stuff to report! But it will have to wait. Meanwhile, here are a couple of updates;
1) I have all the details for our excellent field trip to China this fall and I will post them before weeks end.
2) The parts for the CT-19 Transfer Bevel are done with machining, you can follow the progress here
4) The miter square run is back on track (we had some supplier issues). That’s good news.
5) Had a fire at my house, little damage, will report on this later – yes, it could happen to you.
6) Spent 5 days in the hospital 3 weeks ago. Not a fun experience. Will report on this later as well. (I am fine) And yes, this could happen to you as well.
7) I am now on month four of an idea that I am not sure will work. I am going to build a prototype and if it works, I will really be happy and I think you will be happy too!
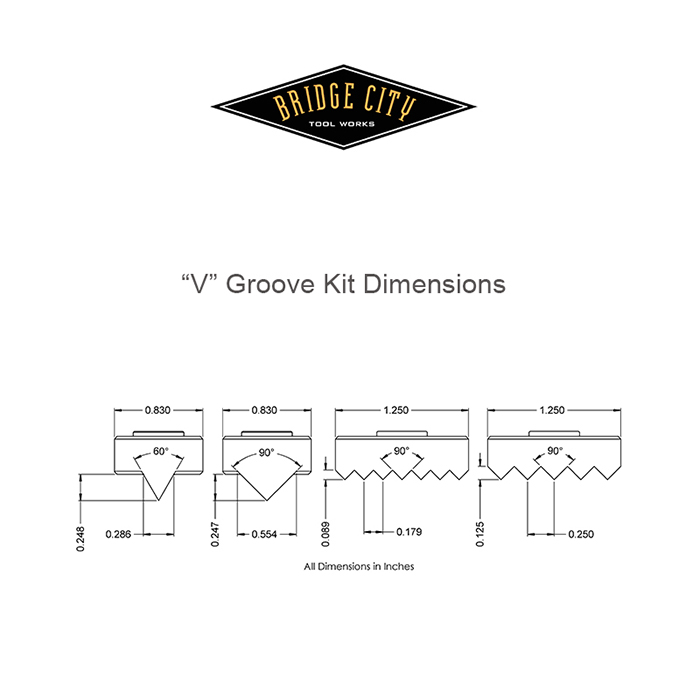
I love our HP-10 Foxtail Convertible Plane and this week we will open the pre-order window for the four-piece “V” Groove Kit. Here are a couple of images;
![]()
![]()
Notice the unique iron design? To sharpen, all you need to do is hone the surface at 30 degrees, no special hone required. How cool is that?
I’ve ranted about this before, but the lack of texture in avocational woodworking drives me crazy. From round trees come square edged stock that typically makes square edged, planar projects. By adding texture, you are adding shadows, and this almost always (when done well) adds interest. Remember, our eyes like to eat too!
Here are my thoughts on the four profiles in this kit.
60 Degree “V” Groove Profile
This profile does a couple of cool things. It obviously makes a sharp “V” groove that can be used as a design element or as a way to save your bacon when you have a seam that is not perfect – simply control the “V” groove depth with the depth skids and cut a “V” groove on said crappy seam to hide it. This is ironically called a “reveal”.
You can also make 60 degree chamfers or full equilateral triangle strips that can be used for inlays, or, grouped in sixes to make incredibly strong linear rods – think fly rods here.
I like the really sharp texture element this profile creates.
90 Degree “V” Groove Profile
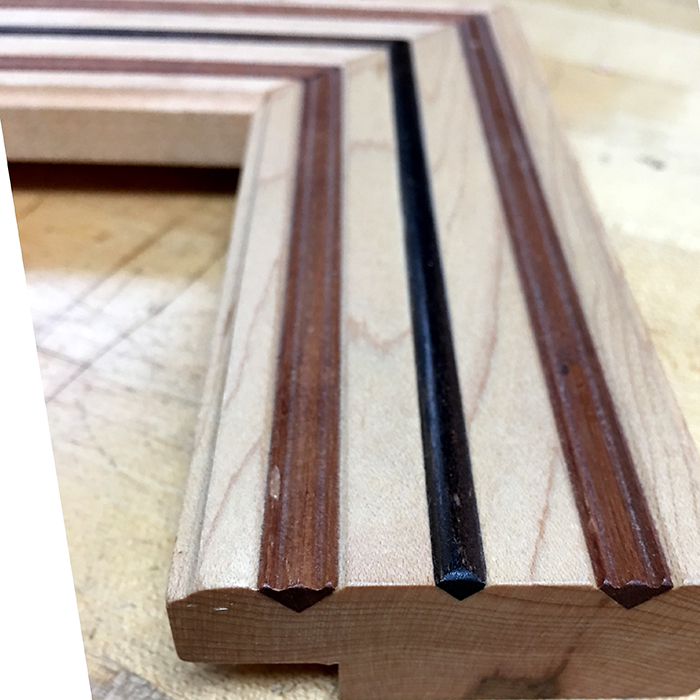
When used with a fence, chamfering is an obvious use, as are all the ideas mentioned above with the 60 Degree Profile. The coolest use in my opinion is to use this profile to inlay corner moldings into planar surfaces to add contrast and/or texture. I’s fast, fun, and as always, when done well, adds much interest. This beat up sample has been in our showroom for over a decade, but you get the idea…
The “V” Groove Texture Profiles
I will post some really cool ideas for these two profiles in the next week or so to show how much fun adding texture can be. Meanwhile, one use for either of these profiles is for indexed glue joints. I like using this joint in thin wood that is not straight. I hate using clamping cauls to straighten out warped material in a glue up. What I prefer is to offset the offending curved stock so they cancel each other to create a straight board. To do this requires either dowels, biscuits, (neither work in thin stock well) or an indexed joint using “V” grooves. The added gluing surface creates an incredible joint that you will never have to worry about.
All done without power, noise or the need for a dust collector.
More later!
-John
If the wood isn’t straight, how can the fence and sold register in order to make straight cuts of consistent depth?
Once again, very cool- planing profiles has to be the most enjoyable part of using handtools… and routers…blah, quickest, loudest and messiest way to ruin a project.
Like the engineering that went into just needing to hone at 30 degrees. Wondering if you’ve thought of making an insert for the HG-1 honing guide that would hold the HP-10 cutters in perfect square?
Best,
Rutager
Great question, a couple of simple solutions.
Depending on the length of the stock, sometimes one can pull the bend out of the stock with just the vise jaws. With longer stock, I have two pieces of aluminum angle that I clamp to the stock to straighten it prior to planing. They are clamped in place just below the bottom of the fence. One could substitute wood for the same purpose.
Make sense?
Yes.
However, to lget this straight (in my head), one more thing: my assumption was that the joint was between two equally curved boards that offset each other, for the purpose of forming a panel. Straightening both boards in opposite directions to mate the joint until the glue sets seems like it would require several extra hands, clamps, and/or cawls across the width of the joint.
Don’t get me wrong–the idea of manually “finger jointing” the edges of boards appeals to me greatly. I’m sure, as is often the case, I’m missing something.
Your loyal Doubting Thomas.
With an indexed joint, (and this really depends upon how thick and stiff the material is) and thin stock, the boards will self-align. If they become difficult, one might need cauls, but the end result is no mismatch of the surface.
I have often laid a curved board convex up across the corner of my bench and used clamps to bring the ends down to the bench surface. The mating concave down board might require a clamp in the center if it is really stiff, but with this setup, and only two hands, you can clamp the boards together convex to concave.
The whole point of using an indexed glue joint is to minimize the the work to make the surface planar, which can be substantial.
Thanks for the explanation. I think I was visualizing thicker stock than you’re talking about.