Drivel Starved Nation!
It’s always exciting when we have something new to share… which I suppose makes this post news. (I did that math all by myself – FYI)
Since 1983, (that’s 34 human years, but 311 tool maker years), we have been producing impeccably crafted bench tools primarily for avocational woodworkers. It’s been mostly fun, but not as fun as it could have been knowing what I know now…
Three years ago, I experienced a life changing happening in China that I cannot get out of my head. If you missed my original post, you can read it here.
What I learned over the previous three years is the enthusiastic joy the Chopstick Master™ has brought to people’s lives the world around is something I hope to duplicate with future offers from Bridge City.
I believe the thrill of using the Chopstick Master is not the pair of chopsticks (yes, they are beautiful and function perfectly), but the self-esteem boost one experiences from the making process. Learning something new is always its own reward (good and bad) but there is another aspect in play here that is noteworthy. And that is the power of gesture.
To make a pair of chopsticks takes about 15 minutes. Giving them away as a gesture creates a feeling that lasts way beyond those fleeting 15 minutes. It is simply about as good as one can feel about themselves. And it is contagious, as in Quality is Contagious™.
Last January I met with the lawyers that manage our patents and trademarks and we were discussing the improbable success of the Chopstick Master when one of them blurted, “What’s next, a gizmo to make pencils?” This unintended comment, meant as a joke, was simply a great idea in my mind. Why? Because I felt that making pencils would be 10 times more fun than making chopsticks! And having fun, is a big deal to me. I now love lawyer humor too!
I left on my annual work retreat in February and immediately jumped head first into the rabbit hole of pencil making (when the Muse talks you listen). I have been doing almost nothing since. So yes, your fearless Tool Potentate has yet again “bet the farm” on this improbable idea. It worked with the Jointmaker Pro and I sure do hope it works here…
The patent and trademark has been filed so here’s an overview of how Pencil Precision™ works;
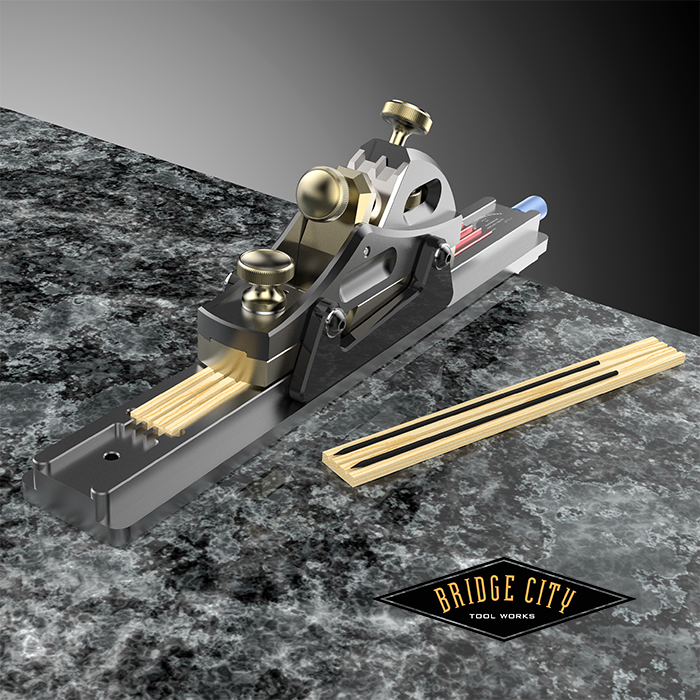
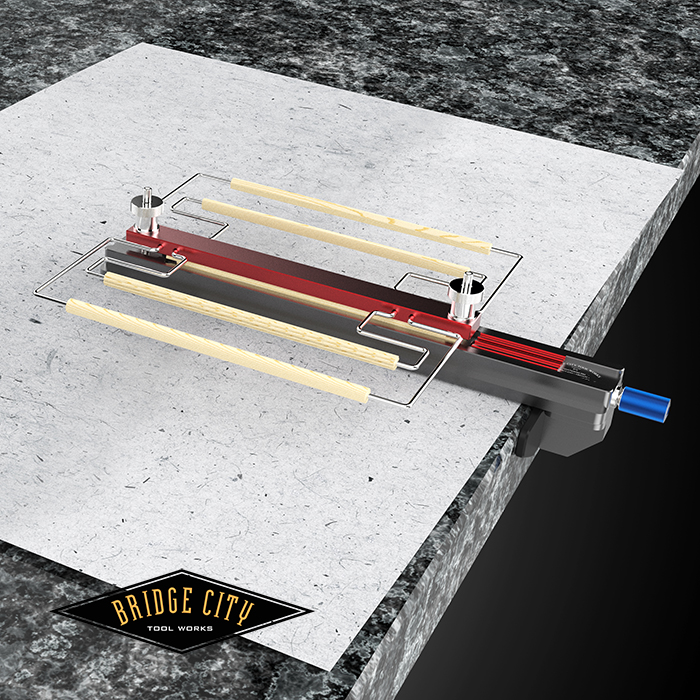
Using our venerable HP-6v2 Plane (any version with locking dovetail nuts), you attach the pencil groove soles, insert the iron and adjust for a whisper cut, attach the fixed purpose acetyl depth skids, and plane the supplied 170mm cedar blank until the plane quits cutting. This process creates two 1mm radius channels and dimensions the blank stock to exactly 4mm in thickness. Repeat this for the second blank. The blue knob tightens the red clamp jaw which freezes the blank in place. The unit was designed to work on a kitchen counter or workbench. This step for both halves is less than 5 minutes.
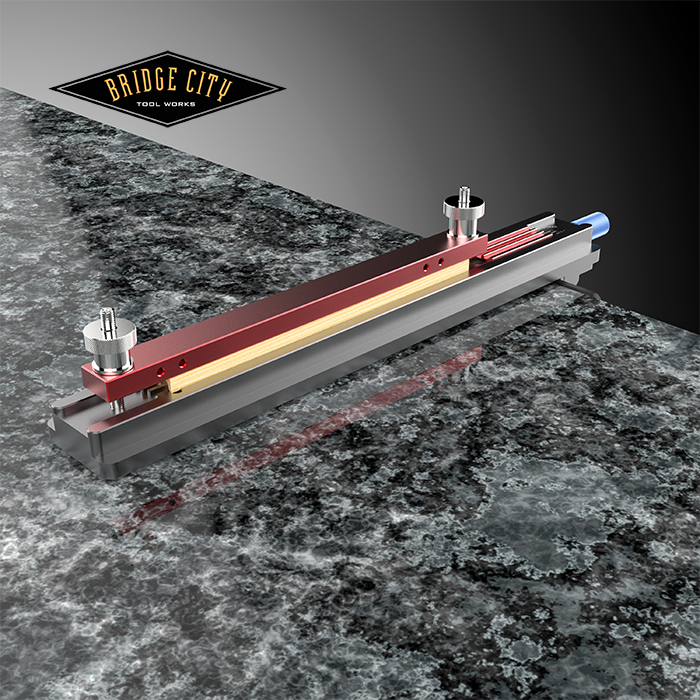
Once the two halves are complete, you put a thin film of wood glue on one side, position the 2mm dia lead blanks in place and use the fixture to clamp the blanks for at least 1 hour. No other tools are required (OK, a small hammer will help later…) but this device is literally a factory in a box.
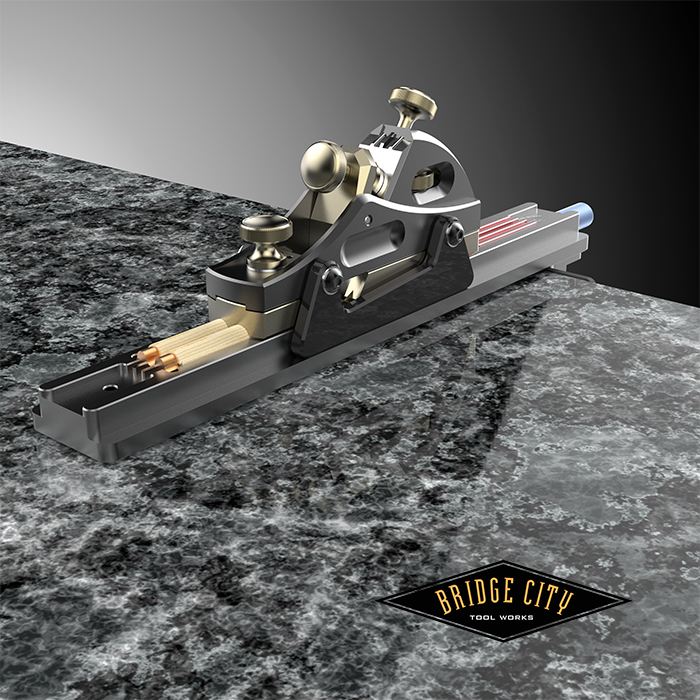
You next place the pencil sandwich back into the fixture using the orange index clamp pads. These keep the pencil blank centered while you plane 1/2 the diameter of a round pencil blank. All pencils shapes emanate from this round pencil blank. When the plane quits cutting (the depth skids control everything so you cannot screw up), flip the blank and repeat. The result will be two round pencils! Again, about 5 minutes for this step.
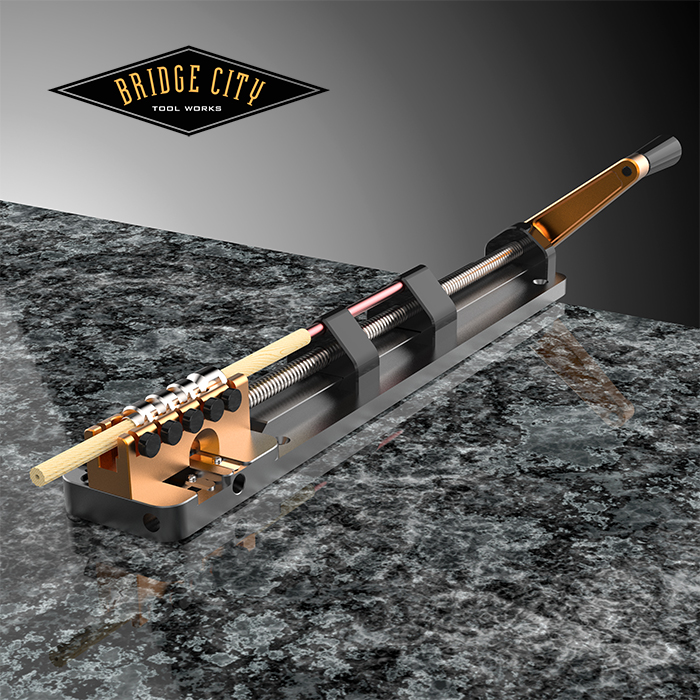
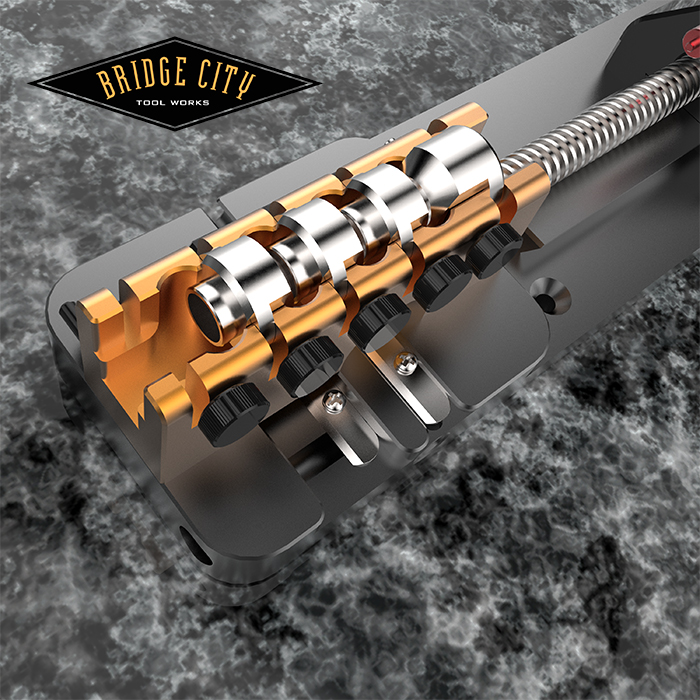
Next, you decide what pencil profile you would like to make, your choices are to stay with round (perfect for colored pencils) or hex, or beaded or our modified Reuleaux profile. In the image below, we are making a beaded pencil. Put in fixture and crank away. You are literally extruding wood through a series of progressive dies (think circular plane irons). The results will almost make you scream with joy the first time, the second and third… it is that much fun! This takes about 1 minute.
With a completed blank, you have to decide now how to finish your pencil. You can paint, or go natural, the many choices are yours. (I will post later why making a pencil out of cocobolo/ebony/rosewood is a stupid idea). With a piece of cardboard under the fixture, your paint set-up looks like this;
Painting will require at least 3 coats, so you need to plan accordingly. We will provide detailed painting tips (I have an airbrush which is awesome) but in the shop we are painting with a brush using acrylics and a top gloss coat. Once the finish is dry, it is now time to cut the tenon to receive the ferrule. This is strikingly easy for anybody regardless of skill. First, you put the pencil blank in the hole and lower the guillotine. Spin the pencil with the cutter engaged to score the shoulder. This takes 15 seconds.
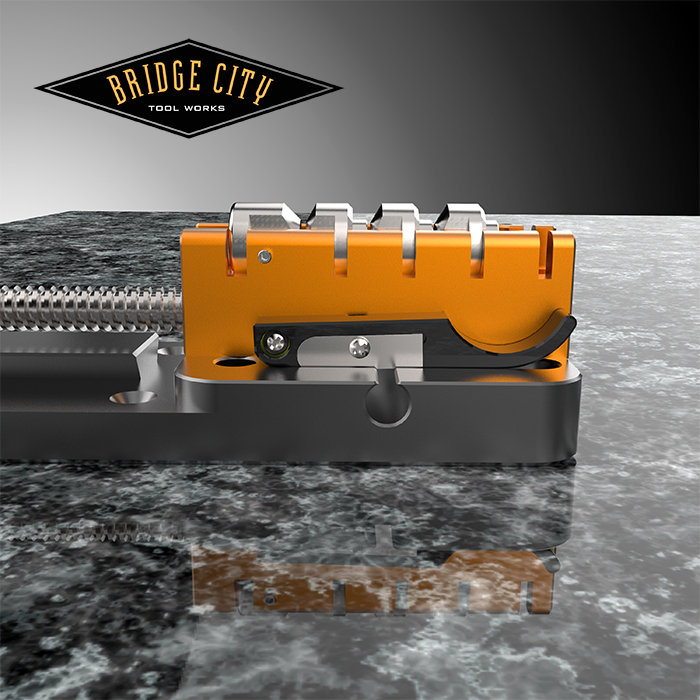
Once the pencil blank has been scored, you remove the excess wood by repeatedly pushing the ferrule end of the pencil into the hole at the end of the fixture, rotate and repeat. This shaves the pencil to the proper diameter. The other cutter you see is the built in pencil sharpener.
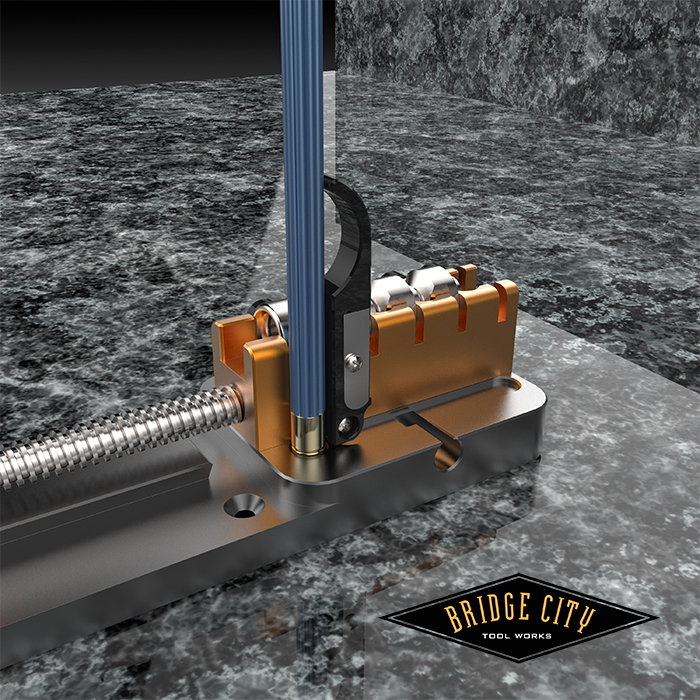
The supplied ferrules (we have not decided on all the colors yet, but we really like the champagne color, works for everything) are beautiful. Plop one in the the fixture, raise the guillotine to the fixed 90 degree position (no, the blade is not exposed, it just looks that way) and with the pencil resting against the guillotine and the orange body, tap the pencil home. Without this setup it is way too easy to get the ferrule on crooked. All that is left is sharpening and inserting the supplied eraser.
What’s not to like?
Yes, we have a way to identify the lead types and we will offer colored pencil leads for the adult coloring book market.
Imagine making a pencil for your child’s SAT test? Your grandchild’s first pencil? The gesture opportunities are endless. This “pencil factory in a box” can be enjoyed by your entire family on the kitchen counter!
I will give a report on the crazy way our contest was won in my next post. And, we are still working on pricing.
-John
![]()
I like the grey/gunmetal colored ferrule in some of your other examples.
I know I’ve seen pencils on “How It’s Made” TV show and despite seeing it in high-volume production it’s still amazing to see how many processes you have to set up for.
I’m going to have to try a few woods though – I have always found mesquite really nice for woodturning (easy to cut and leaves good shavings) and I hope that makes it good for pencils.
Never in a million years would I have figured out what any of those parts did that you showed in the clues.
Might be a good time to do a V2 of the jointmakers hammers?
Excited for the pre-order on this 🙂
Are the ferrules going to have an eraser attached or will there be an eraser-less ferrule option like a lot of artist’s pencils have?
We can do an eraserless ferrule and will offer it as an ala carte item.
Eraserless version will be very welcome for those of us that never make mistakes…
What, no carpenter’s pencil version?!
This is a really cool idea.
You had a triangular version in your clues. How is that one made? I assume sequential dies to cut it to the shape?
BTW, I’m in the middle of making a dozen sets of chopsticks.
They do take a little longer than 15 minutes a set 😉
Thanks Neil.
We had prototype dies made for a modified Reuleaux pencil and they came out great. However, this profile will not be included in our initial offering because of a mfg. cost issue that I need to address. It will be addressed and we will offer it at a later date. Really comfortable pencil! It also requires a custom ferrule that we are working on.
Can’t do it all overnight!
John
Neil-
You need to pick up your game lad! It took me 12.5 hours to make 100 pair in Padouk. That comes out to 7.5 minutes per pair. I did however make all the diamond cuts on my JMP.

-John 🙂
Love that shape, made a table years ago, it gives a triangle more usable room. Looking forward to it in a pencil.
I have had a high failure rate with Padouk – lots of tearout. So I gave up on it.
I do have your higher bevel angle blade guide and I have used it on Walnut and Cherry with good results.
I guess I need to get some more Padouk and see if it makes a difference.
And up my productivity too 😉
Neil,
What I did with Padouk, and a lot of it, was feel the surface on the very first stroke. If I felt tear out, I turned the plane around and pulled it. Out of all those blanks, I think I lost six or so to aggressive switch backed grain.
FYI.
John
Just made 20 more chopstick sets – my time was closer to yours – about 10 minutes per pair. I tried your approach with the Padauk and it worked better. Practice improves the technique for sure.
Enjoy the trip to China – looking forward to the full report!
neil
It’s always nice to learn that an old dog can learn new tricks!
Glad to learn you are having fun-
John
dude,
any estimate for when this is going into production?
No update, here’s why…
We were working on a video and it occurred to me that a six year old kid would struggle with the plane. So I changed the process, and ordered new prototype parts.
Yes! Kid friendly, much easier and as soon as we ship the JMP’s, Precision Fences, and the Fab 50 Tool from 2016… they are all going out in the next three weeks.
We are shooting the Pencil Precision video in California, and as soon as that is finished we will close the pre-order window.
Patience Grasshopper!
-John
yes, master, and i promise not to hold my breath or otherwise asphyxiate while patiently waiting.