Drivel Starved Nation!
I am so glad 2020 is in the rear view mirror. What a nasty year.
Regarding your New Year resolution… I have an idea for you! How about making 2021 the year you earnestly try to convert to the metric system? You were born metric so it is not that hard… just sayin’. My resolution is to try and kick my addiction to stool softeners which is WAY HARDER than learning the metric system.
I haven’t posted in a month or two because I have had nothing of meaning to share. Meaningless has never stopped me in the past but am I really trying to be a better person?
Nope. I have been distracted with new tool designs, my 4 grandkids, and my bird photography hobby. So let’s all catch up…. Before you start reading the following drivel, be warned this is a long post.
PENCIL PRECISION DEPT.
As you may have noticed on the BCTW website, Pencil Precision is coming in 2021. I have seen the packaging, and today I received the manual to correct and edit. I believe they are busy making videos at the factory so this is great news. We will honor the original price unless it is lower, we will then pass on the savings before I jump off a bridge (just kidding). As we get closer to shipping I will issue a delivery advisory. And just like every delivery announcement I have made over the past 38 years, it will be inaccurate. Maybe grossly so. BUT, you have to admire my consistency YES/NO?
The ALL NEW DJ-3 DRILLING JIG DEPT
Over the last 6 months I completely redesigned our Drilling Jig. With the feedback from customers (most notably Rutager West), combined with my own experiences using this tool, I believe I have fixed all that is less than desirable and I am excited to share the changes with the Drivel Starved Nation!
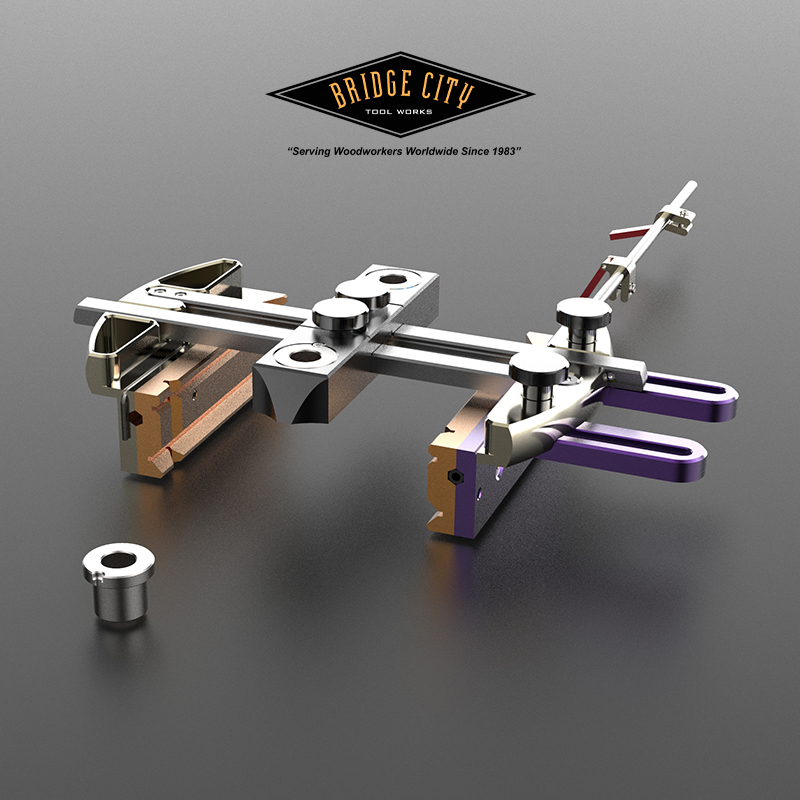
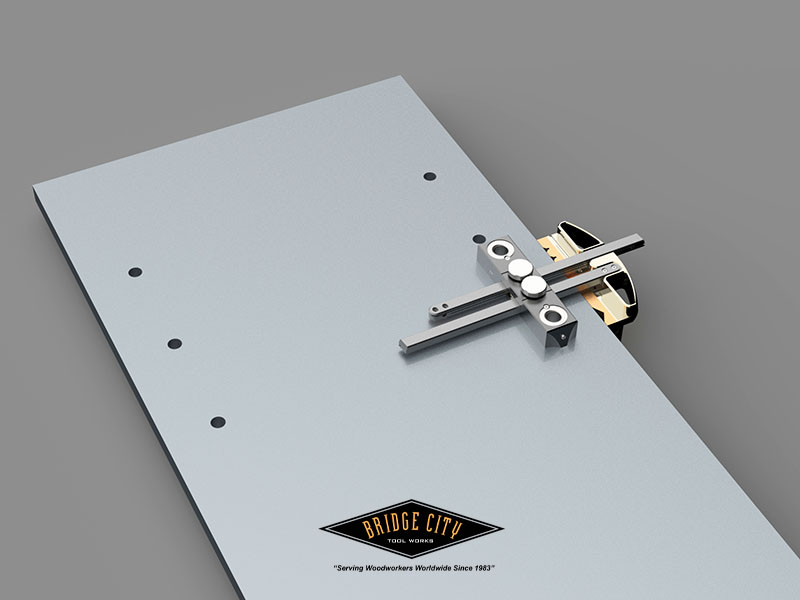
The image below shows the changes I made to the drill bushings, the addition of an adjustable jaw, and an improved stop assembly.
First, the new DJ-3 is backward compatible with our previous bushings. The new bushings have a positive lock to the body so they cannot spin if chip evacuation procedures are not followed. (Always, when drilling through a bushing you must “peck drill” which means you drill a little, extract the chips by backing the drill out a bit, drill a little and repeat.)
The arm lock knobs are lowered which helps prevent crashes with the chuck when using shorter drills. Also, in an effort to improve this undesirable scenario, the body is longer and the center-to-center distance of the bushings is now 94mm. This means I moved the locking knobs further away from the bushings. Lastly, regarding the locking knobs, the threads are now metal and press against skid plates. This makes them next to impossible to fail in their intent, or break because those with gorilla hands only know excessive force.
Also, please note the new stop system features a tube with flip stops, a major upgrade from my last effort.
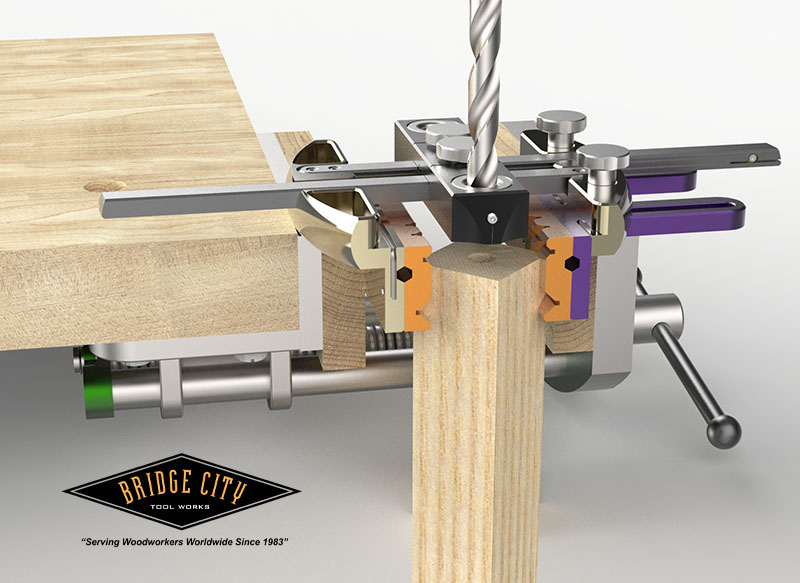
The most important addition to our DJ-3 Drilling Jig is the adjustable jaw (it is purple) and you will see it in action in the next image.
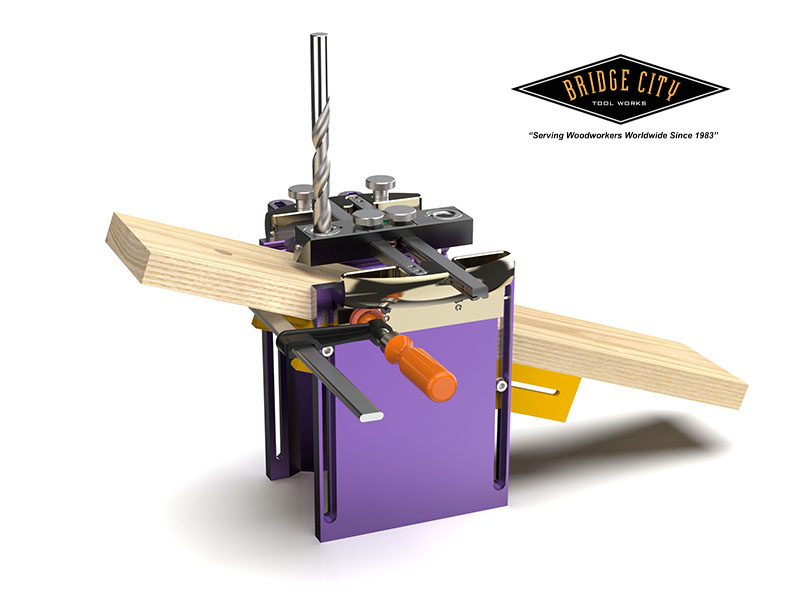
The DJ-3 Drilling Jig employs the same cable system as in our CS-3 CenterScribe. What this means: it is impossible for one jaw to move without the other moving the exact same distance. There is ZERO backlash and it is dead-on accurate. When the tool arrives, it will drill dead center on your stock within the capacity of the tool. I don’t think it is necessary to illustrate this but look at what you can now do with the new adjustable jaw. Yup, drill off center and there are many reasons why this may be required. (Think about making a cribbage board for example.) This is a really nice addition to this amazing tool.
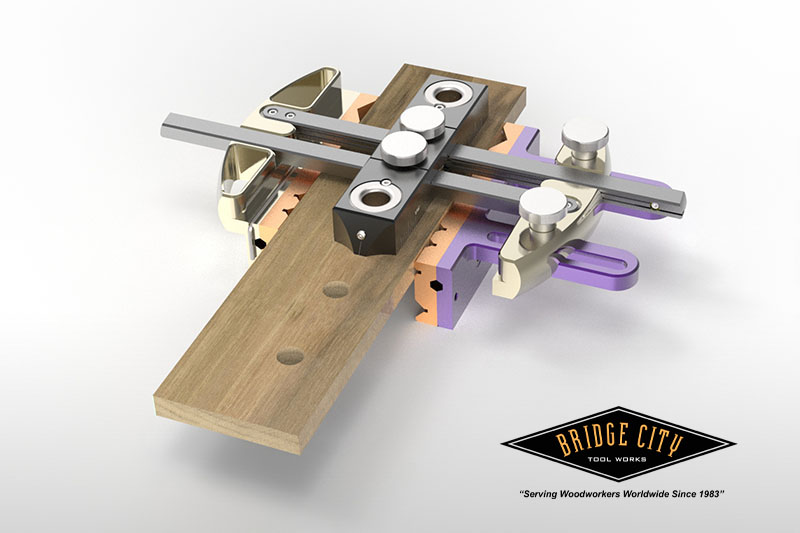
The ability to instantly drill in the center of round stock is nowhere as near as simple compared to a drill press. You will see similar ease-of-use examples as this post continues. I am not making the claim that the DJ-3 is a replacement for a drill press in a shop, but it is a serious contender. It fits in a drawer or on a shelf and does free up floor space.
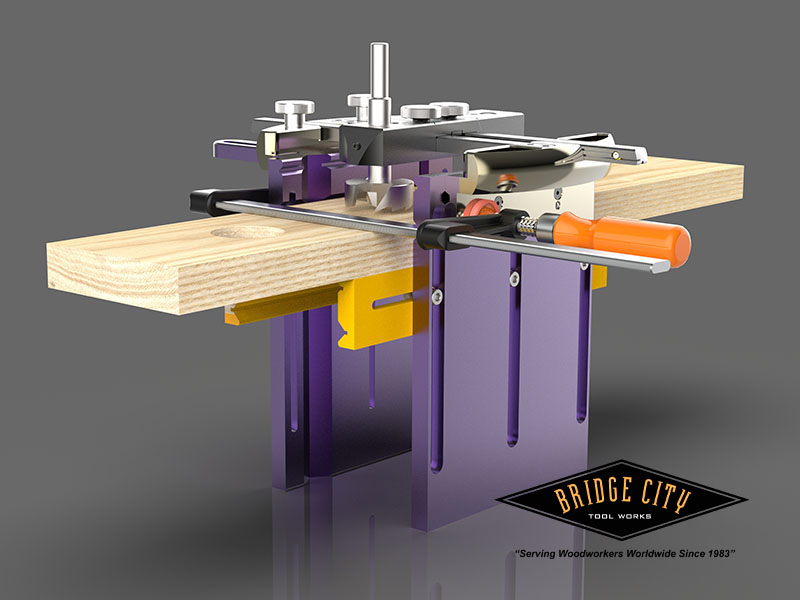
In the image below you can see the improved flip-stop system for equally spaced holes. Note how easy the DJ-3 fits within the jaws of a bench vise.
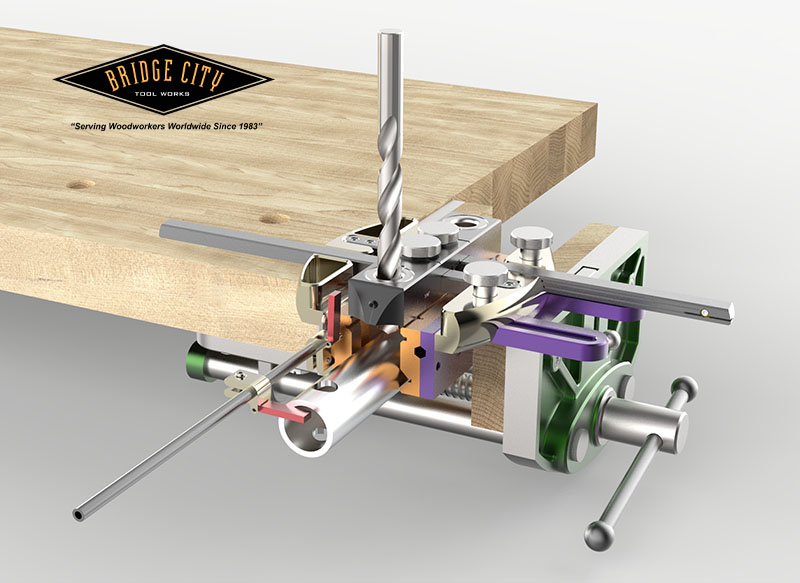
End drilling round stock is one task that a drill press cannot compete because the DJ-3 can drill stock of infinite length. Well, not exactly infinite, but you get the idea. Because drilling axially may create significant down force, the end of the stock may need to be supported, particularly in metal.
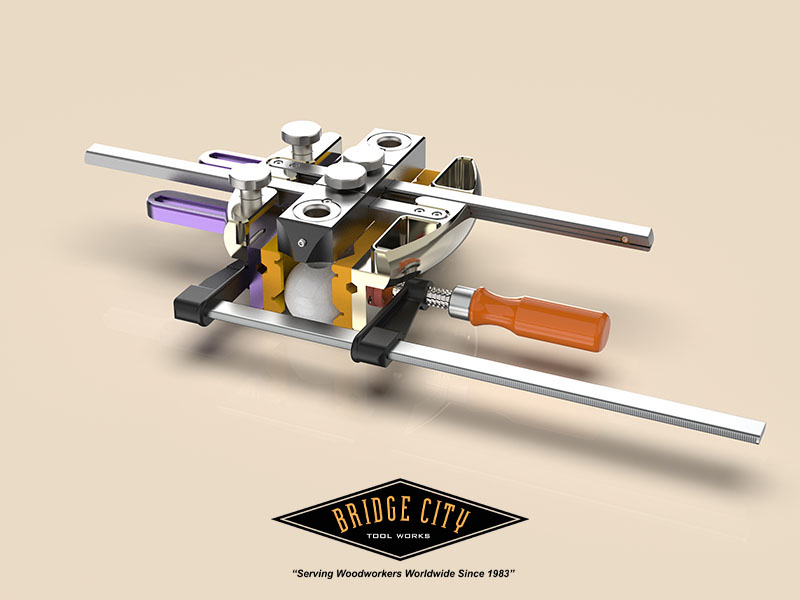
Axially drilling square stock is easy and with smaller drill sizes, can be done hand held. In addition, you can also axially drill rectangular stock using this same corner-to-corner system. No layout lines required with either.
Bias drilling is also straight forward. I love this feature and have posted pics of the dowel joint you can make using this ability in combination with the Jointmaker Pro.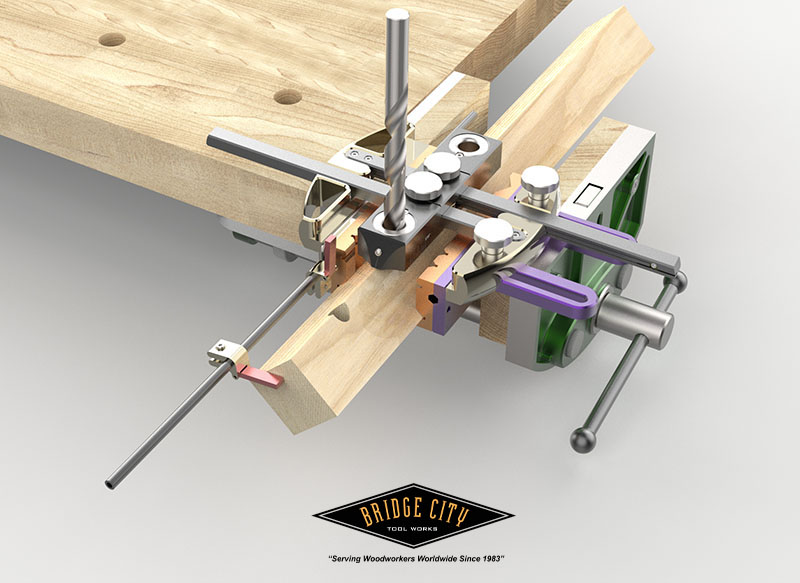
I would never use this dowel joint in furniture, but in small, non load bearing projects it is beautiful, different and in my opinion, way more fun to look at than flat-on-flat structures. End drill the axial hole before cutting the “V” cheeks, much less material to saw when using the Jointmaker Pro.

There are special grooves in the jaws of the DJ-3 that will allow you to center drill spheres, about pool ball size and down.
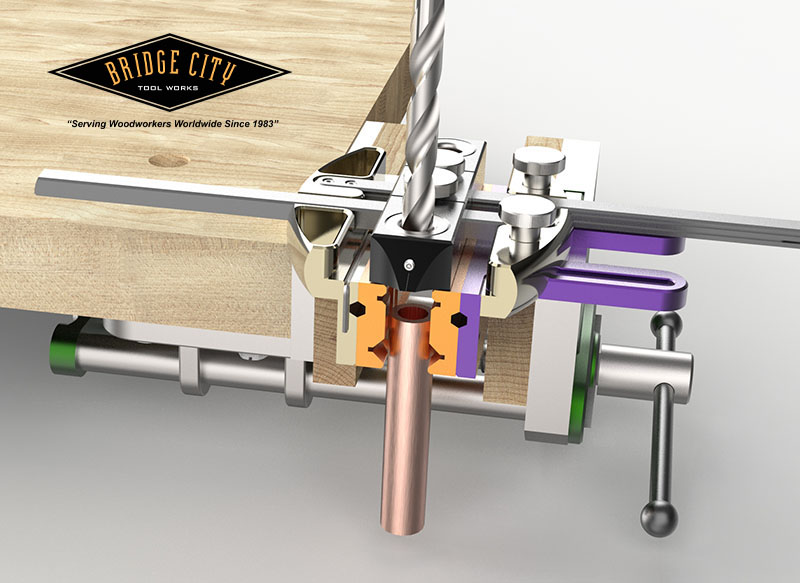
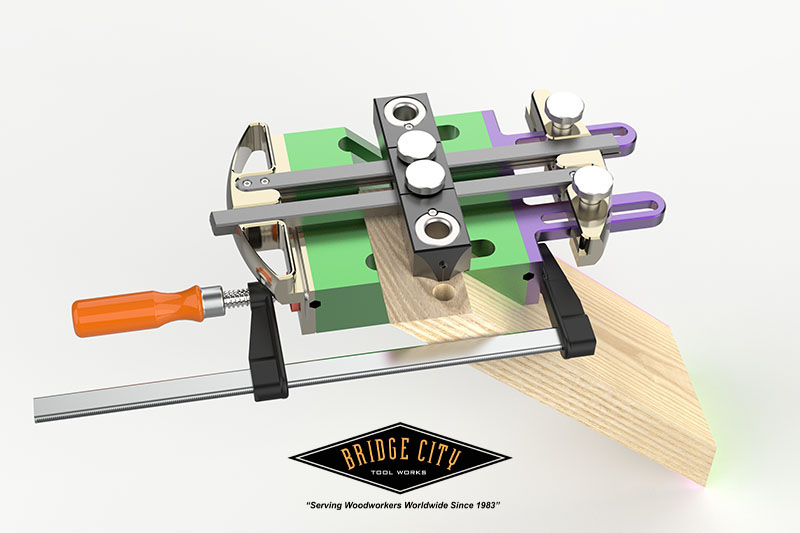
One accessory that can be incredibly useful are the miter jaws. When the adjustable jaw is set flush, the holes will drill dead center in the face of the mitered edge. However, this is not always desirable. By using the adjustable jaw, you can position the holes closer to the heel of the joint which will allow for deeper holes and a stronger joint as pictured below.
For holes close to the edge of wide stock, you remove one jaw (two cap screws) and the unit will sit flat on your stock. The hex key that is required to remove the jaw is stored in the body of the DJ-3 and is the same size as required to secure the bushings in the tool body. It is so much easier drilling these types of holes at the bench as opposed to wrestling with the panel on a drill press. How do I know this?
Angled holes require long jaws. You set up one jaw with a t=bevel, square or protractor, tighten. Close the jaws until the opposite jaw dowel pins align with the other jaw and tighten.
For larger holes AND if your drills have nominal shaft diameters, you can use the long jaws as pictured.
One capability I did not include was the ability to drill radial holes. In all the years we have been making this jig, I never once heard from a customer who used this accessory. I can be persuaded to add it back, but right now, I nixed it.
I truly hope you all STAY NEGATIVE. Just like me.
-Your Tool Potentate
PS: I have no idea what I am supposed to be doing with all of these bird pictures I am taking so I am offloading a couple on the Drivel Starved Nation! I hope you enjoy them.
Canadian Geese hitting the road before the storm. Bend, Oregon Dec 31, 2020

Great Egret, Ridgefield National Wildlife Refuge, WA, December, 2020

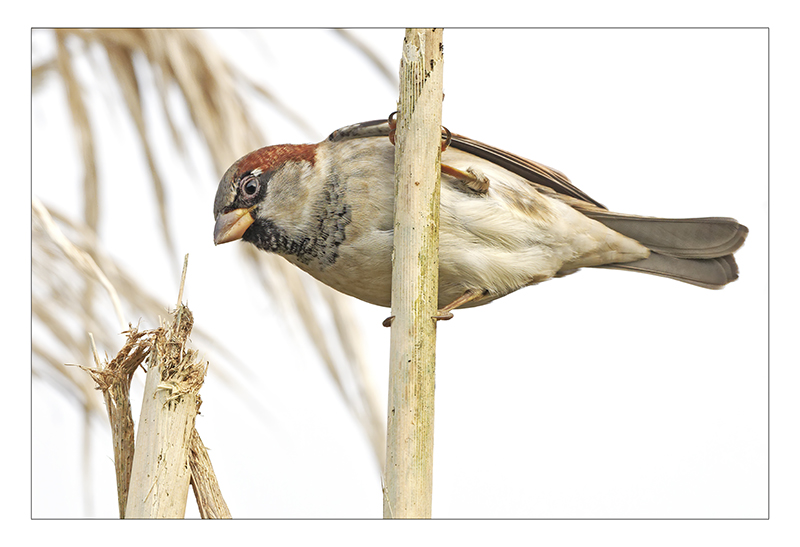
Male Sparrow, Oregon Coast, November 2020
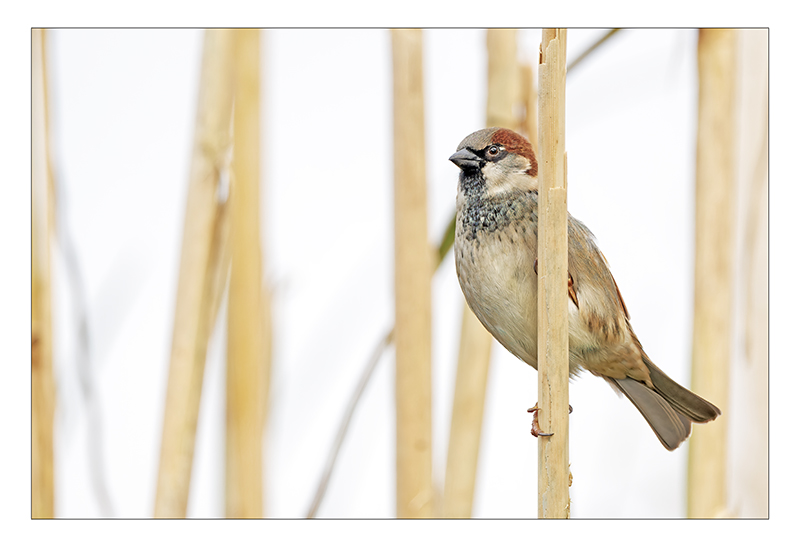
Male Sparrow, Oregon Coast, November 2020 (This picture needs a caption!)
Raven, Yellowstone National Park, September 2020

Female Sparrow, Oregon Coast, November 2020

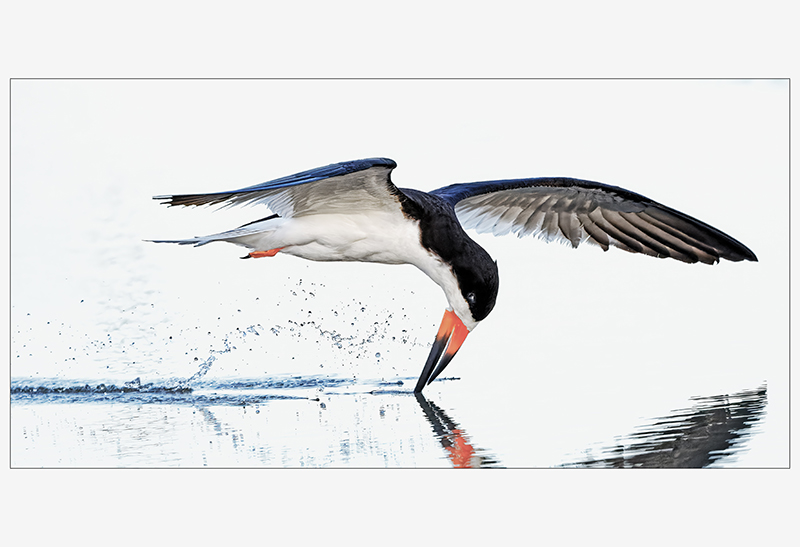
Skimmer, Nickerson Beach, Long Island NY, August 2020
The bird photos are beautiful
As a longtime user of the drilling jigs and a former owner of a drill press, I can confidently say that the only real advantage a drill press offers is in repetitive cutting where you set it once and drill a lot of holes. The drilling jig beats a press in accuracy easily and with the jaws gives you many creative ways to drill holes.
When the jigs first came out, I and several other users did a lot of digital caliper work on forstner bits and all of the cheap ones I checked had some weird dimension on the shafts that don’t match up with any regular bushing size. The German Famag brand have nicely machined shafts with standard metric dimensions.
John
Thank you for this update and the wonderful bird pictures!
Will the new version of the drilling jig be available in the UK?
Paul, yes the DJ-3 will be available globally through Harvey.
– John
Thanks Rutager.
Thanks Mike.
John
So great to hear from you, John! I, for one, have missed your drivel. Yes – I’ve been starved…
The new drilling jig looks amazing. It must be fun, tweaking the original design to make it more functional. Is there any point putting a scale on the purple sliding arm, like you have on the Center Scribe? Or would the various jaw thicknesses make that inaccurate?
Also, I’m 100% behind you on the metric system. All my BCTW tools have been metric, though I do need to get a metric tape measure…
Your bird pictures are just amazing. That Canada Goose one is spectacular. Do you manipulate them after you take them? Incredible work! When’s your gallery showing? 😉
Peter
Thanks Peter.
Regarding the DJ-3, yes, there are grads and centerline indicators and the adjustable arm also has grads that indicate the deviation from center.
Regarding my bird pics, I shoot in a RAW format, so the images need to be “developed” or, as you stated, manipulated. I might remove a branch or two, lift the shadows (Canadian geese) crop when necessary, dodge and burn (All of Ansel Adam’s images were manipulated like this when the print was made) when I think it will help add interest, etc. Basically, normal workflow for digital photography. It is all So. Much. Fun!
So glad you liked them! You liking the the Canadian goose shot makes sense since you are a Canuck!
-John
Three cheers to metric. I always appreciate that you offer your tools in metric. For those looking for a metric tape, this is the one I most often reach for: https://www.bmi.de/en/products-pocket-tapes-429-bmimeter.php
john, where is the best place to send feedback / questions? I have some from using the hand brace.
John,
Fascinating design of the drilling jig.
On the bird pics, what camera & lens are you using? I’m a bird photographer as well and been nursing my D7000 and 200-500 along for a lot of years. Thinking I’ll switch to mirrorless this year if business improves and if I do, it’s probably time to entertain a platform change as well if it makes sense. Love your work–camera and tool both.
John,
I am and always have been a negative person and proud of it. I have no intention of changing either. You can count on me as a co-negativian.
Beautiful press and photos.
Joe Vetrano
Ansel Adams was often criticized for his photo editing. His retort was something to the effect that the negative was like a music composition, and the photo was an arrangement of it.
Thanks for the drilling jig update, your drivel makes me drool every time.
Your photos are wall hangers. I believe I saw that flock of geese flying over Sisters toward Bend.
Dale
Matthew,
You can always reach me direct here: john@bridgecitytools.com
Thanks for the metric tape link.
John
Thanks Bob! The DJ-3 is a nice move forward from the DJ-2, which was a very popular tool for us over the past 10 years.
I am using the Nikon D850 with their 500mm PF lens which is just an awesome piece of glass. I too am going to wade into mirrorless, I just got on a wait list for the Nikon Z7II. The in body image stabilization is something I need at my age.
John
Thanks Joe!
Dale,
Great sunny/cloudy/sunny/cloudy 3 days in Bend while we were there.
John
With regards the sparrow pic headline, possibly,
“When I grow up I’m gonna be a Woodpecker mum”
Good to hear from you all, especially Rutager, I hope you are well. The Drill jig improvement is amazing. I’ll have to get one.
Hi Gina! Glad you are considering the DJ-3 — I think you will be thrilled adding this tool to your shop.
John
Phillip, that’s a good one.
I’m suggesting; “Tweety, I warned you about the dangers of eating too many mealworms.”
John, thanks for the tools update and the bird pics. What camera and lens(es) are you using? I am thinking about upgrading my camera system. I have a Nikon D 7000 which has seen better days and am looking at other brands. Thanks!
Brian,
I am shooting with the Nikon D850 and their 500mm PF lens.
-John
Sounds like a very promising and unique jig, particularly with the mitter and long jaw accessories.
I do question the distance between the center holes and I would suggest 96mm, as a multiple of 32mm.
Using the metric system, holes are usually drilled the 32mm apart (or multiple thereof) is a common standard for cabinet making. You can find much hardware that is compatible with this standard.
Benoit,
Your suggestion completely exposes a major oversight on my part. 96mm it is.
Thank you!
John
Metric? Feh!
Nega-Dave
John, thanks for your attention to feedback. I’m really looking forward to the miter and long jaws!
John – I really like the look and functions of the DJ-3. I make wooden gear clocks, so precision goes hand-in-hand with functioning clocks, not just one that’s good looking.
There are so many operations I perform that your jig can be used for. I can’t count how many parts were made multiple times because the hole was just not right. Using the drill press there is the positioning of the part by eye under the bit, that is the first critical step. Even with that right, I’ve had the bit initially be deflected on entry (ever so slightly) by the wood grain. Even with the right initial set-up, sometimes this is enough to cause the gears to bind when they mesh in some specific combination.
I’m thinking that this jig will help with the locating of the hole and the initial bit ‘steering’.
That said, when I initially read your blog about this jig a few days ago, I did additional research on the prior jig version. A review comment that caught my eye was that the bushings may not match the hole to be drilled. This may be obvious, but I haven’t seen anyone discuss using the following process. I use this for other positioning operations, but given the number of bit sizes I use, I can see doing this using the jig.
1. Using a hand drill, bit, jig and appropriate bushing, drill a hole at the center of the desired position using a bit that is smaller than the required hole dimension.
2. Install that bit into a drill press.
3. Position the part just drilled on the drill press table while the bit is as far as possible inside the hole.
4. Secure the part to the table with the bit in place.
5. While making sure the side to side relative positions don’t move during the next operations, raise the chuck to clear the bit from the hole and replace this bit with a bit of the desired size. In the initial table set up you will need to make sure you have enough clearance to make this bit swap.
6. Slowly re-drill the hole by lowering the chuck while making sure the part doesn’t move.
This should give you the right hole in the right location without a custom bushing.
Anyway, I enjoy your tool discussions and pictures. Looking forward to this becoming available.
Thanks Carl. We have learned over the years that inexpensive drill bits often are not to spec. The clearance on a drill bushing is 0.0002-3”.
John
John have you seen this? I know, totally unrelated to woodworking……but VERY cool just the same!
https://youtu.be/2Nd8BA3OHCc
That is SO COOL! THANKS for sending the link!
-John
Hey John,
Any hints on what else is coming perhaps? Does it perhaps “unify” the try and mitre square and its stock is movable along the blade (stem) ? 🙂 🙂 🙂 Perhaps even just serves as a try square but with a movable stock along the stem and it’s of quite small 4/6″ dimensions 🙂
I’d say if someone was to release things like that they would complement my try/mitre square sets and MTs quite nicely!
Greetings from Croatia!
Filip,
I can’t divulge what is next, but I do know right now, it is all hands on deck to release the Pencil Precision!
John
What size Systainer would a DJ-3 and the arms fit into?
Has selling tools in Systainers been considered? (Please use the older designs if doing so)
Just sizing the boxes so that the lid could be reversed and the box would fit snugly into a Systainer would be huge.
William,
I don’t know what a Systainer is so cannot help with size. That, and I have yet to see the pre-production version so I don’t know the box size either. Will post here when I do!
John
Systainers are a standardized storage box system used for Festool and other tool manufacturers:
https://en.wikipedia.org/wiki/Systainer
See for example:
https://www.woodpeck.com/woodpeckers-t-loc-systainer-1-in-anthracite.html
Thanks William, I’ll check these out!
I’ve been going back and forth on various tool storage and portable work area strategies, and after trying some pretty wild things (search for “When Home Depot meets Harbor Freight” or see: https://imgur.com/a/BLS5QJM ) have pretty much settled on Systainers, centering around a Festool MW 1000 “Mobile Workshop” — I figure that (and a set of Bessey clamps which came in an Systainer-style working surface (Bessey STC-S-MFT Systainer Toggle Clamp Set) and the DJ-3 which I’ll source a suitable Systainer to store in, and a Mafell A 18M bl Cordless Drill Driver (which comes in a Systainer) should work out well.
I’ll just need to work up a clamp which mates to the MFT worksurface which can then hold the DJ-3.